
How to install Finish Trim you can be proud of (with detailed pictures)
Fine cuts and sharp corners: master these basic cutting and installation techniques and you will be able to apply finish trim with expert accuracy.
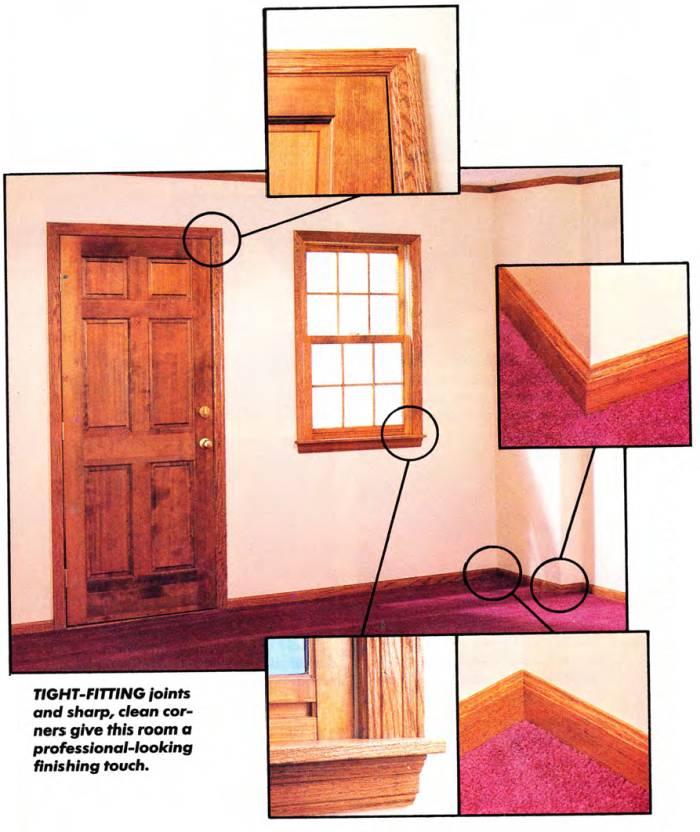
Whether trimming out an entire room or simply replacing an unsightly piece of molding, you really want that finish trim to look sharp. Baseboards, door casings, and window trim create much of the grace, accent, and individuality of our homes. The well-crafted older styles — wide, thick, and sometimes fanciful — stamped a specific character on each room.
But times changed, and our contemporary trim, much slimmed down and simplified, has a reduced impact. In fact, when carefully installed with crisp corners and tight joints, you’ll hardly notice modern trim. Rather than standing out, It tends to accent, outline, and frame a room.
However, let some joints loosen, or a miter fall to align and the trim pops back into View, with attention focusing on the poor fit.
It’s not difficult to solve this problem. To accurately apply finish woodwork you only have to master two basic cutting techniques, coping and mitering, and then follow the steps for installation.
Of course, there is no substitute tor experience, so practice these skills first with a soft wood like pine before moving on to a harder wood like oak.
CUTTING: mitering outside corners
Using a miter saw
The miter saw was designed precisely for trim work. If you can get your hands on one, you’ll complete your trim projects a whole lot faster and more accurately than ever before.
But they don’t guarantee expertise. You’ll still have to cut as carefully and patiently as you would with a hand saw.
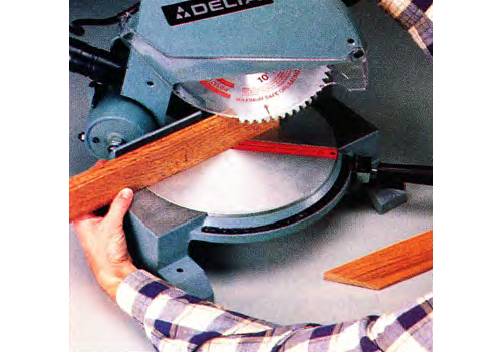
Hold trim tightly against cutting fence and slowly lower blade. Keep hands well away from blade.
The miter saw runs last and smooth, but it can be dangerous. Your hands will frequently be close to the blade, and loosely held material can kick out suddenly. Perhaps one of the best safety measures is to use a sharp, high quality cross-cut blade.
When mitering, cut your pieces a little long. The big advantage of the miter saw is its ability to shave cuts very cleanly. Miter the pieces about 1/4 in long, put them up for a trial fit, and then shave them back a little at a time to get a perfect joint. This technique works particularly well when the comer being mitered isn’t exactly 90 degrees.
Using a circular saw jig
Your circular saw can do a fine job of finish mitering if you give it a little help. Use a guide. For the occasional miter, a tightly held framing square may be all you need. For more frequent use, make up a simple jig from scrap material (see illustration).
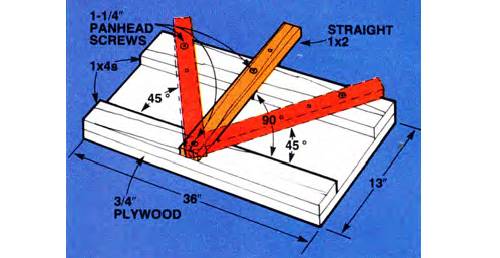
If you carefully align the jig’s adjustable arm to the exact angle before screwing it down, simply return it to the same screw hole to get the same angle.
Splintering is the biggest problem with this system. The best remedy is to use a sharp saw blade (usually the more teeth, the smoother the cut) and to cut from the backside of your stock, so the saw teeth out up through the finish face.
- Use framing square as a saw guide for miter cuts. Saw from backside to avoid splintering.
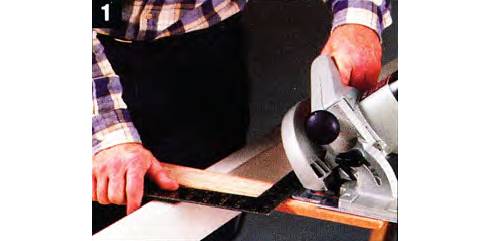
- Adjust jig for 45 degree angle cut, insert door casing, hold tight against edge, and cut.
- Adjust saw for miter and insert baseboard to be cut, again from the back. Use a sharp saw blade.
With a little practice, you’ll cut very accurate miters with this system and can tailor it to your own special needs.
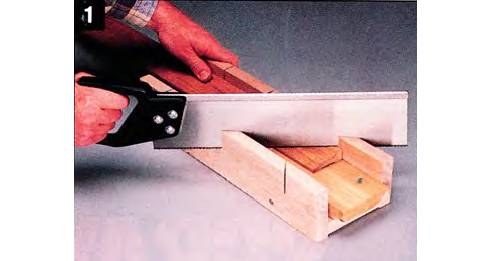
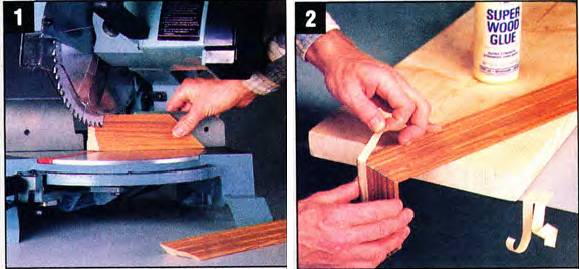
Using a miter box
The old hand miter box, available in plastic as well as wood (both for about the same price). continues to be a practical choice for smaller miters.
- Miter casing using pre-cut saw guides in wooden miter box. Use sharp, fine-toothed saw.
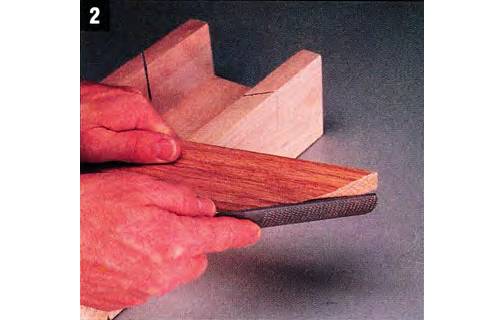
- File a back-sloping bevel on the cut face to allow the finished edges to close more tightly.
You’ll need a very sharp hand saw with fine teeth (14 teeth per in.) to make fine cuts. And expect to file the miter to get that tight fit, since you won’t be able to finely shave your trim with the hand saw:
- It’s helpful to anticipate potential problems and make the first cut accurate. Check the comer receiving the trim with your square to make sure it's 90 degrees. If not, compensate slightly on your cut.
- File a slight bevel on the back of your cut to allow the front edge to close tightly.
The patience and technique learned here will improve your skills when mitering with power tools as well.
CUTTING: coping inside corners
Using a coping saw and a jigsaw
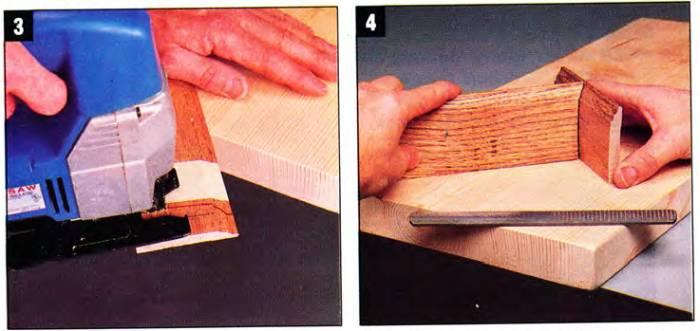
- Outline shape to be cut on baseboard with scrap piece or follow the line on the trim face left by a miter.
- Cut outline with coping saw. Slim, narrow blade cuts on pull stroke can follow tight curves accurately.
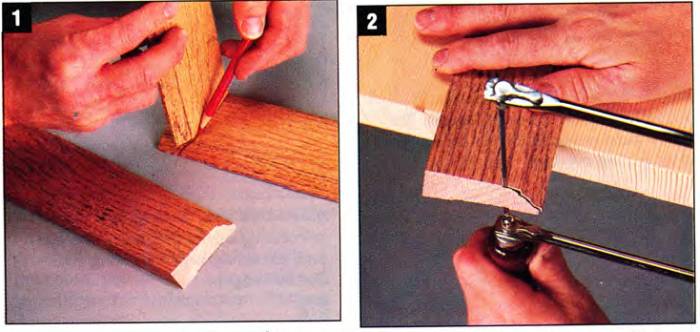
- Cutting with jigsaw is faster, although not as flexible as coping saw. Tape protects baseboard finish.
- Test fit to scrap piece. File out fine details and bevel back side for more accuracy, and a tighter joint.
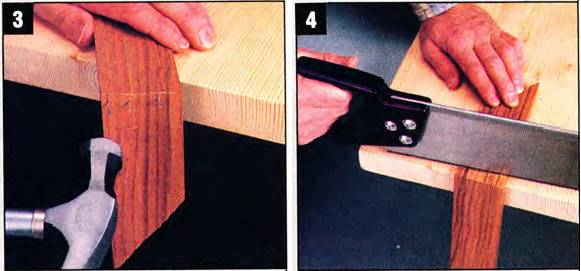
You can miter inside corners as well as outside, but you’ll find that inside corners frequently open up when nailed, leaving an unsightly crack.
Coping the joint solves this problem. The coped piece clamps the adjacent comer baseboard tightly to the wall, so that the adjoining piece need not be nailed. Then, nailing the coped piece holds both in place without forcing the joint open. Slick and clean.
As with miters. Bevel back the coped edge with a file to make a close fit (especially with more complex moldings). Experiment using both the coping saws and jigsaws. You’ll probably find both to be handy — the jigsaw for flatter pieces like baseboard and the coping saw for more elaborate moldings.
INSTALLATION: door casing
After mastering the cutting techniques, it’s time for the finishing touch — installing the trim.
You’ve already smoothed and painted the walls. Stain or prime the trim in advance to simplify finishing. Then fit and nail the door casings. (The baseboard will butt against them.)
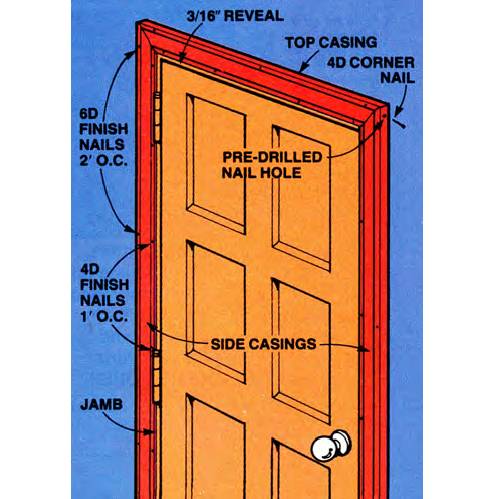
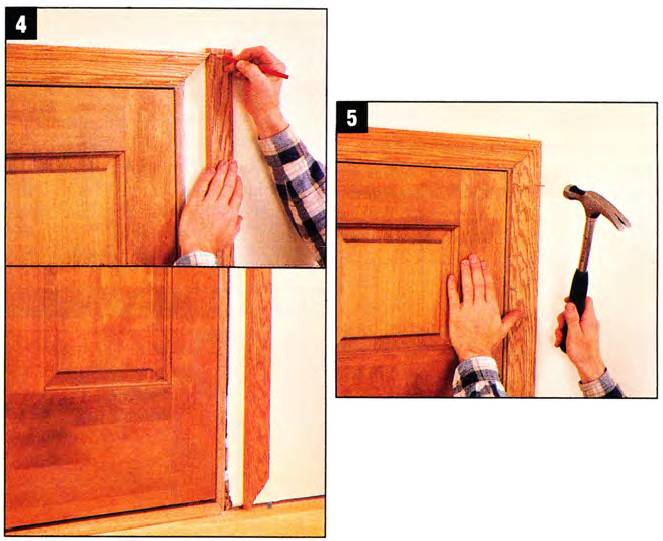
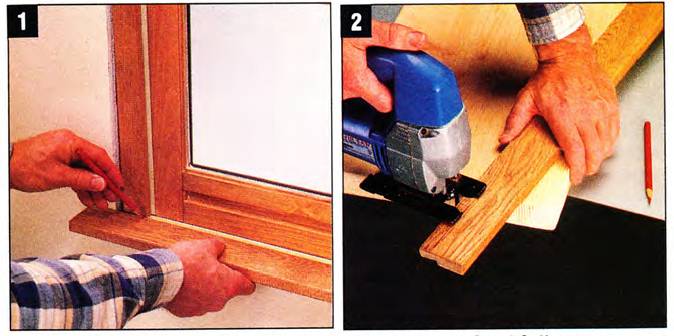
- Measure for top casing length. Be sure to add reveals. Miter all corners leaving side casings 1" long.
- Hold miters tightly together on flat surface. Drill hole through corner for 4d finish nail to be added after trim is nailed up.
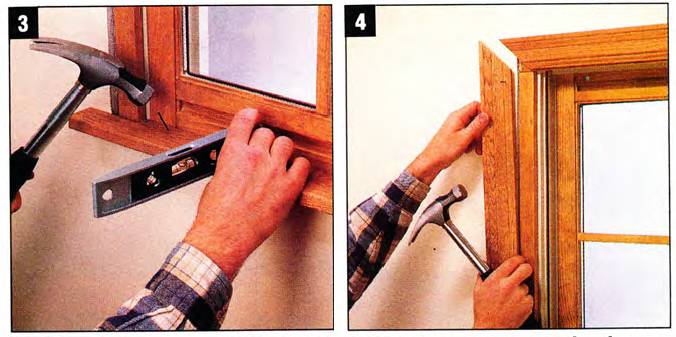
- Center and tack top casing in place leaving 3/16" of top jamb edge exposed (reveal). Don't nail off until miters fit.

- Measure side casing by reversing ends, resting mitered end on floor, and marking top. Cut to length.
- Install side casings. Secure with 6d finish nails to wall, 4d finish nails to jamb. Finally, tap in corner nails to tighten miter.
Check those jamb corners with your square to see if they are 90 degrees. If not, you’ll have to adjust your miters to fit. Both sides of the miter should be cut at the exact same angle for a tight joint. Be sure to pre-drill the comer nail hole before putting up the casings. You can’t drill them in place without marring the wall. Allow the same reveal (see illustration) on all sides, since slight variations will stand out. And until everything fits, drive nails only partially so they may be easily removed.
Finally, after driving and setting the finish nails, tap in the corner nail to align and tighten the miter.
INSTALLATION: window trim
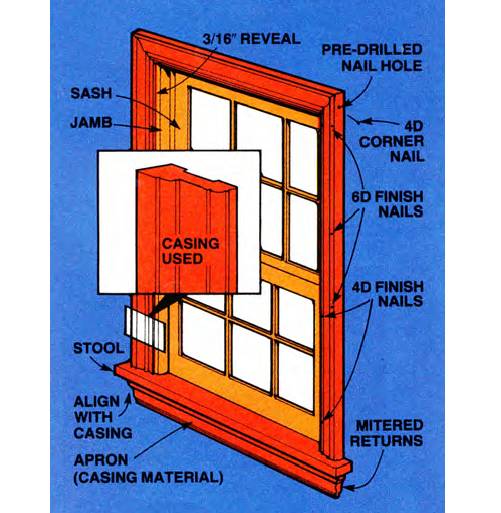
Except for the stool (see illustration), install window trim just like door trim. In fact, you can omit the stool and simply add a fourth piece of casing beneath the window. But the stool retains a traditional look and, well, gives you another place to put your coffee cup.
- Cut stool stock to length, center in opening, mark at side jambs, and measure depth of notch.
- Cut out notch with jigsaw. Subtract 1/16" from notch depth to allow sash to clear stool.
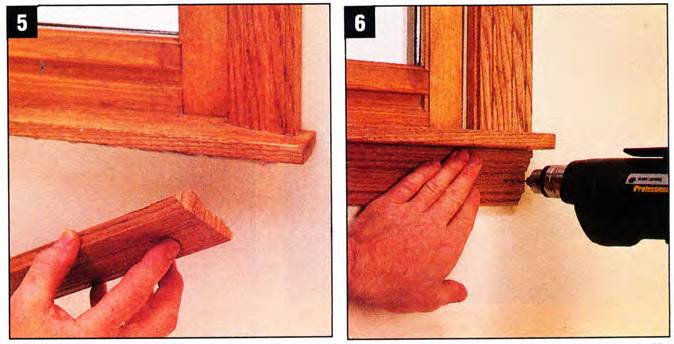
- Level and fasten stool to window sill with 6d finish nails. Prop stool from below if needed.
- Install casings using the door casing procedure: measure top, miter corners, cut sides.
- Miter returns on apron ends. Make sure apron extends under side casings.
- Pre-drill and nail apron to wall with 6d finish nails. Then nail stool down to apron with 4d finish nails.
You can buy the stool material already milled to fit over the window sill, although you may have to saw or plane it narrower.
Figure its length by adding the width between the jambs at the bottom, the reveals, the casing widths, plus 3/4 in. for the ends on each side.
Notch it to fit between the jambs and stop about 1/16 in. from the window sash. This allows the window to open and close freely.
Level and nail the stool to the sill.
Later, after installing the casings and apron, support the apron with a block from the floor and nail down through the stool into the apron for further support.
How do I miter a return?
Whenever a molding terminates without butting another trim piece, dress up the end with a return. A “return” simply means that rather than ending abruptly, the molding turns the corner and seems to head into (return to) the wall. It’s a neat solution to the problem of unsightly ends.
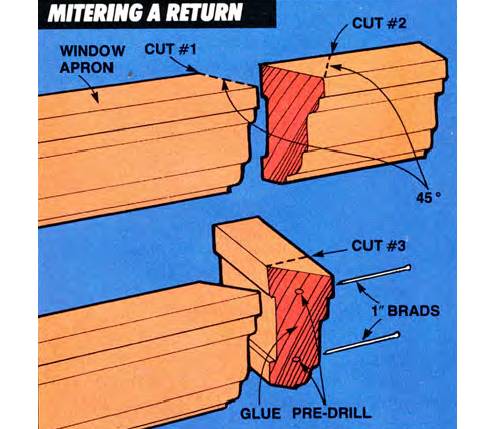
- Miter apron ends, leaving 6" minimum scrap cutoffs. Miter cutoffs carefully.
- Glue cutoffs to apron ends and secure with masking tape until glue dries.
- Reinforce joint by nailing with 1" brads. Pre-drill to avoid splitting.
- Saw off scrap flush with back side with a sharp hand saw. Saw or file smooth.
To make a return in the window apron, measure the length and cut each end at 45 degrees as if you were mitering a baseboard corner. Allow at least 6 in. of scrap wood at either end. Miter each of these scraps and glue them to their respective apron ends. Over a long period the glue will weaken, so rely on mechanical fasteners (brads). They may be added while the glue is wet to help clamp the joint. Or you can add them after the glue dries. Then simply cut off the excess and install the apron as a single piece.
Mitered returns can come in handy in other places as well. Use them with baseboard and steal ends to avoid exposed end grain, as well as with more decorative moldings — base shoe, chair rails, picture moldings, and crowns.
INSTALLATION: baseboards
Install baseboard tightly to the floor or raised 3/8 in. using spacer blocks it you intend to install carpeting. Raising it allows more of the narrow modem styles to show and provides a place to tuck the carpet edge as well.
There are several ways to enhance your baseboard’s attractiveness. Buy your material in sufficient lengths to avoid splicing short pieces (see illustration). By planning the lengths needed you can also avoid waste.

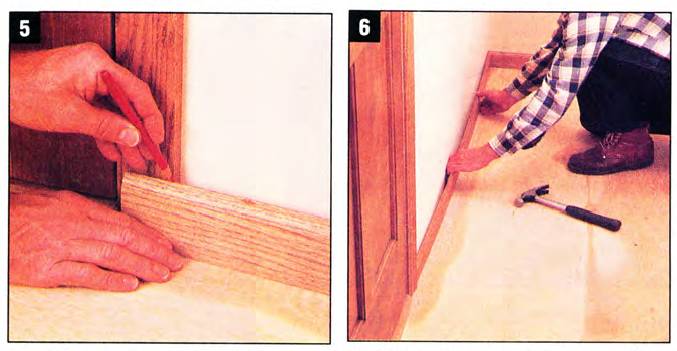
- Cut baseboard to rough lengths and set in place. Put nicest pieces in most visible areas.
- Mark baseboard and miter outside corner first. Draw lines along lower edges to help align cut.

- Fasten with 6d finish nails, the top nail into a stud, the bottom nail into the sole plate. Pre-drill.
- Cope adjacent pieces with jig or coping saw and test fit. File as necessary to get tight joint.
- Mark cut for butt joint with coped end tightly in place. Add 1/16" extra and cut to length.
- Bow baseboard slightly and fot ends, then push against wall. This clamps coped joint tightly. Nail.
Then, when cutting and laying pieces out, select the most attractive for the most visible spots. Hide the worst in the closet. If possible, use the same piece to “wrap” highly visible comers, so that the grain pattern continues right on through the miter. If you have to splice, select pieces with similar grain and color so the splice will not be noticed.
Begin installation with the most exacting pieces, the outside miters. Progress toward the easiest, the butt joints at the doors. Nail at the top into each stud (it helps to locate and mark these in advance) and at the bottom into the sole plate.
Fine cuts and sharp corners: master these basic cutting and installation techniques and you will be able to apply finish trim with expert accuracy.
Whether trimming out an entire room or simply replacing an unsightly piece of molding, you really want that finish trim to look sharp. Baseboards, door casings, and window trim create much of the grace, accent, and individuality of our homes. The well-crafted older styles — wide, thick, and sometimes fanciful — stamped a specific character on each room.
But times changed, and our contemporary trim, much slimmed down and simplified, has a reduced impact. In fact, when carefully installed with crisp corners and tight joints, you’ll hardly notice modern trim. Rather than standing out, It tends to accent, outline, and frame a room.
However, let some joints loosen, or a miter fall to align and the trim pops back into View, with attention focusing on the poor fit.
It’s not difficult to solve this problem. To accurately apply finish woodwork you only have to master two basic cutting techniques, coping and mitering, and then follow the steps for installation.
Of course, there is no substitute tor experience, so practice these skills first with a soft wood like pine before moving on to a harder wood like oak.
CUTTING: mitering outside corners
Using a miter saw
The miter saw was designed precisely for trim work. If you can get your hands on one, you’ll complete your trim projects a whole lot faster and more accurately than ever before.
But they don’t guarantee expertise. You’ll still have to cut as carefully and patiently as you would with a hand saw.
Hold trim tightly against cutting fence and slowly lower blade. Keep hands well away from blade.
The miter saw runs last and smooth, but it can be dangerous. Your hands will frequently be close to the blade, and loosely held material can kick out suddenly. Perhaps one of the best safety measures is to use a sharp, high quality cross-cut blade.
When mitering, cut your pieces a little long. The big advantage of the miter saw is its ability to shave cuts very cleanly. Miter the pieces about 1/4 in long, put them up for a trial fit, and then shave them back a little at a time to get a perfect joint. This technique works particularly well when the comer being mitered isn’t exactly 90 degrees.
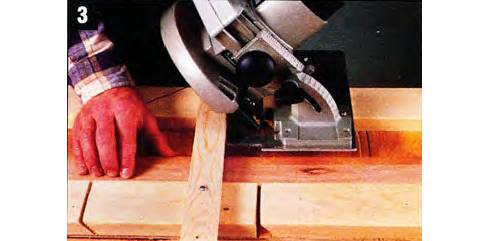
Using a circular saw jig
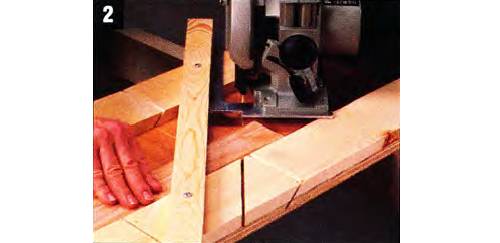
Your circular saw can do a fine job of finish mitering if you give it a little help. Use a guide. For the occasional miter, a tightly held framing square may be all you need. For more frequent use, make up a simple jig from scrap material (see illustration).
If you carefully align the jig’s adjustable arm to the exact angle before screwing it down, simply return it to the same screw hole to get the same angle.
Splintering is the biggest problem with this system. The best remedy is to use a sharp saw blade (usually the more teeth, the smoother the cut) and to cut from the backside of your stock, so the saw teeth out up through the finish face.
- Use framing square as a saw guide for miter cuts. Saw from backside to avoid splintering.
- Adjust jig for 45 degree angle cut, insert door casing, hold tight against edge, and cut.
- Adjust saw for miter and insert baseboard to be cut, again from the back. Use a sharp saw blade.
With a little practice, you’ll cut very accurate miters with this system and can tailor it to your own special needs.
Using a miter box
The old hand miter box, available in plastic as well as wood (both for about the same price). continues to be a practical choice for smaller miters.
- Miter casing using pre-cut saw guides in wooden miter box. Use sharp, fine-toothed saw.
- File a back-sloping bevel on the cut face to allow the finished edges to close more tightly.
You’ll need a very sharp hand saw with fine teeth (14 teeth per in.) to make fine cuts. And expect to file the miter to get that tight fit, since you won’t be able to finely shave your trim with the hand saw:
- It’s helpful to anticipate potential problems and make the first cut accurate. Check the comer receiving the trim with your square to make sure it's 90 degrees. If not, compensate slightly on your cut.
- File a slight bevel on the back of your cut to allow the front edge to close tightly.
The patience and technique learned here will improve your skills when mitering with power tools as well.
CUTTING: coping inside corners
Using a coping saw and a jigsaw
- Outline shape to be cut on baseboard with scrap piece or follow the line on the trim face left by a miter.
- Cut outline with coping saw. Slim, narrow blade cuts on pull stroke can follow tight curves accurately.
- Cutting with jigsaw is faster, although not as flexible as coping saw. Tape protects baseboard finish.
- Test fit to scrap piece. File out fine details and bevel back side for more accuracy, and a tighter joint.
You can miter inside corners as well as outside, but you’ll find that inside corners frequently open up when nailed, leaving an unsightly crack.
Coping the joint solves this problem. The coped piece clamps the adjacent comer baseboard tightly to the wall, so that the adjoining piece need not be nailed. Then, nailing the coped piece holds both in place without forcing the joint open. Slick and clean.
As with miters. Bevel back the coped edge with a file to make a close fit (especially with more complex moldings). Experiment using both the coping saws and jigsaws. You’ll probably find both to be handy — the jigsaw for flatter pieces like baseboard and the coping saw for more elaborate moldings.
INSTALLATION: door casing
After mastering the cutting techniques, it’s time for the finishing touch — installing the trim.
You’ve already smoothed and painted the walls. Stain or prime the trim in advance to simplify finishing. Then fit and nail the door casings. (The baseboard will butt against them.)
- Measure for top casing length. Be sure to add reveals. Miter all corners leaving side casings 1" long.
- Hold miters tightly together on flat surface. Drill hole through corner for 4d finish nail to be added after trim is nailed up.
- Center and tack top casing in place leaving 3/16" of top jamb edge exposed (reveal). Don't nail off until miters fit.
- Measure side casing by reversing ends, resting mitered end on floor, and marking top. Cut to length.
- Install side casings. Secure with 6d finish nails to wall, 4d finish nails to jamb. Finally, tap in corner nails to tighten miter.
Check those jamb corners with your square to see if they are 90 degrees. If not, you’ll have to adjust your miters to fit. Both sides of the miter should be cut at the exact same angle for a tight joint. Be sure to pre-drill the comer nail hole before putting up the casings. You can’t drill them in place without marring the wall. Allow the same reveal (see illustration) on all sides, since slight variations will stand out. And until everything fits, drive nails only partially so they may be easily removed.
Finally, after driving and setting the finish nails, tap in the corner nail to align and tighten the miter.
INSTALLATION: window trim
Except for the stool (see illustration), install window trim just like door trim. In fact, you can omit the stool and simply add a fourth piece of casing beneath the window. But the stool retains a traditional look and, well, gives you another place to put your coffee cup.
- Cut stool stock to length, center in opening, mark at side jambs, and measure depth of notch.
- Cut out notch with jigsaw. Subtract 1/16" from notch depth to allow sash to clear stool.
- Level and fasten stool to window sill with 6d finish nails. Prop stool from below if needed.
- Install casings using the door casing procedure: measure top, miter corners, cut sides.
- Miter returns on apron ends. Make sure apron extends under side casings.
- Pre-drill and nail apron to wall with 6d finish nails. Then nail stool down to apron with 4d finish nails.
You can buy the stool material already milled to fit over the window sill, although you may have to saw or plane it narrower.
Figure its length by adding the width between the jambs at the bottom, the reveals, the casing widths, plus 3/4 in. for the ends on each side.
Notch it to fit between the jambs and stop about 1/16 in. from the window sash. This allows the window to open and close freely.
Level and nail the stool to the sill.
Later, after installing the casings and apron, support the apron with a block from the floor and nail down through the stool into the apron for further support.
How do I miter a return?
Whenever a molding terminates without butting another trim piece, dress up the end with a return. A “return” simply means that rather than ending abruptly, the molding turns the corner and seems to head into (return to) the wall. It’s a neat solution to the problem of unsightly ends.
- Miter apron ends, leaving 6" minimum scrap cutoffs. Miter cutoffs carefully.
- Glue cutoffs to apron ends and secure with masking tape until glue dries.
- Reinforce joint by nailing with 1" brads. Pre-drill to avoid splitting.
- Saw off scrap flush with back side with a sharp hand saw. Saw or file smooth.
To make a return in the window apron, measure the length and cut each end at 45 degrees as if you were mitering a baseboard corner. Allow at least 6 in. of scrap wood at either end. Miter each of these scraps and glue them to their respective apron ends. Over a long period the glue will weaken, so rely on mechanical fasteners (brads). They may be added while the glue is wet to help clamp the joint. Or you can add them after the glue dries. Then simply cut off the excess and install the apron as a single piece.
Mitered returns can come in handy in other places as well. Use them with baseboard and steal ends to avoid exposed end grain, as well as with more decorative moldings — base shoe, chair rails, picture moldings, and crowns.
INSTALLATION: baseboards
Install baseboard tightly to the floor or raised 3/8 in. using spacer blocks it you intend to install carpeting. Raising it allows more of the narrow modem styles to show and provides a place to tuck the carpet edge as well.
There are several ways to enhance your baseboard’s attractiveness. Buy your material in sufficient lengths to avoid splicing short pieces (see illustration). By planning the lengths needed you can also avoid waste.
- Cut baseboard to rough lengths and set in place. Put nicest pieces in most visible areas.
- Mark baseboard and miter outside corner first. Draw lines along lower edges to help align cut.
- Fasten with 6d finish nails, the top nail into a stud, the bottom nail into the sole plate. Pre-drill.
- Cope adjacent pieces with jig or coping saw and test fit. File as necessary to get tight joint.
- Mark cut for butt joint with coped end tightly in place. Add 1/16" extra and cut to length.
- Bow baseboard slightly and fot ends, then push against wall. This clamps coped joint tightly. Nail.
Then, when cutting and laying pieces out, select the most attractive for the most visible spots. Hide the worst in the closet. If possible, use the same piece to “wrap” highly visible comers, so that the grain pattern continues right on through the miter. If you have to splice, select pieces with similar grain and color so the splice will not be noticed.
Begin installation with the most exacting pieces, the outside miters. Progress toward the easiest, the butt joints at the doors. Nail at the top into each stud (it helps to locate and mark these in advance) and at the bottom into the sole plate.