
Leaky Roofs: Common Causes (and their Solutions)
Three feet of water fall on the average house in an average year — that’s 75 tons or 518,400,000 raindrops by my estimate. The shingles and flashings of your roof must work together, day in and day out, to prevent that cascade of water from working its way inside. At the same time, your roof must let chimneys and vents escape through it, endure 100-degree temperature fluctuations and serve as an attractive part of your home’s exterior.
That’s what I call an awesome task!
Your roof needs all the help it can get — and you can help it out with simple repairs and maintenance.
Fixing a leaky roof is a job that simply can’t be put off; seeping water can damage not only the plaster and paint on the walls. But the structural framework and insulation within as well.
You may be hesitant to tackle roof repairs — and indeed the heights and slopes of your roof should be approached with great caution. Yet with the proper know-how and a few simple tools and materials. you can perform many simple repairs to your asphalt or fiberglass shingles, vents, and flashings.
Here’s how.
Where’s my water coming from?
Plumbing pipe flashings and metal chimneys
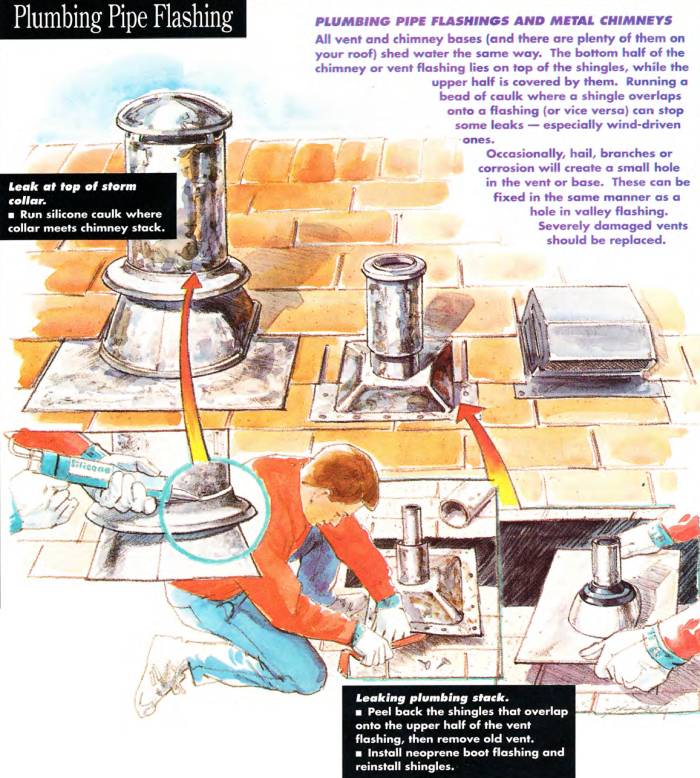
All vent and chimney bases (and there are plenty of them on your roof) shed water the same way. The bottom half of the chimney or vent flashing lies on top of the shingles, while the upper half is covered by them.
Running a bead of caulk where a shingle overlaps onto a flashing (or vice versa) can stop some leaks - especially wind-driven ones.
Occasionally, hail, branches, or corrosion will create a small hole in the vent or base. These can be fixed in the same manner as a hole in valley flashing. Severely damaged vents should be replaced.
Leaking plumbing stack
- Peel back the shingles that overlap onto the upper half of the vent flashing, then remove the old vent.
- Install neoprene boot flashing and reinstall shingles.
Leak at top of storm collar
Run silicone caulk where the collar meets the chimney stack.
Masonry chimneys and flashings

Areas where brick and mortar meet shingles are a common source of leaks. A house and chimney often settle and move at different rates, causing flashings to pull away from the shingles or mortar joints.
If the repairs described don’t stop the leak, lift the shingles and run roofing tar where they abut chimney and flashing.
Pay immediate attention to a cracked chimney cap. Cracks allow water to seep inside the chimney where it can freeze, expand, and destroy the entire structure.
Cement chimney cap is cracked
- Brush off loose cement and dirt.
- Force butyl caulk into the cracks, then smooth.
Counterflashing has pulled out from between the bricks
- Scrape out all the old loose mortar using first a chisel, then a wire brush.
- Push flashing back in place, then fill the mortar joint with butyl caulk. Also, seal the joint where counterflashing overlaps the step flashing.
Valley flashing repairs
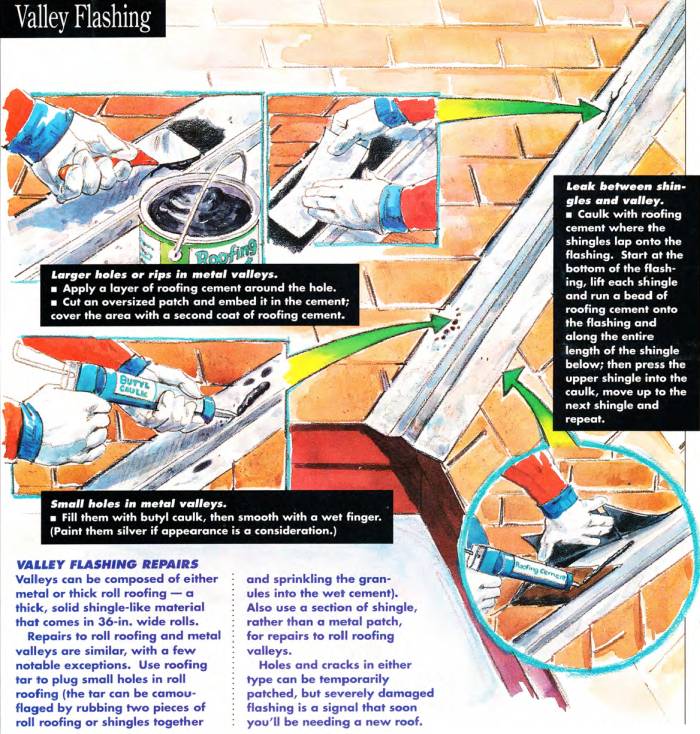
Valleys can be composed of either metal or thick roll roofing - a thick, solid shingle-like material that comes in 36-in. wide rolls.
Repairs to roll roofing and metal valleys are similar, with a few notable exceptions. Use roofing tar to plug small holes in roll roofing (the tar can be camouflaged by rubbing two pieces of roll roofing or shingles together and sprinkling the granules into the wet cement). Also use a section of shingle, rather than a metal patch, for repairs to roll roofing valleys.
Holes and cracks into either type can be temporarily patched, but severely damaged flashing is a signal that soon you’ll be needing a new roof.
Larger holes or rips in metal valleys
- Apply a layer of roofing cement around the hole.
- Cut an oversized patch and embed it in the cement; cover the area with a second coat of roofing cement.
Small holes in metal valleys
Fill them with butyl caulk, then smooth with a wet finger. (Paint them silver is appearance is a consideration.)
Leak between shingles and valley
- Caulk with roofing cement where the shingles lap onto the flashing.
- Start at the bottom of the flashing, lap each shingle and run a bead of roofing cement onto the flashing and along the entire length of the shingle below; then press the upper shingle into the caulk.
- Move up to the next shingle and repeat.
Missing shingle

This is the most common roofing malady. One missing shingle can start a chain reaction by which surrounding shingles become susceptible to wind and weather and, in turn, blow off.
Repairing a missing or damaged shingle
- Use a pry bar to remove the nails securing the damaged shingle and the shingle above.
- Slip a new shingle into place. Secure tabs with roofing cement.
- Secure the new shingle in place with galvanized roofing nails.
More details on roof leaks
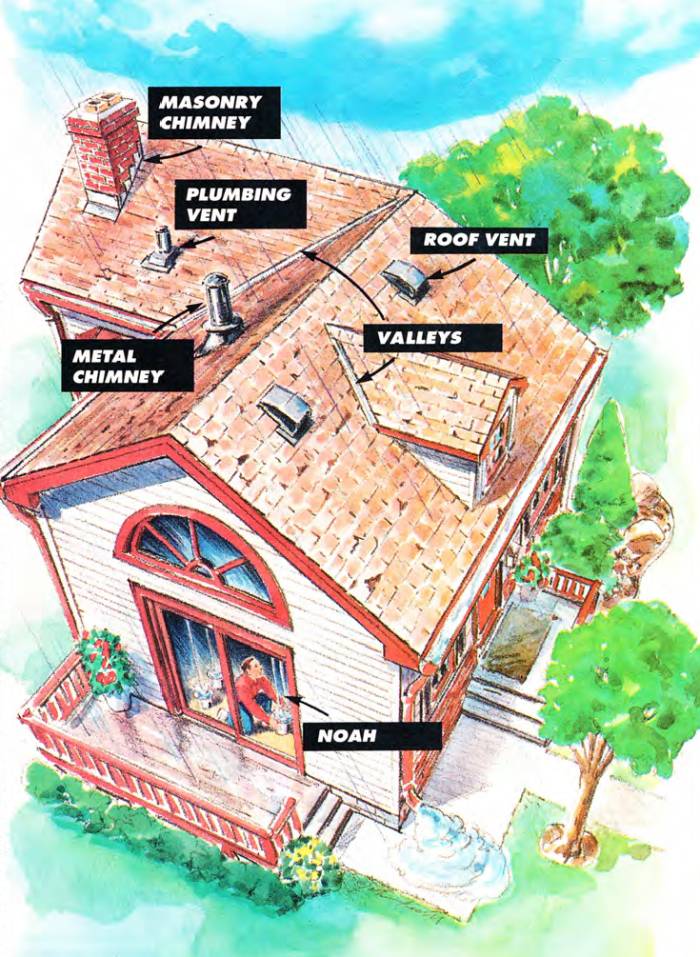
The wide open planes of a roof don’t leak – unless shingles are missing entirely. The problems occur where shingles are interrupted by skylights and chimneys or by vents that exhaust air from bathroom fans, plumbing pipes or attic areas.
Valleys (the diagonal troughs formed where two roofs meet) are another common trouble spot.
Leaks can be baffling to trace. Water may enter a cracked roof vent, sneak across the plywood sheathing, slip in at a seam and follow a sloped roof rafter, then creep along the drywall and dribble from a ceiling light fixture 10 ft. or more from the original point of entry.
Begin your leak investigation with a trip to the attic during a rain shower (or while an accomplice sprays water on the roof with a garden hose). You may have to pull insulation away and contend with dust, mold and general gross stuff, so wear gloves, a dust mask and long pants and shirt. Equip yourself with a flashlight or extension light, too. Mark the leaks you find with chalk, then note where they are in reference to a chimney or end wall so you can locate them when you go up on the roof.
When the roof is dry, climb up to it after safely positioning your extension ladder. Investigate the leaking section and the area above. If you’re lucky. you’ll find something obvious — a missing shingle, protruding nails, your kid’s Tarzan spear. Otherwise, look carefully for the following:
- Shingles, vents, and valleys that have been loosened or torn by wind, ice, hail or tree limbs.
- Missing, curled or cracked shingles
- Missing or dried-out caulk — especially around masonry chimneys and skylights
- Metal flashings (which direct water away from chimneys and other areas) that have pulled away from the shingles or chimney
- Sagging sections of roof, indicating rotted roof boards, plywood or rafters (get off the roof pronto, and call a pro).
If your leak occurs only during a rainstorm accompanied by strong winds, you need to look in less obvious places. Wind could be forcing the water up and under shingles, up and into vents, or sideways between your shingles and roof sheathing at the eaves. Your best chance of tracing this leak is to watch from inside your attic as someone simulates a storm with a hose spraying hard at a horizontal angle.
When should you call a pro?
Everyone has his own comfort zone when it comes to heights; some people just have more mountain goat genes in them than others. If you tremble at the mere thought of an extension ladder, use this article as a guide in helping you discuss your repairs with a pro. Consider these other limitations:
- Avoid steep roofs (over 30 degrees) and houses over two stories high. They’re dangerous to work and walk on.
- Don’t tackle repairs that require tearing off shingles and replacing underlying plywood, sheathing or rafters. A professional contractor will enlist a swarm of workers to do the demolition and repairs in one or two days. A DIYer could spend weeks — and if a storm hits in mid-repair you’ll have the ultimate leak.
- Avoid odd-looking roof lines and flashings. Houses that have been added onto and remodeled may have flat sections of roof or areas where several roof lines converge These areas require specially made flashings — something a sheet metal shop should fabricate and a pro should install.
- To protect an area where a vertical wall meets a roof, “step flashing” (a series of L-shaped pieces of metal that lie under the shingles and siding) offers the best protection. Repairing these areas can involve removing both the siding (or stucco) and shingles. Step flashing is rarely damaged — if you have a leak in an area where a wall meets the roof, chances are it was flashed incorrectly or not at all when the home was first built. If you do find a cracked or missing piece of siding material, repairing it may cure the leak.
- Ice damming — the tendency of melted snow to accumulate and freeze at the eave area, then back up under shingles. remelt and enter the home — is a problem in cold climates. A permanent cure requires surgery by a pro.
Repair or replace?
An asphalt or fiberglass shingle roof normally lasts 15 to 25 years At some point you need to stop patching and think about reshingling the entire roof.
To check the overall condition:
- Pinch off a corner from a shingle; if the inside appears black it still has protective oils. If the inside is gray or crumbly, it’s time to replace.
- Bend back a few corners: the shingles should be flexible and resilient on a 70-degree day If they seem brittle and crack, they can easily be torn off in the wind, and it‘s time to replace.
- Look for areas where shingles are discolored or streaked. This indicates the granular top coat is deteriorating and chances are the shingles are ready for replacement.
Roof maintenance
Perform a yearly inspection These steps will prolong the life of your roof:
- Resecure any loose or curled shingles with a line of roofing cement along the bottom edge of each tab. Dab exposed nailheads with roofing cement. Tool
- Clear off any debris. especially from valleys where it can impede the flow of water.
- Cut back branches within reach of your house so that even in a strong wind they won’t batter your roof and damage shingles.
- Clean out your gutters. Overflowing water can damage your eaves, and in severe cases, work its way into your home.
- If cable TV has made your roof antenna obsolete, remove it — it can only cause damage Antennas attached to chimneys are a major cause of chimney damage: they act as big pry bars that blow in the wind and loose bricks and mortar. If your antenna was roof-mounted, dab the holes where the hook eyes or anchors used to be with roofing cement.
Tools, materials, and safety
A good caulking gun will be your best friend for most roofing repairs A pry bar, hammer, and tin snips may be needed at times. and a sturdy extension ladder is mandatory Keep yourself, your ladder, and your tools far away from all electrical wires that enter your home or pass overhead.
Various caulks excel at various tasks — use the ones recommended:
- Roofing cement, also called plastic roof cement, is the best caulk for shingle-to-shingle or shingle-to-metal repairs.
- “Wet surface” cement can be applied to both wet and dry surfaces.
- Butyl caulks excel at adhering to metals such as valleys or gutters, even when totally submerged in water.
- Silicone adheres well to metals and remains flexible over a wide temperature range.
- Asphalt-coated fabric (available in 5-in. wide rolls at well-stocked hardware stores) is a screen-like mesh that can be embedded in and covered with, roofing cement for patching cracks that extend through several rows of shingles. This should be considered a temporary fix and a pretty unsightly one at that. Patch damaged areas with shingles when possible.
Wear loose, comfortable clothing and sneakers or soft rubber-soled shoes when on the roof. Avoid working in extreme temperatures. In hot weather the shingles are gummy and can tear; in cold weather the shingles are brittle.
Finally, never work alone. Your assistant can help secure the bottom of the ladder, fetch tools and materials, and help out in an emergency.
Three feet of water fall on the average house in an average year — that’s 75 tons or 518,400,000 raindrops by my estimate. The shingles and flashings of your roof must work together, day in and day out, to prevent that cascade of water from working its way inside. At the same time, your roof must let chimneys and vents escape through it, endure 100-degree temperature fluctuations and serve as an attractive part of your home’s exterior.
That’s what I call an awesome task!
Your roof needs all the help it can get — and you can help it out with simple repairs and maintenance.
Fixing a leaky roof is a job that simply can’t be put off; seeping water can damage not only the plaster and paint on the walls. But the structural framework and insulation within as well.
You may be hesitant to tackle roof repairs — and indeed the heights and slopes of your roof should be approached with great caution. Yet with the proper know-how and a few simple tools and materials. you can perform many simple repairs to your asphalt or fiberglass shingles, vents, and flashings.
Here’s how.
Where’s my water coming from?
Plumbing pipe flashings and metal chimneys
All vent and chimney bases (and there are plenty of them on your roof) shed water the same way. The bottom half of the chimney or vent flashing lies on top of the shingles, while the upper half is covered by them.
Running a bead of caulk where a shingle overlaps onto a flashing (or vice versa) can stop some leaks - especially wind-driven ones.
Occasionally, hail, branches, or corrosion will create a small hole in the vent or base. These can be fixed in the same manner as a hole in valley flashing. Severely damaged vents should be replaced.
Leaking plumbing stack
- Peel back the shingles that overlap onto the upper half of the vent flashing, then remove the old vent.
- Install neoprene boot flashing and reinstall shingles.
Leak at top of storm collar
Run silicone caulk where the collar meets the chimney stack.
Masonry chimneys and flashings
Areas where brick and mortar meet shingles are a common source of leaks. A house and chimney often settle and move at different rates, causing flashings to pull away from the shingles or mortar joints.
If the repairs described don’t stop the leak, lift the shingles and run roofing tar where they abut chimney and flashing.
Pay immediate attention to a cracked chimney cap. Cracks allow water to seep inside the chimney where it can freeze, expand, and destroy the entire structure.
Cement chimney cap is cracked
- Brush off loose cement and dirt.
- Force butyl caulk into the cracks, then smooth.
Counterflashing has pulled out from between the bricks
- Scrape out all the old loose mortar using first a chisel, then a wire brush.
- Push flashing back in place, then fill the mortar joint with butyl caulk. Also, seal the joint where counterflashing overlaps the step flashing.
Valley flashing repairs
Valleys can be composed of either metal or thick roll roofing - a thick, solid shingle-like material that comes in 36-in. wide rolls.
Repairs to roll roofing and metal valleys are similar, with a few notable exceptions. Use roofing tar to plug small holes in roll roofing (the tar can be camouflaged by rubbing two pieces of roll roofing or shingles together and sprinkling the granules into the wet cement). Also use a section of shingle, rather than a metal patch, for repairs to roll roofing valleys.
Holes and cracks into either type can be temporarily patched, but severely damaged flashing is a signal that soon you’ll be needing a new roof.
Larger holes or rips in metal valleys
- Apply a layer of roofing cement around the hole.
- Cut an oversized patch and embed it in the cement; cover the area with a second coat of roofing cement.
Small holes in metal valleys
Fill them with butyl caulk, then smooth with a wet finger. (Paint them silver is appearance is a consideration.)
Leak between shingles and valley
- Caulk with roofing cement where the shingles lap onto the flashing.
- Start at the bottom of the flashing, lap each shingle and run a bead of roofing cement onto the flashing and along the entire length of the shingle below; then press the upper shingle into the caulk.
- Move up to the next shingle and repeat.
Missing shingle
This is the most common roofing malady. One missing shingle can start a chain reaction by which surrounding shingles become susceptible to wind and weather and, in turn, blow off.
Repairing a missing or damaged shingle
- Use a pry bar to remove the nails securing the damaged shingle and the shingle above.
- Slip a new shingle into place. Secure tabs with roofing cement.
- Secure the new shingle in place with galvanized roofing nails.
More details on roof leaks
The wide open planes of a roof don’t leak – unless shingles are missing entirely. The problems occur where shingles are interrupted by skylights and chimneys or by vents that exhaust air from bathroom fans, plumbing pipes or attic areas.
Valleys (the diagonal troughs formed where two roofs meet) are another common trouble spot.
Leaks can be baffling to trace. Water may enter a cracked roof vent, sneak across the plywood sheathing, slip in at a seam and follow a sloped roof rafter, then creep along the drywall and dribble from a ceiling light fixture 10 ft. or more from the original point of entry.
Begin your leak investigation with a trip to the attic during a rain shower (or while an accomplice sprays water on the roof with a garden hose). You may have to pull insulation away and contend with dust, mold and general gross stuff, so wear gloves, a dust mask and long pants and shirt. Equip yourself with a flashlight or extension light, too. Mark the leaks you find with chalk, then note where they are in reference to a chimney or end wall so you can locate them when you go up on the roof.
When the roof is dry, climb up to it after safely positioning your extension ladder. Investigate the leaking section and the area above. If you’re lucky. you’ll find something obvious — a missing shingle, protruding nails, your kid’s Tarzan spear. Otherwise, look carefully for the following:
- Shingles, vents, and valleys that have been loosened or torn by wind, ice, hail or tree limbs.
- Missing, curled or cracked shingles
- Missing or dried-out caulk — especially around masonry chimneys and skylights
- Metal flashings (which direct water away from chimneys and other areas) that have pulled away from the shingles or chimney
- Sagging sections of roof, indicating rotted roof boards, plywood or rafters (get off the roof pronto, and call a pro).
If your leak occurs only during a rainstorm accompanied by strong winds, you need to look in less obvious places. Wind could be forcing the water up and under shingles, up and into vents, or sideways between your shingles and roof sheathing at the eaves. Your best chance of tracing this leak is to watch from inside your attic as someone simulates a storm with a hose spraying hard at a horizontal angle.
When should you call a pro?
Everyone has his own comfort zone when it comes to heights; some people just have more mountain goat genes in them than others. If you tremble at the mere thought of an extension ladder, use this article as a guide in helping you discuss your repairs with a pro. Consider these other limitations:
- Avoid steep roofs (over 30 degrees) and houses over two stories high. They’re dangerous to work and walk on.
- Don’t tackle repairs that require tearing off shingles and replacing underlying plywood, sheathing or rafters. A professional contractor will enlist a swarm of workers to do the demolition and repairs in one or two days. A DIYer could spend weeks — and if a storm hits in mid-repair you’ll have the ultimate leak.
- Avoid odd-looking roof lines and flashings. Houses that have been added onto and remodeled may have flat sections of roof or areas where several roof lines converge These areas require specially made flashings — something a sheet metal shop should fabricate and a pro should install.
- To protect an area where a vertical wall meets a roof, “step flashing” (a series of L-shaped pieces of metal that lie under the shingles and siding) offers the best protection. Repairing these areas can involve removing both the siding (or stucco) and shingles. Step flashing is rarely damaged — if you have a leak in an area where a wall meets the roof, chances are it was flashed incorrectly or not at all when the home was first built. If you do find a cracked or missing piece of siding material, repairing it may cure the leak.
- Ice damming — the tendency of melted snow to accumulate and freeze at the eave area, then back up under shingles. remelt and enter the home — is a problem in cold climates. A permanent cure requires surgery by a pro.
Repair or replace?
An asphalt or fiberglass shingle roof normally lasts 15 to 25 years At some point you need to stop patching and think about reshingling the entire roof.
To check the overall condition:
- Pinch off a corner from a shingle; if the inside appears black it still has protective oils. If the inside is gray or crumbly, it’s time to replace.
- Bend back a few corners: the shingles should be flexible and resilient on a 70-degree day If they seem brittle and crack, they can easily be torn off in the wind, and it‘s time to replace.
- Look for areas where shingles are discolored or streaked. This indicates the granular top coat is deteriorating and chances are the shingles are ready for replacement.
Roof maintenance
Perform a yearly inspection These steps will prolong the life of your roof:
- Resecure any loose or curled shingles with a line of roofing cement along the bottom edge of each tab. Dab exposed nailheads with roofing cement. Tool
- Clear off any debris. especially from valleys where it can impede the flow of water.
- Cut back branches within reach of your house so that even in a strong wind they won’t batter your roof and damage shingles.
- Clean out your gutters. Overflowing water can damage your eaves, and in severe cases, work its way into your home.
- If cable TV has made your roof antenna obsolete, remove it — it can only cause damage Antennas attached to chimneys are a major cause of chimney damage: they act as big pry bars that blow in the wind and loose bricks and mortar. If your antenna was roof-mounted, dab the holes where the hook eyes or anchors used to be with roofing cement.
Tools, materials, and safety
A good caulking gun will be your best friend for most roofing repairs A pry bar, hammer, and tin snips may be needed at times. and a sturdy extension ladder is mandatory Keep yourself, your ladder, and your tools far away from all electrical wires that enter your home or pass overhead.
Various caulks excel at various tasks — use the ones recommended:
- Roofing cement, also called plastic roof cement, is the best caulk for shingle-to-shingle or shingle-to-metal repairs.
- “Wet surface” cement can be applied to both wet and dry surfaces.
- Butyl caulks excel at adhering to metals such as valleys or gutters, even when totally submerged in water.
- Silicone adheres well to metals and remains flexible over a wide temperature range.
- Asphalt-coated fabric (available in 5-in. wide rolls at well-stocked hardware stores) is a screen-like mesh that can be embedded in and covered with, roofing cement for patching cracks that extend through several rows of shingles. This should be considered a temporary fix and a pretty unsightly one at that. Patch damaged areas with shingles when possible.
Wear loose, comfortable clothing and sneakers or soft rubber-soled shoes when on the roof. Avoid working in extreme temperatures. In hot weather the shingles are gummy and can tear; in cold weather the shingles are brittle.
Finally, never work alone. Your assistant can help secure the bottom of the ladder, fetch tools and materials, and help out in an emergency.