
How to Use (ONLY) a Biscuit Joiner to Make Cabinets
Complex woodworking projects — even some simple ones — used to scare me away. I just didn’t have the patience, skills, or equipment needed to make strong, accurate joints. Then I discovered a clever little tool biscuit joiner. You use this tool to cut half-moon slots in the adjacent pieces of a joint, then you spread glue in the slots and join the pieces with store-bought flat discs called “biscuits”. The biscuits swell when they contact the glue, locking the joint firmly together.
Creating biscuit joints is easier than doweling and quicker than dadoing, and the results are stronger than nailing. You can make face frame cabinets, bookshelves (like the one below), join mitered corners for picture frames, assemble deck railings, and join boards together, side by side and end for end, for furniture projects. You can use biscuits to join solid wood, plywood, and even particleboard.
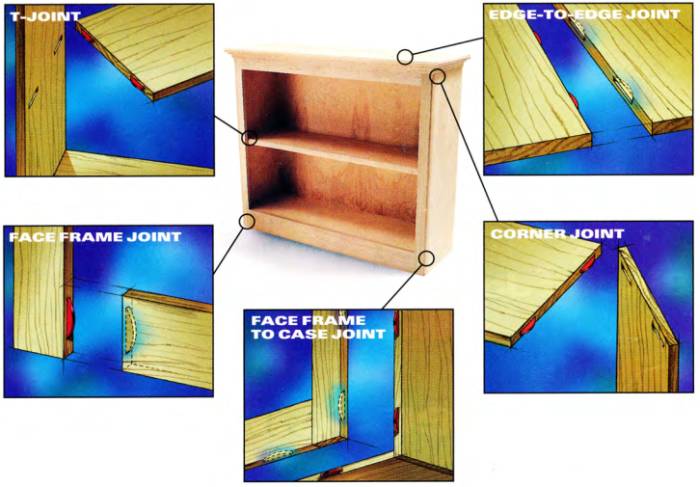
Every joint in this bookshelf is held together with only biscuits and glue.
There are differences in how biscuit joiners are adjusted, and some can cut smaller slots for smaller-scale projects, but all the models perform the single basic function of cutting slots for the biscuits. There are three standard biscuit sizes — 0, 10, and 20 — with “0” being the smallest.
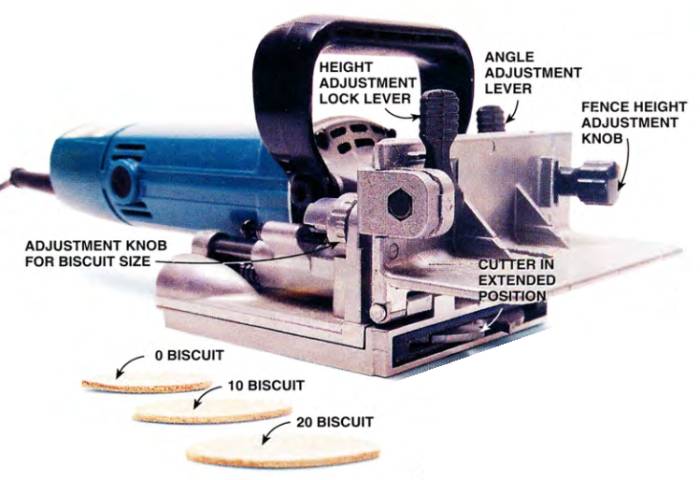
Biscuit joiners operate by cutting small half-moon slots in boards that are then joined using biscuits and glue. The tool can be adjusted to accommodate different-size biscuits, wood thicknesses and angles.
A basic biscuit joiner plus biscuits cost a darn reasonable price for equipment that can make or break your decision to enter the world of furniture building or cabinetmaking.
Biscuit Joint Basics
There are four basic steps to making a strong biscuit joint:
Lay out the slots
Position the boards exactly how they’ll be joined, then use a square and pencil to mark the biscuit positions. The joiner has an alignment indicator mark (Photo 3) that lines up with these pencil lay-out lines.
When possible, keep the slots at least 2-1/2 in. away from the ends of the boards, and equally spaced 6 to 8 in. along their length.
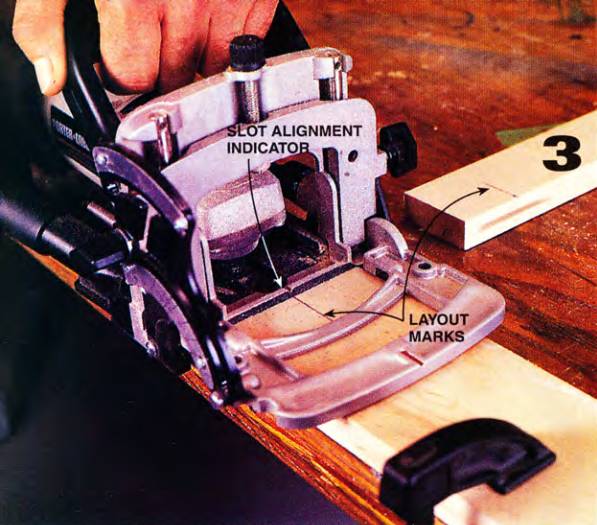
Line up the slot indicator mark on the tool with the layout mark on the board, then push the tool firmly into the board to create the biscuit slot.
Adjust the angle and depth of the slot
All joiners have a knob that adjusts the plunge depth of the cutter for the size biscuit being used (Photo 2). Dial in the size biscuit you’ll be using and the depth of cut is automatically set.
The tool has an angle scale on the side of the fence that indicates what angle the slot will be in relation to the surface the tool is resting on. Most of the time it will be a 0- or 90-degree angle, but the fence is adjustable to cut slots for any size angle in between.
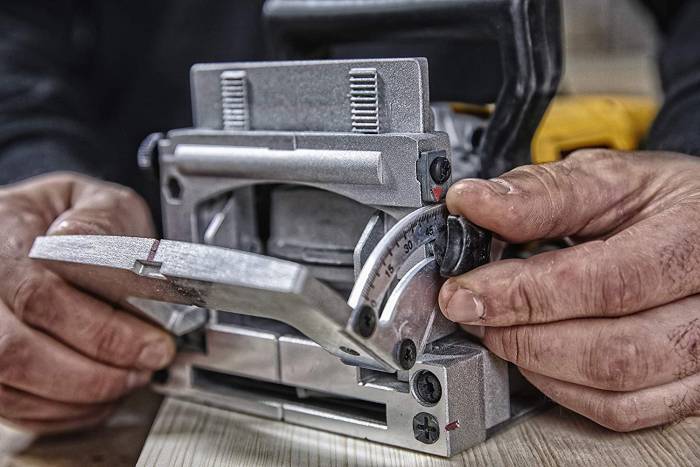
You also need to adjust the fence up or down to position the slot along the thickness of the board. Keep the slot a minimum of 1/4 in. away from the surface of the board.
The biscuit expands as it soaks up the glue, and if it’s too close to the surface, it will cause a bulge. In most cases, you’ll center the slot on the thickness of the board.
Cut the slots
Clamp the workpiece to your workbench, then line up the indicator mark on the tool with the layout line on the workpiece.
Keep the fence flat on the board, press the On switch and slowly push the joiner against the wood until the joiner stops, then retract the tool.
Blow and tap any loose wood shavings out of the slot.
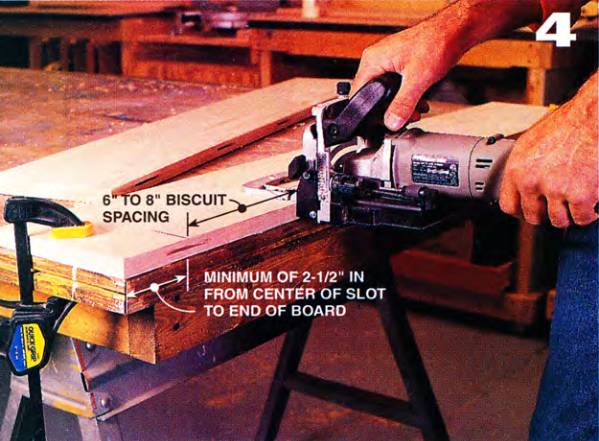
Cut the slots at least 2-1/2 in. from the end of the board, and equally spaced every 6 to 8 in. along its length for maximum strength.
Glue and clamp the boards
Dry-fit the boards and biscuits to make sure the slots and joints line up.
Fill the slots with carpenter’s glue, using a special glue container with a long, flattened snout to get the glue into and along the sides of the slots.
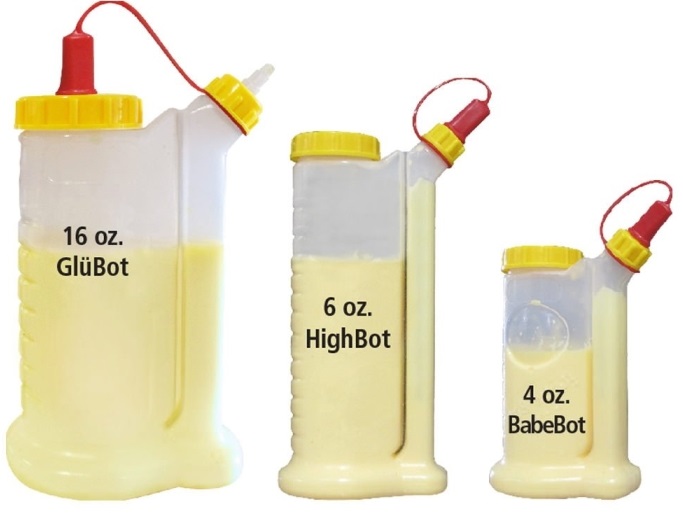
FastCap came up with the best glue bottle you will ever find, working with most types of glues or solvents. It feeds from the bottom, so start pressing to apply glue and you will have a continuous glue line. Release pressure on the bottle and the suction action finishes off your glue line with no drips or mess. The wide mouth for easy filling and the wide bottom for more stability are great for hobbist woodworkers and professional cabinet makers.
Available in 3 sizes, all 3 come with one Yorker and one Blade style tip: Glu-Bot (16 oz.), HighBot (6 oz.), or Babe-Bot (4 oz.).
If the joint is part of an outdoor project, use an exterior-grade carpenter’s glue.
Press the biscuit into one slot (Photo 5), apply glue to the rest of the surfaces being joined, then clamp the joints together for at least 20 minutes. Remove excess glue with a damp rag.
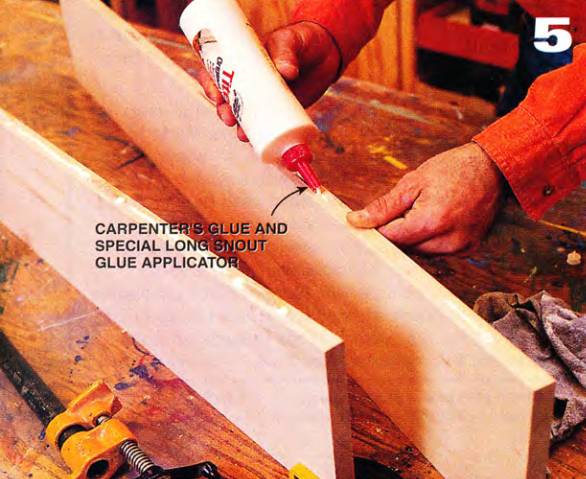
Spread the glue into the slots so the biscuit will be completely coated when it’s put in place. Apply glue along the edges to be joined, then clamp the boards together.
5 Easy-to-Make Joints
Practice cutting slots on scrap pieces of wood before cutting the slots on your real project. Once you get a feel for the tool, you can easily create the joints shown in Photo 1:
Edge-to-edge joints
Use biscuits when edge-gluing to both strengthen a joint and help align the board surfaces (Photo 5). Place glue along the entire edge of the joint for a strong bond.
The boards should be at least 1/2 in. thick to ensure that the biscuits don’t create surface bulges. On boards more than 1 in. thick, you can cut two pockets, one from each face of the board, and use two biscuits for extra strength.
Lay out the biscuit slots so they won’t be exposed when the board is cut to finished size.
Corner butt joints (creating biscuit slots in end grain)
After clamping a support board on the workpiece (Photo 6), adjust the front fence so it’s perpendicular to the surface being prepared.
Lay the joiner on the workpiece and line up the indicator mark with the layout line.
Use both hands on the tool to keep it steady while cutting the slot.
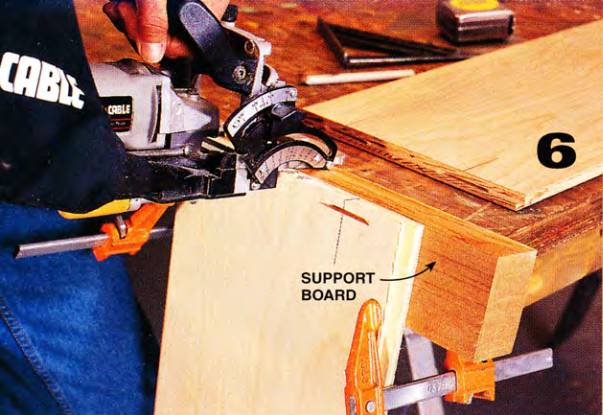
Use a support board to create a wider surface to guide the fence while cutting slots for a butt joint.
T-joint (creating biscuit slots in face grain)
A biscuit joint can take the place of a dado when you’re building fixed shelves (Photo 7).
Mark layout lines on the workpiece to show where the matching board will join, then clamp a temporary wood fence on the board so the joiner will cut the slots at the proper offset and the joint will match up.
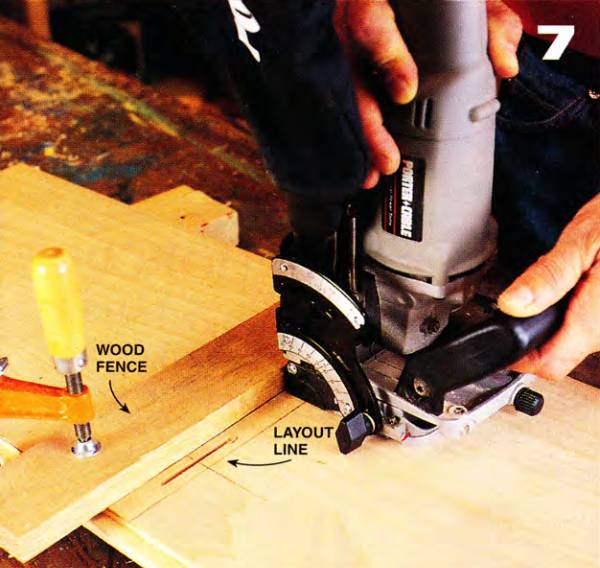
Clamp a wood fence to the workpiece to guide the biscuit joiner’s fence when you’re making T-joints or other mid-board connections.
Face frame construction
Joining a rail and stile of a face frame (Photo 3) with biscuits used to be troublesome if the rail was less than 2 in. wide. The biscuit slot would be large enough that it would show after the pieces were assembled (the slot for a “0” biscuit is wider than a standard 1-1/2 in. stile).
But joiners are now available that can cut slots for mini biscuits. Depending on the size of your projects, you may want to consider a model that can cut these mini biscuits.
Porter Cable and Ryobi are just two companies that market mini biscuit models or accessories.
Face frame assembly to the box
Using biscuits to join a face frame to a cabinet box (Photo 8) not only creates an indestructible joint but eliminates the need for unsightly nails and screws.
Clamp the face frame to the box in the position it will be assembled.
Mark the corresponding layout marks on the face frame and box with a square.
Cut the slots, dry-fit the pieces, then glue and clamp the pieces until the glue is set up.
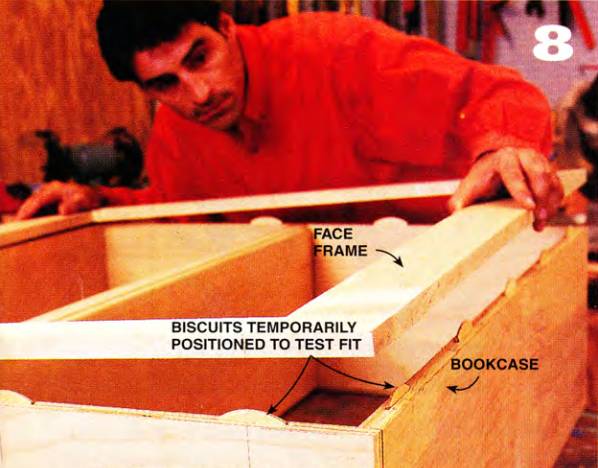
Dry-fit all joints with the biscuits in place to ensure a good fit. Then glue and clamp the pieces together.
Biscuit Joiner Safety & Maintenance
In theory, the cutter is safely retracted when not in use and safely buried in the wood when in use. Still, the tool requires caution.
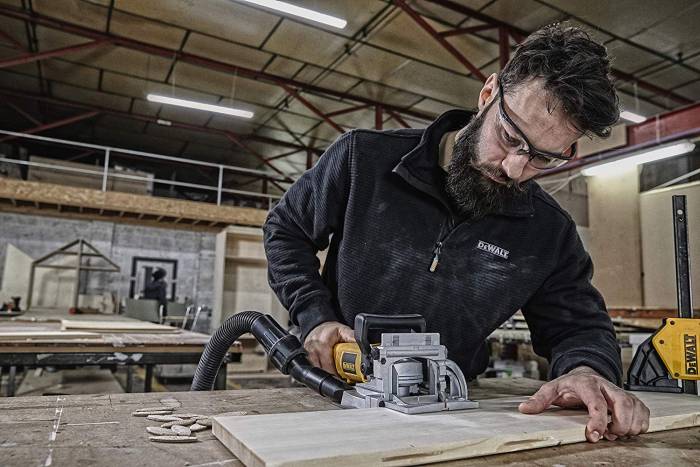
Wear safety glasses and hearing protection, and keep hands and loose clothing away from the front of the tool while cutting.
Maintenance is simple; you just replace the cutter when it becomes dull. Most cutters will give you years of work (unless you join a lot of particleboard).
The DeWalt DW682K is the best biscuit joiner on the market today. Its motor is plenty strong to allow working with hardwoods. It has a dual rack and pinion fence system, which ensures parallel and accurate joints every single time. The fence adjusts and tilsts from 0 to 90 degrees and it’s a solid one-piece part. Click here to buy it today from Amazon.
Complex woodworking projects — even some simple ones — used to scare me away. I just didn’t have the patience, skills, or equipment needed to make strong, accurate joints. Then I discovered a clever little tool biscuit joiner. You use this tool to cut half-moon slots in the adjacent pieces of a joint, then you spread glue in the slots and join the pieces with store-bought flat discs called “biscuits”. The biscuits swell when they contact the glue, locking the joint firmly together.
Creating biscuit joints is easier than doweling and quicker than dadoing, and the results are stronger than nailing. You can make face frame cabinets, bookshelves (like the one below), join mitered corners for picture frames, assemble deck railings, and join boards together, side by side and end for end, for furniture projects. You can use biscuits to join solid wood, plywood, and even particleboard.
Every joint in this bookshelf is held together with only biscuits and glue.
There are differences in how biscuit joiners are adjusted, and some can cut smaller slots for smaller-scale projects, but all the models perform the single basic function of cutting slots for the biscuits. There are three standard biscuit sizes — 0, 10, and 20 — with “0” being the smallest.
Biscuit joiners operate by cutting small half-moon slots in boards that are then joined using biscuits and glue. The tool can be adjusted to accommodate different-size biscuits, wood thicknesses and angles.
A basic biscuit joiner plus biscuits cost a darn reasonable price for equipment that can make or break your decision to enter the world of furniture building or cabinetmaking.
Biscuit Joint Basics
There are four basic steps to making a strong biscuit joint:
Lay out the slots
Position the boards exactly how they’ll be joined, then use a square and pencil to mark the biscuit positions. The joiner has an alignment indicator mark (Photo 3) that lines up with these pencil lay-out lines.
When possible, keep the slots at least 2-1/2 in. away from the ends of the boards, and equally spaced 6 to 8 in. along their length.
Line up the slot indicator mark on the tool with the layout mark on the board, then push the tool firmly into the board to create the biscuit slot.
Adjust the angle and depth of the slot
All joiners have a knob that adjusts the plunge depth of the cutter for the size biscuit being used (Photo 2). Dial in the size biscuit you’ll be using and the depth of cut is automatically set.
The tool has an angle scale on the side of the fence that indicates what angle the slot will be in relation to the surface the tool is resting on. Most of the time it will be a 0- or 90-degree angle, but the fence is adjustable to cut slots for any size angle in between.
You also need to adjust the fence up or down to position the slot along the thickness of the board. Keep the slot a minimum of 1/4 in. away from the surface of the board.
The biscuit expands as it soaks up the glue, and if it’s too close to the surface, it will cause a bulge. In most cases, you’ll center the slot on the thickness of the board.
Cut the slots
Clamp the workpiece to your workbench, then line up the indicator mark on the tool with the layout line on the workpiece.
Keep the fence flat on the board, press the On switch and slowly push the joiner against the wood until the joiner stops, then retract the tool.
Blow and tap any loose wood shavings out of the slot.
Cut the slots at least 2-1/2 in. from the end of the board, and equally spaced every 6 to 8 in. along its length for maximum strength.
Glue and clamp the boards
Dry-fit the boards and biscuits to make sure the slots and joints line up.
Fill the slots with carpenter’s glue, using a special glue container with a long, flattened snout to get the glue into and along the sides of the slots.
FastCap came up with the best glue bottle you will ever find, working with most types of glues or solvents. It feeds from the bottom, so start pressing to apply glue and you will have a continuous glue line. Release pressure on the bottle and the suction action finishes off your glue line with no drips or mess. The wide mouth for easy filling and the wide bottom for more stability are great for hobbist woodworkers and professional cabinet makers.
Available in 3 sizes, all 3 come with one Yorker and one Blade style tip: Glu-Bot (16 oz.), HighBot (6 oz.), or Babe-Bot (4 oz.).
If the joint is part of an outdoor project, use an exterior-grade carpenter’s glue.
Press the biscuit into one slot (Photo 5), apply glue to the rest of the surfaces being joined, then clamp the joints together for at least 20 minutes. Remove excess glue with a damp rag.
Spread the glue into the slots so the biscuit will be completely coated when it’s put in place. Apply glue along the edges to be joined, then clamp the boards together.
5 Easy-to-Make Joints
Practice cutting slots on scrap pieces of wood before cutting the slots on your real project. Once you get a feel for the tool, you can easily create the joints shown in Photo 1:
Edge-to-edge joints
Use biscuits when edge-gluing to both strengthen a joint and help align the board surfaces (Photo 5). Place glue along the entire edge of the joint for a strong bond.
The boards should be at least 1/2 in. thick to ensure that the biscuits don’t create surface bulges. On boards more than 1 in. thick, you can cut two pockets, one from each face of the board, and use two biscuits for extra strength.
Lay out the biscuit slots so they won’t be exposed when the board is cut to finished size.
Corner butt joints (creating biscuit slots in end grain)
After clamping a support board on the workpiece (Photo 6), adjust the front fence so it’s perpendicular to the surface being prepared.
Lay the joiner on the workpiece and line up the indicator mark with the layout line.
Use both hands on the tool to keep it steady while cutting the slot.
Use a support board to create a wider surface to guide the fence while cutting slots for a butt joint.
T-joint (creating biscuit slots in face grain)
A biscuit joint can take the place of a dado when you’re building fixed shelves (Photo 7).
Mark layout lines on the workpiece to show where the matching board will join, then clamp a temporary wood fence on the board so the joiner will cut the slots at the proper offset and the joint will match up.
Clamp a wood fence to the workpiece to guide the biscuit joiner’s fence when you’re making T-joints or other mid-board connections.
Face frame construction
Joining a rail and stile of a face frame (Photo 3) with biscuits used to be troublesome if the rail was less than 2 in. wide. The biscuit slot would be large enough that it would show after the pieces were assembled (the slot for a “0” biscuit is wider than a standard 1-1/2 in. stile).
But joiners are now available that can cut slots for mini biscuits. Depending on the size of your projects, you may want to consider a model that can cut these mini biscuits.
Porter Cable and Ryobi are just two companies that market mini biscuit models or accessories.
Face frame assembly to the box
Using biscuits to join a face frame to a cabinet box (Photo 8) not only creates an indestructible joint but eliminates the need for unsightly nails and screws.
Clamp the face frame to the box in the position it will be assembled.
Mark the corresponding layout marks on the face frame and box with a square.
Cut the slots, dry-fit the pieces, then glue and clamp the pieces until the glue is set up.
Dry-fit all joints with the biscuits in place to ensure a good fit. Then glue and clamp the pieces together.
Biscuit Joiner Safety & Maintenance
In theory, the cutter is safely retracted when not in use and safely buried in the wood when in use. Still, the tool requires caution.
Wear safety glasses and hearing protection, and keep hands and loose clothing away from the front of the tool while cutting.
Maintenance is simple; you just replace the cutter when it becomes dull. Most cutters will give you years of work (unless you join a lot of particleboard).
The DeWalt DW682K is the best biscuit joiner on the market today. Its motor is plenty strong to allow working with hardwoods. It has a dual rack and pinion fence system, which ensures parallel and accurate joints every single time. The fence adjusts and tilsts from 0 to 90 degrees and it’s a solid one-piece part. Click here to buy it today from Amazon.