
How to Install a Pedestal Sink - w/ Detailed Pictures
Make a small bathroom look bigger, or a big bathroom look better!
Go into any bathroom in today’s model homes. especially the half-bath or powder room (sink and toilet, no tub or shower), and you’re likely to find a pedestal sink. And for good reason.
Pedestal sinks are elegant, without being overstated. They also make the room look bigger because of the exposed floor and wall space that’s normally covered by a vanity.
You do lose the storage space normally found inside the vanity, but you can get most of it back by installing a larger medicine cabinet, or a wall-mounted cabinet that’s designed to fit above the toilet (called an “over-john” cabinet).
How Should You Choose A Pedestal Sink?
Pedestal sinks are sold in just about every home center and at plumbing supply stores. Prices start at under $200 and can go well over $1,000. The designs are more attractive and the quality better as the price increases.
The difference in quality may be most noticeable in the appearance of the ceramic — cheaper models often have flaws and imperfections. And while surface flaws don’t affect the sink’s function, they’re quite obvious and may signal a shorter life expectancy as well because the glaze that protects the surface is usually quite thin.
However, when a high-quality pedestal sink is installed, you won’t be disappointed. All the work will have been worth it.
More Than Putting In A Sink
Make a quick comparison of Photos 1, 2, and and 3 and the opening photo. There’s usually a lot more to this project than just replacing an old, outdated vanity.
A pedestal sink installation is often part of a larger bathroom renovation, so this project is generally not for a rank beginner. Don’t plan to complete this project in a couple of days, either.
You’ll need to make drywall repairs, since you’ll probably be moving the water supply lines, which are inside the wall. The old flooring and wallcovering (paint or wallpaper) won‘t do much to complement the new sink, either, so you’ll probably want to redecorate.
In this article, I don’t show you how to do the cosmetic repairs, but you may find what you are looking for in a related article I’ve already published:
- How to tile a bathroom floor and walls
- How to repair ceramic tile
- How to replace a subfloor
- How to install a glass block shower wall
- How to hang drywall on walls by yourself
Preliminary Checking
Installing a sink is installing a sink, right? Not when you’re dealing with a pedestal style.
All of the water connections (shutoff valves, traps, and drain) will be exposed, so you need to examine your current plumbing connections and their locations and compare them to the installation requirements of the new sink before you buy it.
This couple of articles might be helpful for you:
To help you decide if you can or want to install a pedestal sink in your bathroom, you need to measure the height of the existing drain opening in the wall. That’s the spot where the metal or plastic drain waste arm goes into the wall (Photo 2).
Measure from the floor to the center of the drain opening and compare that measurement to the drain height requirement of the new sink. If the measurements are within an inch or so, you can probably install a pedestal sink, If you need to move the drain, which is unlikely, you may not want to go any further.
Tools For Two Changes
You’ll need a variety of tools for both carpentry and plumbing repairs.
For the carpentry work you’ll need:
- a utility knife,
- a drywall saw,
- a short length of 2x8 board (at least 16 in. long),
- some 2-1/2 or 3-in. drywall screws,
- an electric drill, and
- a stud finder.
For the plumbing changes, round up the following:
- one 10-ft. length of 1/2-in. rigid copper pipe (used to make the new supply lines),
- an assortment of l/2-in., 90—degree elbows and unions,
- a dielectric union (if your existing water supply lines are galvanized),
- a tube cutter (the smaller “mini” size is better for working in cramped quarters),
- a hacksaw,
- lead-free solder,
- emery cloth,
- plumber's paste (flux), and
- a propane torch for soldering.
You’ll also need:
- two compression shutoff valves (these are secured to the new water supply pipes with a brass compression ring and a nut -- no soldering!),
- a new drain trap assembly, and
- new water supply tubes.
Keep some rags and a bucket handy too.
Removing The Old Stuff
The first thing you need to do is shut off the water to the bathroom sink. Disconnect the water supply lines, drain arm, and trap. Then remove the old vanity and sink (Photo 1). It’s probably screwed to the wall and may require some additional effort to break it free from the floor too.
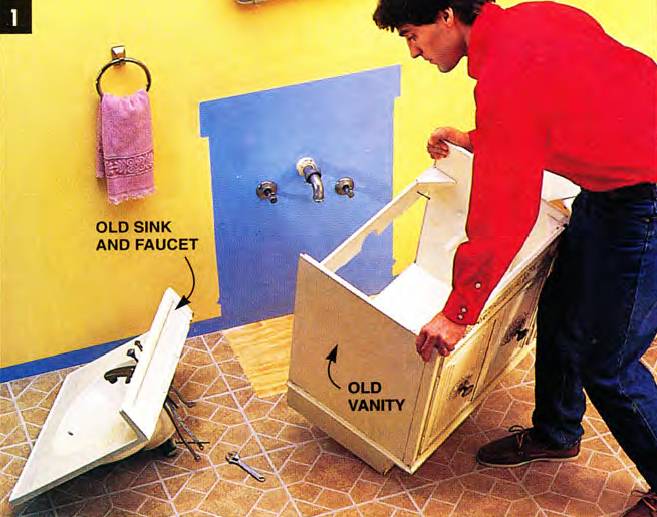
Shut off the water at the water main (near the meter), then disconnect the water supply tubes and the drain. Remove the old vanity, sink, and faucet.
Whether your old sink had shutoff valves underneath it or it looks like ours (sweat-soldered fittings on the water supply lines that come out of the wall; see Photo 2), you’ll want to replace them. To do this. you’ll have to shut off the water at the water meter.
The meter is usually located in the basement or crawl space. If your home is on a slab (no basement or crawl space), it’s usually where the main water line enters the house, which is often in the garage or laundry room. The entire house will be without water, so make sure everyone knows this in advance.

Cut off the old elbows with a tube cutter and then remove the escutcheon plate. Keep some rags and a bucket handy - you’ll need them. Remove the wallboard to gain access to the water supply lines.
Photo 2 shows the old water supply elbows and the drain waste arm. The new shutoff locations (the required height measurement, 24 in. for this sink, was in the sink’s instructions) are indicated with an “X.” They’re closer together than the old ones. The new valves will be 4 in. apart; the old elbows were about 10 in. apart. The new ones also are level with each other.
These shutoff valves are going to be 4 in. apart so we can hide them behind the pedestal. Doing this is harder because the work space is confined, but the final look (see Photo 8) is worth it.
Another option is to make the valves level, but space them 8 in. apart. The shutoff valves and supply tubes will show, but that’s okay. New chrome valves and chrome supply tubes look just fine.
Getting Inside The Wall
Before you can remove the drywall to begin the plumbing changes, you need to cut off the old elbows with a tube cutter (Photo 2). I used a mini-tube cutter because I’ll be cutting off the existing copper supply lines in the wall. and a regular tube cutter is too big. Remove the escutcheon plate once the elbows have been cut off
When you cut out the drywall, do the following to make the repair work easier and look better. Use a utility knife to cut the drywall back slightly wider than the wall stud cavity to expose a 1/2-in. to 3/4-in. lip of 2x4 (Photo 3). Use this lip to secure the new drywall patch.

Cut off the water supply pipes, then solder on new pipes to make the new shutoff valves level. Install the backer board, used to hold the sink’s hanger bracket. Close up the wall and make the cosmetic repairs.
Cut off the existing vertical water supply lines with the tube cutter so they’re level (Photo 3). This allows you to add the same length pipes to both the existing hot and cold supply pipes so the new shutoff valves are level and evenly spaced.
Fig. A shows both the new copper supply lines and stubouts (4 in. apart, level and shown in orange), and the old elbows, shown in pink.

FIG. A - New Copper Supply Pipes
When you make the water supply line changes, use the fewest number of elbows possible, We used two 90-degree elbows and three lengths of pipe to make each new supply line and stubout.
The exact length of pipe depends on the existing pipe, so you’ll have to measure. The shorter pieces move the supply pipes 4 in. apart and form the stubout from the wall. The longer piece is used to bring the water supply stubouts to the correct height. Check your instructions for shutoff heights.
Then solder a cap over the end of each stubout so you can turn the water back on for the rest of the house.
Soldering Copper Pipes
All of the copper connections are sweat-soldered. For leak-free connections, the ends of the pipe and the inside of all the fittings must be clean and corrosion-free.
The best way to clean these pipes is with emery cloth. Apply plumber’s paste (flux) to the cleaned pipe area before assembling the pipe and fittings.
Heat the fitting (not the pipe) with the flame from the propane torch and touch the solder to the joint. The hot fitting will draw the solder into the joint and seal it.
As the fitting starts to cool (remove the torch flame from the fitting for a couple of seconds), run a bead of solder around the joint. The fitting will still be hot enough to melt the solder.
Dealing With Galvanized Pipes
If your water supply pipes are galvanized, you can still make the changes with copper pipe. Just be sure to install a dielectric union between the galvanized and copper pipes.
A dielectric union has a plastic spacer that prevents corrosion and later leakage. The galvanized pipe end of the union is threaded; the copper pipe end is soldered onto the copper supply pipe. Dielectric unions are available at any plumbing supply store.
Installing A Backer Board
Once the water supply pipe heights are correct, you should install the backer board (Photo 3). It’s required by most sink manufacturers to secure the hanger bracket that holds the sink.
The backer board should be a length of 2x8 that fits between the wall studs. The backer is secured with four drywall screws into the wall studs The installation height for the hacker will be in the sink instructions.
If the 2x8 board is too thick, especially if the wall studs are 2x4s or the drain vent pipe is in the way. use a 1x8 board. You can notch the front edge of the wall studs with a handsaw and set the 1x8 into the notches. Then secure it to the 2x4 with drywall screws.
Installing New Shutoffs
Before moving to the next step, notice that there’s now quite a difference in the appearance of our bathroom. All of the repairs to the drywall were made, plus painted, wallpapered, installed chair rail molding and put in a new bathroom floor.
You should make your cosmetic repairs at this time too, so you don’t have to work around the new sink.
To begin the installation, shut off the water to the bathroom once again so you can cut off the caps on the stubouts and install the shutoff valves.
Measure out from the wall 1-3/8 in., make a mark on the stubout and cut it off with the tube cutter (Photo 4). Keep the rags and bucket handy to catch the water that will spill from the pipe. A 1-3/8 in. pipe stubout from the surface of the wall is the correct length to fit the shutoff valve and still be completely covered by the valve’s escutcheon plate.

Install the compression shutoff valves. Cut off the stubout, leaving 1-3/8 in. protruding from the wall. This length works best for installing the new valve. The rest of the stub is covered by the escutcheon plate.
Now install the compression-fit shutoff valve. Most compression valve packages have adequate instructions printed on them. However, let’s walk you through the steps (Photo 4 shows one shutoff valve already installed):
- Slip the compression nut over the pipe and then slip the brass compression ring over the pipe. The nut threads must face the cut end of the pipe.
- Slide the valve as far onto the pipe as it will go. Now screw the compression nut onto the fitting. The nut is tightened onto the fitting and snugs the brass compression ring onto the copper supply pipe to form a leak-free joint.
Make sure the shutoff valves are closed (turned clockwise until tight). Now, have someone else turn the water back on for the rest of the house so you can check the valves for leaks.
Secure the hanger bracket to the wall (Photo 5). The bracket is usually secured with 1/4-in. dia. lag bolts screwed into the backer board. The brackets also have slots so you can make small height adjustments (about 1 in.) to level the sink.
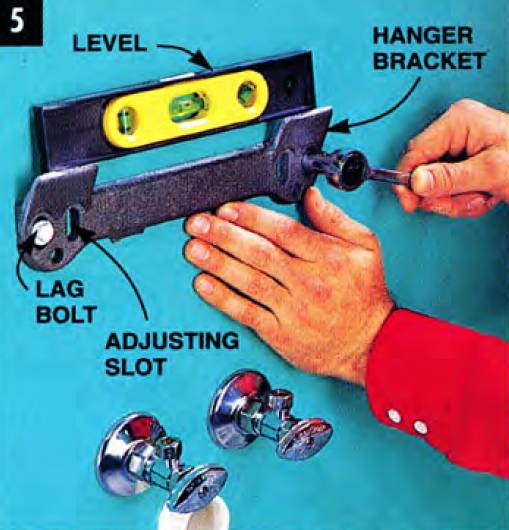
Position the hanger bracket on the wall and secure it into the backer board with 1/4-in. dia. log bolts. Use a level to make sure the hanger bracket is level. The slots allow for leveling adjustments.
Sink And Faucet Assembly
Begin by attaching the new faucet to the sink. The way it’s secured to the sink depends on the brand of faucet
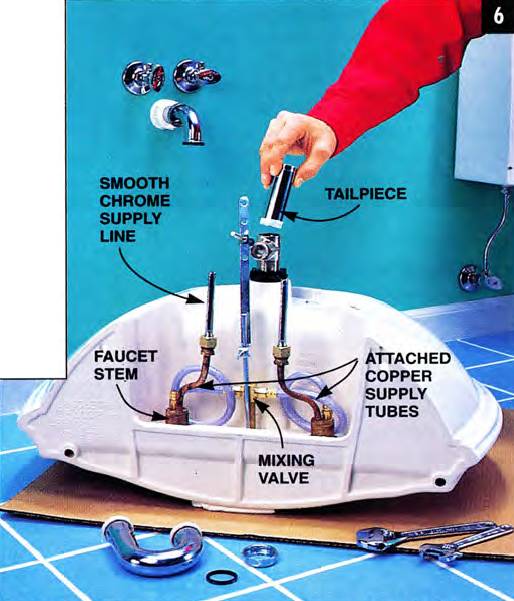
This faucet has separate handles and spout, so there are a couple of additional water supply tube connections. The hot water and cold water supply tubes are connected to a mixing valve (Photo 6).
Consult your faucet’s instructions and the drain and trap instructions, since the installation steps vary widely among brands.
Attach the faucet and drain to the sink. Check both the sink and faucet instructions for specific directions, since faucet assembly varies widely. Be careful when you bond attached copper supply tubes on the faucet. If you kink or split them, you’ll have to buy another faucet.
Notice that our faucet handles are 8 in. apart but we positioned the shutoff valves 4 in. apart to hide the valves and supply tubes behind the pedestal. (I like the look of the 8-in. faucet better than the 4-in. style.)
These faucet handle stems also have copper supply tubes attached, so we had to bend these tubes to approximately 4 in. apart before attaching the supply tube.
If your faucet has attached copper supply tubes, be careful when you bend them. It’s easy to put a kink or flat spot in the tube But if you bend them slowly and gently, using two hands, you’ll be able to get them into the correct position.
Work carefully! If you kink or split the tubes, you’ll have to buy another faucet – you won’t be able to fix it.
The type of supply tube to use between the faucet and shutoff valve depends on how much bending is required to get tubes to the shutoff valves.
Chrome supply tubes are available in smooth or corrugated (flexible). If you’re really cramped for space, you could use a braided metal supply tube. All three types come in different lengths and meet the current plumbing codes (inset to Photo 6).
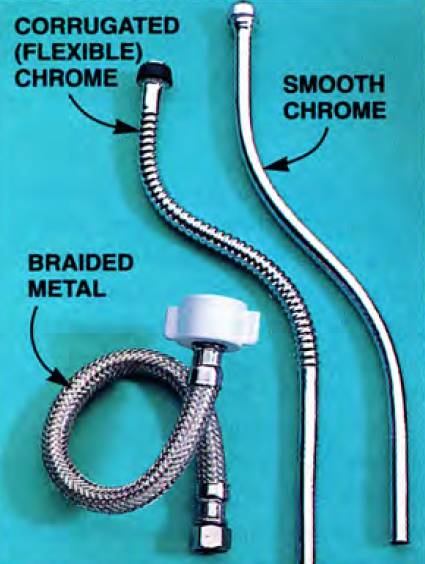
Water supply tubes some in a variety of styles. The smooth or corrugated chrome tubes allow for gradual bends and can be cut to length. The braided metal tube can’t be cut, but it can handle more severe twists and turns. All three meet current plumbing codes.
The chrome supply tubes can be cut to length with a tube cutter. The braided metal type can’t be cut, but it’s much more flexible. You’ll have to make sure that the connecting joints for the drain tailpiece.
P-trap and waste arm line up with one another, both vertically and horizontally when the sink is on the wall. This means you’ll probably have to cut off the tailpiece (Photo 6) with a hacksaw to the correct length. Don’t cut the tailpiece until you test-fit the drain and trap with the sink in place. Then cut it to the exact length.
Hanging The Sink
Now’s when you’ll appreciate a helper. Pedestal sinks are heavy and hard to handle. It’s much easier to position the sink on the hanger bracket and then line up all of the plumbing connections with two people working together. However, it can be done by one person.
Once the sink is securely on the hanger bracket. you can connect the P-trap to the drain waste arm in the wall and the supply tubes into the shutoff valves (Photo 7).
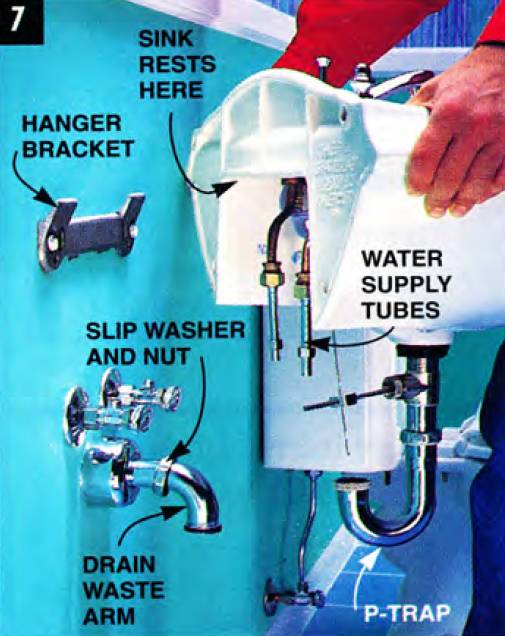
Hang the sink on the hanger bracket. Then attach the water supply tubes to the compression shutoff valves and the drain F-trap to the drain waste arm.
The drain and trap sections are secured with slip nuts and slip washers. The supply tubes are secured into the shutoff valves by a compression fitting.
Position the pedestal by lifting the bowl slightly and pushing the pedestal under the bowl (Photo 8).
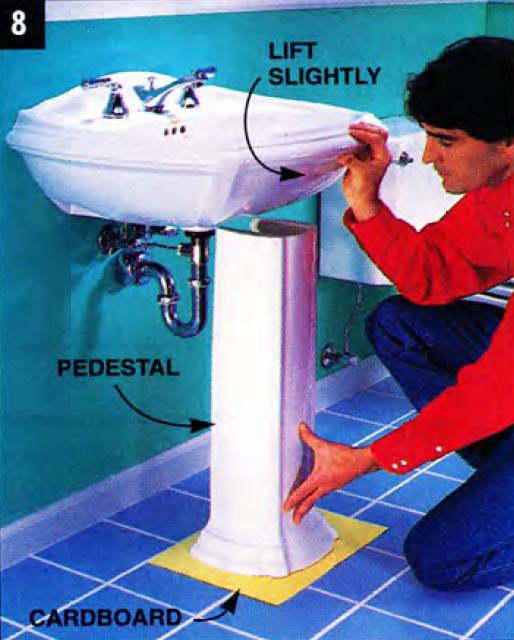
Position the pedestal under the sink. Put thin cardboard under the pedestal to protect the floor when you slide the pedestal. Lift up slightly on the sink as you slide the pedestal.
Don’t lift up on the bowl too much when positioning the pedestal (only about 1/8 in. and no more than 1/4 in.). You could crack the sink at the hanger or cause the sink to slip off the hanger bracket completely.
Place a thin piece of cardboard under the pedestal to prevent it from scratching the floor when you slide it. You can remove the cardboard once the pedestal is in place.
Most sinks and pedestals are secured to the wall and floor, respectively, with lag bolts. Fig. B shows where the sink and pedestal are secured. Check your sink instructions for their recommended location, installation method, and the size of the anchoring bolt needed to secure the sink.

Fig. B Securing the bowl and pedestal.
You’ll probably need to drill a starter hole for the pedestal’s bolt, since you’ll be cramped for space and the starter hole will make this step easier. Mark the floor through the hole in the base of the pedestal and then slide the pedestal out. Now drill the hole.
If you try to drill the starter hole through the hole in the base, you’ll most likely chip or crack the pedestal.
After both are secured, apply a head of clear silicone caulk along the top edge of the bowl where it meets the wall. Also caulk where the pedestal touches the floor.
Finally, turn the water on at the shutoff valves and fill the sink bowl completely with water. Then let it out. This sudden rush of water is the best way to check the drain assembly and P-trap for leaks.

Make a small bathroom look bigger, or a big bathroom look better!
Go into any bathroom in today’s model homes. especially the half-bath or powder room (sink and toilet, no tub or shower), and you’re likely to find a pedestal sink. And for good reason.
Pedestal sinks are elegant, without being overstated. They also make the room look bigger because of the exposed floor and wall space that’s normally covered by a vanity.
You do lose the storage space normally found inside the vanity, but you can get most of it back by installing a larger medicine cabinet, or a wall-mounted cabinet that’s designed to fit above the toilet (called an “over-john” cabinet).
How Should You Choose A Pedestal Sink?
Pedestal sinks are sold in just about every home center and at plumbing supply stores. Prices start at under $200 and can go well over $1,000. The designs are more attractive and the quality better as the price increases.
The difference in quality may be most noticeable in the appearance of the ceramic — cheaper models often have flaws and imperfections. And while surface flaws don’t affect the sink’s function, they’re quite obvious and may signal a shorter life expectancy as well because the glaze that protects the surface is usually quite thin.
However, when a high-quality pedestal sink is installed, you won’t be disappointed. All the work will have been worth it.
More Than Putting In A Sink
Make a quick comparison of Photos 1, 2, and and 3 and the opening photo. There’s usually a lot more to this project than just replacing an old, outdated vanity.
A pedestal sink installation is often part of a larger bathroom renovation, so this project is generally not for a rank beginner. Don’t plan to complete this project in a couple of days, either.
You’ll need to make drywall repairs, since you’ll probably be moving the water supply lines, which are inside the wall. The old flooring and wallcovering (paint or wallpaper) won‘t do much to complement the new sink, either, so you’ll probably want to redecorate.
In this article, I don’t show you how to do the cosmetic repairs, but you may find what you are looking for in a related article I’ve already published:
- How to tile a bathroom floor and walls
- How to repair ceramic tile
- How to replace a subfloor
- How to install a glass block shower wall
- How to hang drywall on walls by yourself
Preliminary Checking
Installing a sink is installing a sink, right? Not when you’re dealing with a pedestal style.
All of the water connections (shutoff valves, traps, and drain) will be exposed, so you need to examine your current plumbing connections and their locations and compare them to the installation requirements of the new sink before you buy it.
This couple of articles might be helpful for you:
To help you decide if you can or want to install a pedestal sink in your bathroom, you need to measure the height of the existing drain opening in the wall. That’s the spot where the metal or plastic drain waste arm goes into the wall (Photo 2).
Measure from the floor to the center of the drain opening and compare that measurement to the drain height requirement of the new sink. If the measurements are within an inch or so, you can probably install a pedestal sink, If you need to move the drain, which is unlikely, you may not want to go any further.
Tools For Two Changes
You’ll need a variety of tools for both carpentry and plumbing repairs.
For the carpentry work you’ll need:
- a utility knife,
- a drywall saw,
- a short length of 2x8 board (at least 16 in. long),
- some 2-1/2 or 3-in. drywall screws,
- an electric drill, and
- a stud finder.
For the plumbing changes, round up the following:
- one 10-ft. length of 1/2-in. rigid copper pipe (used to make the new supply lines),
- an assortment of l/2-in., 90—degree elbows and unions,
- a dielectric union (if your existing water supply lines are galvanized),
- a tube cutter (the smaller “mini” size is better for working in cramped quarters),
- a hacksaw,
- lead-free solder,
- emery cloth,
- plumber's paste (flux), and
- a propane torch for soldering.
You’ll also need:
- two compression shutoff valves (these are secured to the new water supply pipes with a brass compression ring and a nut -- no soldering!),
- a new drain trap assembly, and
- new water supply tubes.
Keep some rags and a bucket handy too.
Removing The Old Stuff
The first thing you need to do is shut off the water to the bathroom sink. Disconnect the water supply lines, drain arm, and trap. Then remove the old vanity and sink (Photo 1). It’s probably screwed to the wall and may require some additional effort to break it free from the floor too.
Shut off the water at the water main (near the meter), then disconnect the water supply tubes and the drain. Remove the old vanity, sink, and faucet.
Whether your old sink had shutoff valves underneath it or it looks like ours (sweat-soldered fittings on the water supply lines that come out of the wall; see Photo 2), you’ll want to replace them. To do this. you’ll have to shut off the water at the water meter.
The meter is usually located in the basement or crawl space. If your home is on a slab (no basement or crawl space), it’s usually where the main water line enters the house, which is often in the garage or laundry room. The entire house will be without water, so make sure everyone knows this in advance.
Cut off the old elbows with a tube cutter and then remove the escutcheon plate. Keep some rags and a bucket handy - you’ll need them. Remove the wallboard to gain access to the water supply lines.
Photo 2 shows the old water supply elbows and the drain waste arm. The new shutoff locations (the required height measurement, 24 in. for this sink, was in the sink’s instructions) are indicated with an “X.” They’re closer together than the old ones. The new valves will be 4 in. apart; the old elbows were about 10 in. apart. The new ones also are level with each other.
These shutoff valves are going to be 4 in. apart so we can hide them behind the pedestal. Doing this is harder because the work space is confined, but the final look (see Photo 8) is worth it.
Another option is to make the valves level, but space them 8 in. apart. The shutoff valves and supply tubes will show, but that’s okay. New chrome valves and chrome supply tubes look just fine.
Getting Inside The Wall
Before you can remove the drywall to begin the plumbing changes, you need to cut off the old elbows with a tube cutter (Photo 2). I used a mini-tube cutter because I’ll be cutting off the existing copper supply lines in the wall. and a regular tube cutter is too big. Remove the escutcheon plate once the elbows have been cut off
When you cut out the drywall, do the following to make the repair work easier and look better. Use a utility knife to cut the drywall back slightly wider than the wall stud cavity to expose a 1/2-in. to 3/4-in. lip of 2x4 (Photo 3). Use this lip to secure the new drywall patch.
Cut off the water supply pipes, then solder on new pipes to make the new shutoff valves level. Install the backer board, used to hold the sink’s hanger bracket. Close up the wall and make the cosmetic repairs.
Cut off the existing vertical water supply lines with the tube cutter so they’re level (Photo 3). This allows you to add the same length pipes to both the existing hot and cold supply pipes so the new shutoff valves are level and evenly spaced.
Fig. A shows both the new copper supply lines and stubouts (4 in. apart, level and shown in orange), and the old elbows, shown in pink.
FIG. A - New Copper Supply Pipes
When you make the water supply line changes, use the fewest number of elbows possible, We used two 90-degree elbows and three lengths of pipe to make each new supply line and stubout.
The exact length of pipe depends on the existing pipe, so you’ll have to measure. The shorter pieces move the supply pipes 4 in. apart and form the stubout from the wall. The longer piece is used to bring the water supply stubouts to the correct height. Check your instructions for shutoff heights.
Then solder a cap over the end of each stubout so you can turn the water back on for the rest of the house.
Soldering Copper Pipes
All of the copper connections are sweat-soldered. For leak-free connections, the ends of the pipe and the inside of all the fittings must be clean and corrosion-free.
The best way to clean these pipes is with emery cloth. Apply plumber’s paste (flux) to the cleaned pipe area before assembling the pipe and fittings.
Heat the fitting (not the pipe) with the flame from the propane torch and touch the solder to the joint. The hot fitting will draw the solder into the joint and seal it.
As the fitting starts to cool (remove the torch flame from the fitting for a couple of seconds), run a bead of solder around the joint. The fitting will still be hot enough to melt the solder.
Dealing With Galvanized Pipes
If your water supply pipes are galvanized, you can still make the changes with copper pipe. Just be sure to install a dielectric union between the galvanized and copper pipes.
A dielectric union has a plastic spacer that prevents corrosion and later leakage. The galvanized pipe end of the union is threaded; the copper pipe end is soldered onto the copper supply pipe. Dielectric unions are available at any plumbing supply store.
Installing A Backer Board
Once the water supply pipe heights are correct, you should install the backer board (Photo 3). It’s required by most sink manufacturers to secure the hanger bracket that holds the sink.
The backer board should be a length of 2x8 that fits between the wall studs. The backer is secured with four drywall screws into the wall studs The installation height for the hacker will be in the sink instructions.
If the 2x8 board is too thick, especially if the wall studs are 2x4s or the drain vent pipe is in the way. use a 1x8 board. You can notch the front edge of the wall studs with a handsaw and set the 1x8 into the notches. Then secure it to the 2x4 with drywall screws.
Installing New Shutoffs
Before moving to the next step, notice that there’s now quite a difference in the appearance of our bathroom. All of the repairs to the drywall were made, plus painted, wallpapered, installed chair rail molding and put in a new bathroom floor.
You should make your cosmetic repairs at this time too, so you don’t have to work around the new sink.
To begin the installation, shut off the water to the bathroom once again so you can cut off the caps on the stubouts and install the shutoff valves.
Measure out from the wall 1-3/8 in., make a mark on the stubout and cut it off with the tube cutter (Photo 4). Keep the rags and bucket handy to catch the water that will spill from the pipe. A 1-3/8 in. pipe stubout from the surface of the wall is the correct length to fit the shutoff valve and still be completely covered by the valve’s escutcheon plate.
Install the compression shutoff valves. Cut off the stubout, leaving 1-3/8 in. protruding from the wall. This length works best for installing the new valve. The rest of the stub is covered by the escutcheon plate.
Now install the compression-fit shutoff valve. Most compression valve packages have adequate instructions printed on them. However, let’s walk you through the steps (Photo 4 shows one shutoff valve already installed):
- Slip the compression nut over the pipe and then slip the brass compression ring over the pipe. The nut threads must face the cut end of the pipe.
- Slide the valve as far onto the pipe as it will go. Now screw the compression nut onto the fitting. The nut is tightened onto the fitting and snugs the brass compression ring onto the copper supply pipe to form a leak-free joint.
Make sure the shutoff valves are closed (turned clockwise until tight). Now, have someone else turn the water back on for the rest of the house so you can check the valves for leaks.
Secure the hanger bracket to the wall (Photo 5). The bracket is usually secured with 1/4-in. dia. lag bolts screwed into the backer board. The brackets also have slots so you can make small height adjustments (about 1 in.) to level the sink.
Position the hanger bracket on the wall and secure it into the backer board with 1/4-in. dia. log bolts. Use a level to make sure the hanger bracket is level. The slots allow for leveling adjustments.
Sink And Faucet Assembly
Begin by attaching the new faucet to the sink. The way it’s secured to the sink depends on the brand of faucet
This faucet has separate handles and spout, so there are a couple of additional water supply tube connections. The hot water and cold water supply tubes are connected to a mixing valve (Photo 6).
Consult your faucet’s instructions and the drain and trap instructions, since the installation steps vary widely among brands.
Attach the faucet and drain to the sink. Check both the sink and faucet instructions for specific directions, since faucet assembly varies widely. Be careful when you bond attached copper supply tubes on the faucet. If you kink or split them, you’ll have to buy another faucet.
Notice that our faucet handles are 8 in. apart but we positioned the shutoff valves 4 in. apart to hide the valves and supply tubes behind the pedestal. (I like the look of the 8-in. faucet better than the 4-in. style.)
These faucet handle stems also have copper supply tubes attached, so we had to bend these tubes to approximately 4 in. apart before attaching the supply tube.
If your faucet has attached copper supply tubes, be careful when you bend them. It’s easy to put a kink or flat spot in the tube But if you bend them slowly and gently, using two hands, you’ll be able to get them into the correct position.
Work carefully! If you kink or split the tubes, you’ll have to buy another faucet – you won’t be able to fix it.
The type of supply tube to use between the faucet and shutoff valve depends on how much bending is required to get tubes to the shutoff valves.
Chrome supply tubes are available in smooth or corrugated (flexible). If you’re really cramped for space, you could use a braided metal supply tube. All three types come in different lengths and meet the current plumbing codes (inset to Photo 6).
Water supply tubes some in a variety of styles. The smooth or corrugated chrome tubes allow for gradual bends and can be cut to length. The braided metal tube can’t be cut, but it can handle more severe twists and turns. All three meet current plumbing codes.
The chrome supply tubes can be cut to length with a tube cutter. The braided metal type can’t be cut, but it’s much more flexible. You’ll have to make sure that the connecting joints for the drain tailpiece.
P-trap and waste arm line up with one another, both vertically and horizontally when the sink is on the wall. This means you’ll probably have to cut off the tailpiece (Photo 6) with a hacksaw to the correct length. Don’t cut the tailpiece until you test-fit the drain and trap with the sink in place. Then cut it to the exact length.
Hanging The Sink
Now’s when you’ll appreciate a helper. Pedestal sinks are heavy and hard to handle. It’s much easier to position the sink on the hanger bracket and then line up all of the plumbing connections with two people working together. However, it can be done by one person.
Once the sink is securely on the hanger bracket. you can connect the P-trap to the drain waste arm in the wall and the supply tubes into the shutoff valves (Photo 7).
Hang the sink on the hanger bracket. Then attach the water supply tubes to the compression shutoff valves and the drain F-trap to the drain waste arm.
The drain and trap sections are secured with slip nuts and slip washers. The supply tubes are secured into the shutoff valves by a compression fitting.
Position the pedestal by lifting the bowl slightly and pushing the pedestal under the bowl (Photo 8).
Position the pedestal under the sink. Put thin cardboard under the pedestal to protect the floor when you slide the pedestal. Lift up slightly on the sink as you slide the pedestal.
Don’t lift up on the bowl too much when positioning the pedestal (only about 1/8 in. and no more than 1/4 in.). You could crack the sink at the hanger or cause the sink to slip off the hanger bracket completely.
Place a thin piece of cardboard under the pedestal to prevent it from scratching the floor when you slide it. You can remove the cardboard once the pedestal is in place.
Most sinks and pedestals are secured to the wall and floor, respectively, with lag bolts. Fig. B shows where the sink and pedestal are secured. Check your sink instructions for their recommended location, installation method, and the size of the anchoring bolt needed to secure the sink.
Fig. B Securing the bowl and pedestal.
You’ll probably need to drill a starter hole for the pedestal’s bolt, since you’ll be cramped for space and the starter hole will make this step easier. Mark the floor through the hole in the base of the pedestal and then slide the pedestal out. Now drill the hole.
If you try to drill the starter hole through the hole in the base, you’ll most likely chip or crack the pedestal.
After both are secured, apply a head of clear silicone caulk along the top edge of the bowl where it meets the wall. Also caulk where the pedestal touches the floor.
Finally, turn the water on at the shutoff valves and fill the sink bowl completely with water. Then let it out. This sudden rush of water is the best way to check the drain assembly and P-trap for leaks.