
Woodworking Starter Pack & Projects for Beginners
Starting woodworking can be very simple and very rewarding.
The sheer pleasure of molding wood to suit the form and function you chose, the process to make it all happen, the satisfaction of doing things yourself, and the pride you feel from accomplishing the task are all great feelings that make this hobby a great therapy for the soul.
Buying a good tool and using it to produce furniture and doing odd jobs around the house can help you save lots of money too.
But how can you start your first steps in woodworking? Keep on reading and find out everything you’ll need!
Location, Location, Location
Where are you going to set up your workshop?
A minority of woodworkers are brave apartment dwellers who have used have a spare closet, room, or even outside in their balconies. Anything is possible and it all depends on you, so get rid of obstacles and think about possible solutions to your situation.
Most people interested in woodworking, however, live in houses, and most of them will probably use their basements or their garages. Not all can afford the luxury of huge empty spaces at home, but make sure you claim at least a corner for a workbench, with enough space for storing tools and supplies.
Basement, Garage, Or Backyard?
Tip: no matter what type of space you choose, consider getting some anti-fatigue mats, so you can reduce worker leg and back pain.
Basement Workshop
A basement can be good because it is better isolated against outside temperature changes, however air quality and lack of natural lighting, can be an issue. Air filtering and LED lighting can solve these issues
Another thing to keep in mind is the noise produced by your machinery, so remember to address that as well.
One final issue is to bring wood inside your basement workshop and get finished projects out of your shop – depending on how accessible your shop is, this may or may not be an issue for you.
Woodworking in the Garage
A garage brings the exact opposite scenario: the possibility of opening the doors and exchanging air easily, good lighting throughout the day, (mostly) isolated from the house and less concern about tool noise, and bringing wood in and projects out is much simpler.
However, thermal isolation tends to be worse, and there is also the concern that strangers might be eyeing your tools while you are working and eventually pay a visit to your garage to steal your prized tools.
Backyard Woodworking
The best alternative might be a small shed in your backyard.
Even 200 sq. ft. might be enough to ensure all the good aspect from working above ground, in a place where you ensure your privacy and protect your tools.
If you are smart about how you make this addition to your property, it might even add to the eventual resale value.
Your Most Important Projects
Well, the best way to start woodworking is by building things to organize your own tools and your workspace – in other words, making a toolbox and a workbench.
These are two useful projects where you can practice essential skills and start learning the basics. If you make small mistakes, they will not be seen by others and your final projects will still be useful and lasting.
Your First Toolbox
Each toolbox is personal and completely different because each one of us has different needs. Your uses and imagination are the only boundaries here!
Depending on how many tools you have, and how handy you are, you may want to make a simple first toolbox or themed toolboxes according to the tools you place inside – for example, a toolbox for measuring and cutting tools, another for your cordless drill plus all your drilling and driving bits, a third for sanding paper and finishing supplies, and even another one for carrying all the general use tools for DIY jobs around the house.
Here are some plans for a simple toolbox. The tools you will need are:
- tape measure to measure all your cuts;
- a circular saw to cut the plywood;
- a hammer, some 6d finish nails, and wood glue, for the joinery;
- a power drill with a Forstner bit to drill the handle holes; and
- safety glasses.
Basic Woodworking Tools
| What? | What is it for? | Why this one? |
|---|---|---|
| Stanley FatMax 25 ft Tape Measure | Measuring pieces, parts, and cuts | Accurate measurements, American-made, drop-resistant |
| Swanson Tool S0101CB Speed Square and Combination Square (Value Pack) | Using it as Protractor, cutting guide, or tri square, plus scribing parallel lines | Excellent price on a great American-made tool by a traditional brand |
| Stiletto FH10S Ti 10 Hammer (16" Hickory Handle) | Pounding nails and stuff | Great craftsmanship, balance, and shock-reduction grip |
| Porter-Cable 20V 1/2 inch Drill/Driver and 5 1/2 inch Circular Saw Kit | Making straight and beveled cuts, drilling holes, and driving screws | Great deal for a complete kit (battery, charger, drill, and saw), traditional brand, possibility to buy other 20v bare tools and use the same battery. |
| Stanley 16-150 Short Blade 3-Piece Wood Chisel Set | Chipping, carving, or cutting wood | Extremely low price, good brand, and contain the 3 most used chisel sizes (1/2 in, 3/4 in, and 1 in) |
| Stanley 51-104 16 Oz Rubber Mallet | "Convincing" work pieces to fit snuggly, plus chiseling work | Quality tool, many positive reviews, good brand |
| Irwin Quick Grip One Handed Mini-Clamp (Pack of 4) | Holding two separate pieces firmly while glue sets in and/or while you drill holes and screws | One-handed bar clamps are enough to get you started with your first projects; good price for this set of 4 |
| Ryobi A98901 Drilling and Driving Bit Set | Drilling holes and driving screws | Great starter kit, with good-quality and a wide assortment of useful bits. |
| Stanley 12-404 No. 4 Adjustable Bench Plane | Smoothing over larger surfaces and flattening edges | Unbeatable price on the most traditional plane size made by the most traditional plane brand |
| Stanley 12-220 Block Plane | Beveling edges and smoothing over short lenghts | Traditional brand, great deal |
Consumer Vs. Pro Tools
If you’re getting more involved in home improvement projects, you might be thinking about buying tools like a circular saw, jigsaw and several other power tools.
You might have heard from more experienced people, even tradesmen, who will advise, “Buy the best tool you can afford.”
You might do that — spend hundreds of dollars on professional-grade power tools — but the question always remains: are they really worth the extra money?
The answer is no, it isn’t always worth buying the best power tool you can afford. Sometimes, yes — mostly, no.
When are pro tools worth it?
A top-quality, professional-grade cordless drill and a drill bit set are both a good investment. You’ll use a drill all your life, and since it’s very easy to push a drill and its bits to their limits, you’ll appreciate the extra power and durability of using pro tools. Drilling masonry, for instance, can severely damage a light-weight drill.
When are consumer tools good enough?
For other power tools, though, you’ll generally do fine with a top-of-the-line consumer tool. Take circular saws, for example. A good consumer tool will have all the power you’ll need and cut just as well as a pro model — quality of cut being mainly in the blade, alter all. Furthermore, professional circular saws are quite a bit heavier and they lack the safety switch commonly found on consumer saws.
A jigsaw and a biscuit joiner just don’t get used much, and when you do use them, you aren’t likely to overload them. Save your money on these tools.
What if I will use it a lot?
With sanders, routers, jointers, and planers, it’s a tossup. They don’t normally get used enough in home improvement projects to make it worthwhile buying expensive professional models.
Get a good consumer-grade portable table saw or hybrid table saw or router and you’ll do fine. If you intend to do a fair amount of woodworking, however, a larger, professional-grade router will allow you to do much more, and a pro-grade belt sander will give you much better results on delicate work.
Finally, it’s just a good rule not to buy more tool than you need. When you’re ready to move up to a bigger or better tool, do it then.
Your First Workbench
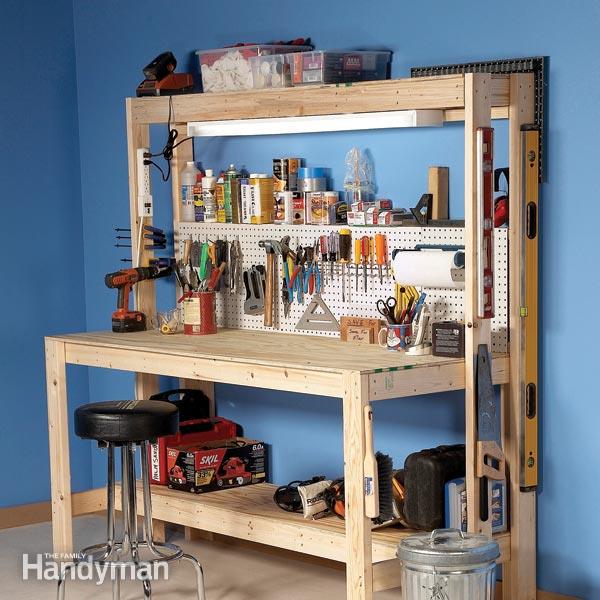
As for a workbench, in my opinion, a good beginner workbench has to offer some storage space as well, this way you can have all your tools and supplies on hand when starting a project instead of searching around the entire house for the glue, and the nails, and the pliers, and so on.
I personally like to have the tools displayed in front of me, and I do not want to attach things to my walls, so that leaves me with a freestanding bench with a tool board. You might even wish to hang a computer monitor there, so you can display PDF plans or review some YouTube tutorials while you are in your shop.
Going back to a more traditional approach to your “tool” board, when a tool has an easy place to be returned to, you increase your odds of keeping your workspace tidy – most of the times, at least. Efficiency will free your mind and open space for your creativity. The path from one to the other is what will keep you busy for countless hours without even realizing time passed by.
If you want to build this workbench with tool storage, these are the tools you will need:
- tape measure to measure all your cuts;
- a circular saw to cut the plywood and the 2x4s;
- a power drill with a pilot hole and countersink bit to pre-drill the holes and a drive bit to drive all the screws; and
- safety glasses.
As for size, workspace surface has to be proportional to the types of projects you want to build. Personally, I am just interested in smaller projects such as picture frames, desktop objects, boxes, and so on. If you want to build cabinetry and furniture, that will certainly influence the workbench size you need.
And remember: you can always graduate to a more traditional workbench later and leave this one for keeping your tool board and other benchtop tools such as a drill press, a grinder, or even a small jointer.
In case you don’t need the storage space, then you are better off building a simpler workbench – the plans I just linked use less wood and better joinery. You can also watch the construction:
If you still want another design option, take a look at my free set of plans for a garage workbench. Also, read my guide on choosing the perfect workbench height for you.
Essential Personal Protective Equipment
| What? | What is it for? | Why this one? |
|---|---|---|
| Homitt Sound Ear Muffs | Especially needed to block the noise produced when operating power tools | Good price, many good reviews, can be worn over safety glasses |
| Gateway Safety Cover2 Safety Glasses | Eye protection is a must in a wood shop, you never know when a piece of wood might fly into your face | Great value for the money, plus they can be worn over biggish prescription glasses - in case you are as blind as I am |
| GVS SPR457 Elipse P100 Half Mask Respirator | Very important, especially if you are around chemical finishings or producing too much dust with power tools | Comfortable, lightweight, great seal even for bearded users; the P100 is the highest rating for personal respiratory protection |
And Before Starting, Remember:
Safety is everything.
Use personal protective equipment. There are many models of safety glasses available and you are bound to find something good and inexpensive, which will protect your eyesight from eventual accidents. Hearing protection is also essential if you are operating power tools – saws, grinders, drills, anything. Wear a dust mask over your nose and mouth to avoid breathing particles of whatever material you are working with. The US Department of Labor has a good starting guide on woodworking hazards.
Use properly sharpened tools. A dull tool is the first step to you over-applying force in some random way you weren’t meant to. Then the tool will escape your control and fall. It could be just a broken tool, which you can solve with cash and some online shopping, or the tool could fall on you and break/cut/shock you, and you could end up in the hospital for something completely avoidable.
Starting woodworking can be very simple and very rewarding.
The sheer pleasure of molding wood to suit the form and function you chose, the process to make it all happen, the satisfaction of doing things yourself, and the pride you feel from accomplishing the task are all great feelings that make this hobby a great therapy for the soul.
Buying a good tool and using it to produce furniture and doing odd jobs around the house can help you save lots of money too.
But how can you start your first steps in woodworking? Keep on reading and find out everything you’ll need!
Location, Location, Location
Where are you going to set up your workshop?
A minority of woodworkers are brave apartment dwellers who have used have a spare closet, room, or even outside in their balconies. Anything is possible and it all depends on you, so get rid of obstacles and think about possible solutions to your situation.
Most people interested in woodworking, however, live in houses, and most of them will probably use their basements or their garages. Not all can afford the luxury of huge empty spaces at home, but make sure you claim at least a corner for a workbench, with enough space for storing tools and supplies.
Basement, Garage, Or Backyard?
Tip: no matter what type of space you choose, consider getting some anti-fatigue mats, so you can reduce worker leg and back pain.
Basement Workshop
A basement can be good because it is better isolated against outside temperature changes, however air quality and lack of natural lighting, can be an issue. Air filtering and LED lighting can solve these issues
Another thing to keep in mind is the noise produced by your machinery, so remember to address that as well.
One final issue is to bring wood inside your basement workshop and get finished projects out of your shop – depending on how accessible your shop is, this may or may not be an issue for you.
Woodworking in the Garage
A garage brings the exact opposite scenario: the possibility of opening the doors and exchanging air easily, good lighting throughout the day, (mostly) isolated from the house and less concern about tool noise, and bringing wood in and projects out is much simpler.
However, thermal isolation tends to be worse, and there is also the concern that strangers might be eyeing your tools while you are working and eventually pay a visit to your garage to steal your prized tools.
Backyard Woodworking
The best alternative might be a small shed in your backyard.
Even 200 sq. ft. might be enough to ensure all the good aspect from working above ground, in a place where you ensure your privacy and protect your tools.
If you are smart about how you make this addition to your property, it might even add to the eventual resale value.
Your Most Important Projects
Well, the best way to start woodworking is by building things to organize your own tools and your workspace – in other words, making a toolbox and a workbench.
These are two useful projects where you can practice essential skills and start learning the basics. If you make small mistakes, they will not be seen by others and your final projects will still be useful and lasting.
Your First Toolbox
Each toolbox is personal and completely different because each one of us has different needs. Your uses and imagination are the only boundaries here!
Depending on how many tools you have, and how handy you are, you may want to make a simple first toolbox or themed toolboxes according to the tools you place inside – for example, a toolbox for measuring and cutting tools, another for your cordless drill plus all your drilling and driving bits, a third for sanding paper and finishing supplies, and even another one for carrying all the general use tools for DIY jobs around the house.
Here are some plans for a simple toolbox. The tools you will need are:
- tape measure to measure all your cuts;
- a circular saw to cut the plywood;
- a hammer, some 6d finish nails, and wood glue, for the joinery;
- a power drill with a Forstner bit to drill the handle holes; and
- safety glasses.
Basic Woodworking Tools
| What? | What is it for? | Why this one? |
|---|---|---|
| Stanley FatMax 25 ft Tape Measure | Measuring pieces, parts, and cuts | Accurate measurements, American-made, drop-resistant |
| Swanson Tool S0101CB Speed Square and Combination Square (Value Pack) | Using it as Protractor, cutting guide, or tri square, plus scribing parallel lines | Excellent price on a great American-made tool by a traditional brand |
| Stiletto FH10S Ti 10 Hammer (16" Hickory Handle) | Pounding nails and stuff | Great craftsmanship, balance, and shock-reduction grip |
| Porter-Cable 20V 1/2 inch Drill/Driver and 5 1/2 inch Circular Saw Kit | Making straight and beveled cuts, drilling holes, and driving screws | Great deal for a complete kit (battery, charger, drill, and saw), traditional brand, possibility to buy other 20v bare tools and use the same battery. |
| Stanley 16-150 Short Blade 3-Piece Wood Chisel Set | Chipping, carving, or cutting wood | Extremely low price, good brand, and contain the 3 most used chisel sizes (1/2 in, 3/4 in, and 1 in) |
| Stanley 51-104 16 Oz Rubber Mallet | "Convincing" work pieces to fit snuggly, plus chiseling work | Quality tool, many positive reviews, good brand |
| Irwin Quick Grip One Handed Mini-Clamp (Pack of 4) | Holding two separate pieces firmly while glue sets in and/or while you drill holes and screws | One-handed bar clamps are enough to get you started with your first projects; good price for this set of 4 |
| Ryobi A98901 Drilling and Driving Bit Set | Drilling holes and driving screws | Great starter kit, with good-quality and a wide assortment of useful bits. |
| Stanley 12-404 No. 4 Adjustable Bench Plane | Smoothing over larger surfaces and flattening edges | Unbeatable price on the most traditional plane size made by the most traditional plane brand |
| Stanley 12-220 Block Plane | Beveling edges and smoothing over short lenghts | Traditional brand, great deal |
Consumer Vs. Pro Tools
If you’re getting more involved in home improvement projects, you might be thinking about buying tools like a circular saw, jigsaw and several other power tools.
You might have heard from more experienced people, even tradesmen, who will advise, “Buy the best tool you can afford.”
You might do that — spend hundreds of dollars on professional-grade power tools — but the question always remains: are they really worth the extra money?
The answer is no, it isn’t always worth buying the best power tool you can afford. Sometimes, yes — mostly, no.
When are pro tools worth it?
A top-quality, professional-grade cordless drill and a drill bit set are both a good investment. You’ll use a drill all your life, and since it’s very easy to push a drill and its bits to their limits, you’ll appreciate the extra power and durability of using pro tools. Drilling masonry, for instance, can severely damage a light-weight drill.
When are consumer tools good enough?
For other power tools, though, you’ll generally do fine with a top-of-the-line consumer tool. Take circular saws, for example. A good consumer tool will have all the power you’ll need and cut just as well as a pro model — quality of cut being mainly in the blade, alter all. Furthermore, professional circular saws are quite a bit heavier and they lack the safety switch commonly found on consumer saws.
A jigsaw and a biscuit joiner just don’t get used much, and when you do use them, you aren’t likely to overload them. Save your money on these tools.
What if I will use it a lot?
With sanders, routers, jointers, and planers, it’s a tossup. They don’t normally get used enough in home improvement projects to make it worthwhile buying expensive professional models.
Get a good consumer-grade portable table saw or hybrid table saw or router and you’ll do fine. If you intend to do a fair amount of woodworking, however, a larger, professional-grade router will allow you to do much more, and a pro-grade belt sander will give you much better results on delicate work.
Finally, it’s just a good rule not to buy more tool than you need. When you’re ready to move up to a bigger or better tool, do it then.
Your First Workbench
As for a workbench, in my opinion, a good beginner workbench has to offer some storage space as well, this way you can have all your tools and supplies on hand when starting a project instead of searching around the entire house for the glue, and the nails, and the pliers, and so on.
I personally like to have the tools displayed in front of me, and I do not want to attach things to my walls, so that leaves me with a freestanding bench with a tool board. You might even wish to hang a computer monitor there, so you can display PDF plans or review some YouTube tutorials while you are in your shop.
Going back to a more traditional approach to your “tool” board, when a tool has an easy place to be returned to, you increase your odds of keeping your workspace tidy – most of the times, at least. Efficiency will free your mind and open space for your creativity. The path from one to the other is what will keep you busy for countless hours without even realizing time passed by.
If you want to build this workbench with tool storage, these are the tools you will need:
- tape measure to measure all your cuts;
- a circular saw to cut the plywood and the 2x4s;
- a power drill with a pilot hole and countersink bit to pre-drill the holes and a drive bit to drive all the screws; and
- safety glasses.
As for size, workspace surface has to be proportional to the types of projects you want to build. Personally, I am just interested in smaller projects such as picture frames, desktop objects, boxes, and so on. If you want to build cabinetry and furniture, that will certainly influence the workbench size you need.
And remember: you can always graduate to a more traditional workbench later and leave this one for keeping your tool board and other benchtop tools such as a drill press, a grinder, or even a small jointer.
In case you don’t need the storage space, then you are better off building a simpler workbench – the plans I just linked use less wood and better joinery. You can also watch the construction:
If you still want another design option, take a look at my free set of plans for a garage workbench. Also, read my guide on choosing the perfect workbench height for you.
Essential Personal Protective Equipment
| What? | What is it for? | Why this one? |
|---|---|---|
| Homitt Sound Ear Muffs | Especially needed to block the noise produced when operating power tools | Good price, many good reviews, can be worn over safety glasses |
| Gateway Safety Cover2 Safety Glasses | Eye protection is a must in a wood shop, you never know when a piece of wood might fly into your face | Great value for the money, plus they can be worn over biggish prescription glasses - in case you are as blind as I am |
| GVS SPR457 Elipse P100 Half Mask Respirator | Very important, especially if you are around chemical finishings or producing too much dust with power tools | Comfortable, lightweight, great seal even for bearded users; the P100 is the highest rating for personal respiratory protection |
And Before Starting, Remember:
Safety is everything.
Use personal protective equipment. There are many models of safety glasses available and you are bound to find something good and inexpensive, which will protect your eyesight from eventual accidents. Hearing protection is also essential if you are operating power tools – saws, grinders, drills, anything. Wear a dust mask over your nose and mouth to avoid breathing particles of whatever material you are working with. The US Department of Labor has a good starting guide on woodworking hazards.
Use properly sharpened tools. A dull tool is the first step to you over-applying force in some random way you weren’t meant to. Then the tool will escape your control and fall. It could be just a broken tool, which you can solve with cash and some online shopping, or the tool could fall on you and break/cut/shock you, and you could end up in the hospital for something completely avoidable.