
How To Build A Garden Shed (click for free plans & detailed photos)
The number one pastime in America? It’s not jogging, bowling or collecting Elvis memorabilia. It’s puttering in our yards and gardens. And we putter with a vengeance. Flowers, grass, and vegetables over-take our yards. Tillers, trimmers and tomato stakes overrun our garages.
Sometimes half the battle is just finding and untangling things before we can get down to pleasure (or business, as the case might be).
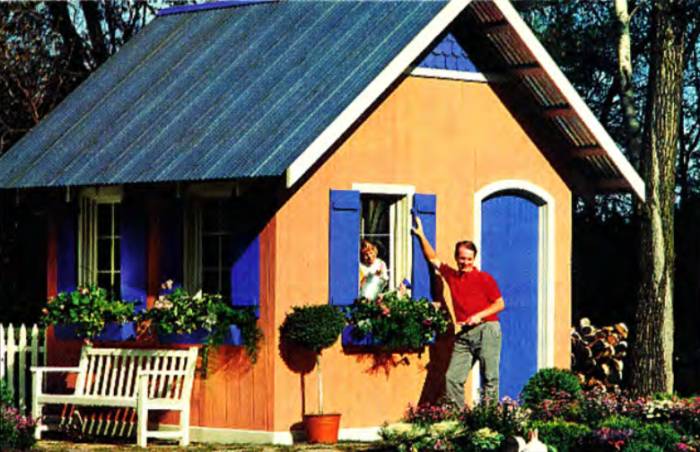
What you need is a shed big enough to hold all your stuff, sturdy enough to last for generations, and quaint enough to be a place you’ll want to spend all afternoon. That’s the garden shed I’ll show you how to build.
What Makes This Garden Shed Unique?
Those slap-‘em-up storage sheds displayed in home center parking lots across America are quickly built and affordable but are notoriously boxy, flimsy and small.
This shed, by comparison, is sturdy, attractive and unique from floor to roof. It includes:
- A post-supported wood floor. It allows you to build the shed on a slope, low area or the top of a hill.
- A metal roof. The old-fashioned corrugated roofing may have caught your eye first. But the underlying framework — the hand-built roof trusses and support purlins — are part of this unique building system too.
- A Dutch door. Part window, part door; this arched-top door is functional. But most people will build it simply because they love the quaint look.
This shed isn’t for those who need quick storage in a weekend. It’s for those willing to invest the time, money and energy to create a permanent, well-built structure.
Altering This Garden Shed Design
This design features a 10x12-ft. shed with three windows and a 3-ft. wide door; you may have different needs or ideas.
You can change this design in the following ways:
- Shed size. You can lengthen the 10-ft. side of the shed as long as the perimeter beam is supported by additional posts (with a 6-ft. maximum spacing). However, increasing the width of the 12-ft. side requires changing the truss design.
- Door and window size. You can install wider windows and doors, but you must increase the header size (Photo 9). Your building inspector or a structural engineer should be consulted before you modify the plans.
- Metal roofing. Various colors and styles are available. The 18-in. purlin spacing (Photo 13) we used will support most types of metal roofing, but consult the roof-ing manufacturer before making changes. You can also use more, or longer, translucent roof panels (Photo 15) to bring in more light.
Material Matters: Plan Ahead
You need to track down or special order a few oddball items:
The metal corrugated roofing is stocked at some home centers and lumberyards, but you may need to order it through a metal building supplier (search for metal building specialists, roofing materials stores, siding material distributors). This is also the time to order the special roof nails (Photo 14), ridge cap and foam strips (Photo 16).
The 6x6 posts that support the floor must be pressure treated to a .60 or “foundation grade” level. Common 6x6 landscape timbers (usually treated to .40) are less resistant to rot and insects. Buy your posts from a lumberyard or metal roofing supplier; if they specialize in farm building materials, they’ll have access to them.
The floor framing and plywood, which is open to the ground below (but in this design, isn’t in direct contact with the ground), should be pressure treated to .25 or “above ground” levels.
What Does It Take To Build This Garden Shed?
This isn’t a project for the novice; you’ll need to feel comfortable working with angles, power tools, heights, and the trials of a long project.
On the other hand, you’re not building a nuclear reactor. If you’ve built a deck or undertaken a large remodeling project, you can handle this one — no sweat.
How Long Will It Take To Build This Garden Shed?
Working mostly alone, you could easily spend a total of six weekends, splitting a weekend each on:
- constructing the platform floor
- cutting and building the trusses
- building the walls
- installing trusses and roofing
- installing the siding
- building the doors, windows, and workbench. And painting.
How Much Will It Cost To Build A 10x12 Shed?
The total cost to build this garden shed varies between $2,400 and $2,900.
The material costs were the following:
- $505 for the bagged concrete and pressure-treated posts, lumber, and plywood used for the floor;
- $600 for the 2x4s, 2x6s and plywood used to build the walls and roof system;
- $280 for the metal roofing, ridge cap, skylight panels and nails;
- windows were an irresistible $25 each, for a total of $75; and
- hardware and paint added $240.
The total cost for the rough structure at about $1,700.
I also splurged and spent $1,200 for the clear cedar used for siding, fascia, doors, shutters and outside trim – you could get by for half that by using knotty cedar or pine.
For the exact cost of materials, bring the illustration of the shed (fig. A) and materials list to a full-service lumberyard where they’ll make up a cost estimate for you.
What Tools Do I Need To Build This Garden Shed?
You’ll need just basic tools:
- circular saw
- drill
- 4-ft. level, and
- standard hand tools.
Sturdy step and extension ladders, plus a set of metal roofing brackets, are a must.
Do I Need A Permit Before Building A Shed In My Backyard?
Most communities have regulations on “outbuildings” such as this. Some have strict ordinances as to the size and style of sheds; you’ll need to submit plans, purchase a building permit, and have your project inspected as you proceed. Other areas won’t require a permit at all unless the shed exceeds a certain number of square feet (often around 100).
Permit or not, almost every community has setback regulations governing how far from the property line the shed can be located.
Call your local building inspector to let him or her know what you’re planning to build.
Also ask your local utility companies to come out and mark underground electrical, telephone, gas or water lines. This project requires digging, hitting one of these lines can be dangerous (and expensive)!
Ground Work
Use a garden hose to loosely outline the shape of your shed. Move it around until you find the best space in your yard, then remove the sod from the shed’s footprint with a square-nose shovel.
Next, establish the corners of the shed. It’s important to lay out an exact rectangle with square corners; everything from your floor plywood to the metal roof panels will give you fits if you cheat on this step.
The key is to use batter boards (Photo 1). Drive in a trio of 2x2 stakes about 1 ft. beyond each approximate shed corner. Connect these stakes with 2-ft. long 1x2s. Stretch a string between the batter boards to establish one shed side, then stretch a line exactly parallel to this 10 ft. away to indicate the opposite wall (the batter boards let you slide the string along the 1x2 to fine-tune the distances).
Use a carpenter’s square to position a third-string roughly perpendicular to the first two. Set this third line exactly square by marking 3 ft. along this string and 4 ft. along the adjacent string from where the two intersect.
Measure diagonally between the two marks (Photo 1) and move the third string (the hypotenuse) until you get a measurement of exactly 5 ft. between the two marks; this will give you a precise, square corner. Finally, set your fourth string parallel to the third.
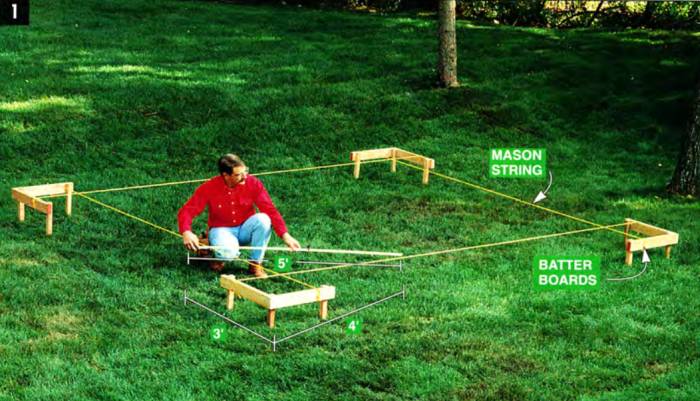
Check the shed’s perimeter for squareness. Measure 3 ft. and 4 ft. along intersecting strings, then shift the strings along the batter boards until you arrive at a 5-ft. hypotenuse.
Dig 12-in. dia. holes where the strings cross at each corner and at halfway points between. The depth of the holes will vary according to frost depth (how deep the ground freezes in your area). Consult your building inspector on this.
Mix concrete, then place enough at the bottom of each hole to create 8-in. thick pads (I used two 60-lb. bags of concrete mix per hole). Cover the holes with plywood so kids, frogs, and other critters don’t fall in, then let the concrete harden overnight.
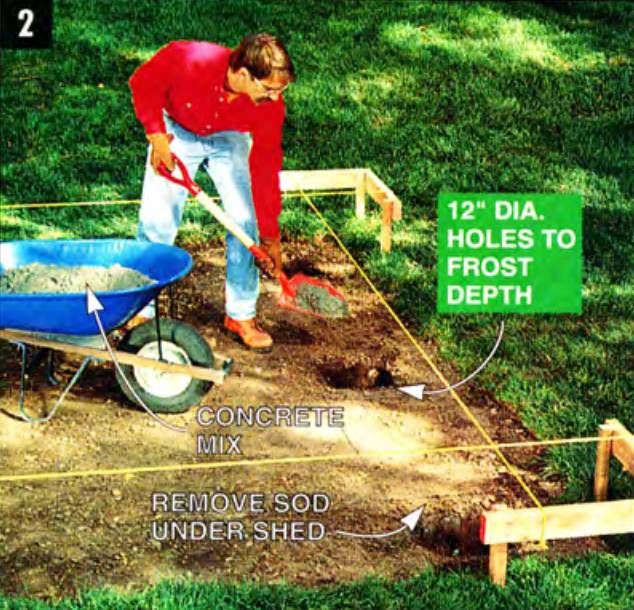
Shovel concrete into 12-in. dia. holes dug to frost depth. Add enough concrete to create an 8-in. thick pad. Let the concrete harden overnight.
Building The Floor
If you’ve built a deck, you’ll be familiar with this procedure.
Place a 6x6 treated post in the hole located at the highest ground level. Mark the post 2 in. above ground level, remove it from the hole, cut it to length, then place it back in the hole. Position the post’s outside corner exactly where the strings intersect, level it, then partially surround it with gravel.
Place an overly long post in another corner hole and use a level and straight 2x4 to mark it level with the top of the already installed post (Photo 3).
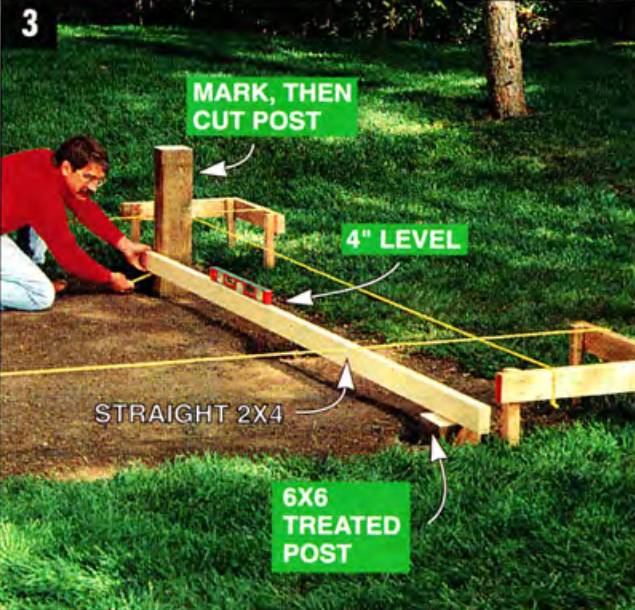
Mark the posts, then cut them at a uniform height. Set the post located at the highest corner of the site first, then use it as a reference to level from.
Withdraw this post, cut it to length, then reinstall it at the string intersection and partially fill the hole with gravel. Repeat this at all the corners.
Determine the height of the intermediate posts by placing overly long posts in the intermediate holes, stringing lines from corner post to corner post, then marking and cutting the posts level with the corner posts they’re located between.
Cut and install the pressure-treated 2x8s that create the double beam perimeter (Fig A).
Fig. A: Shed Overview
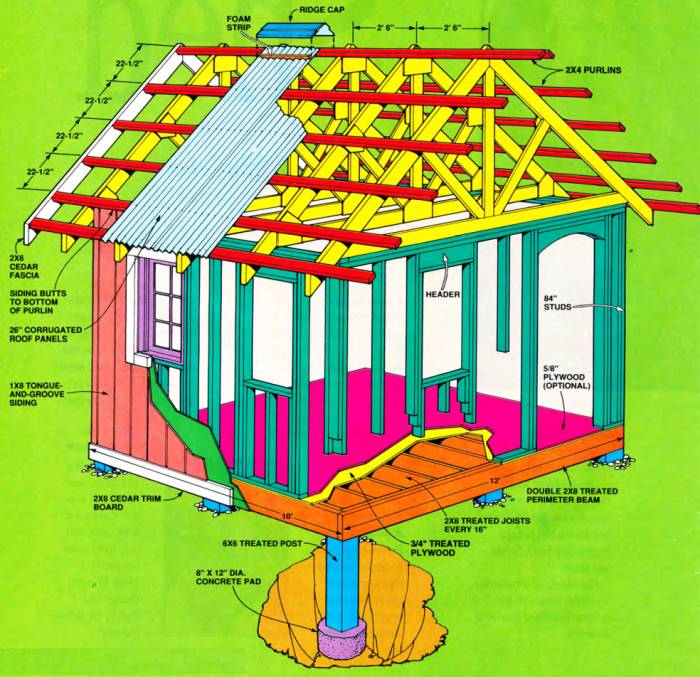
Fasten the 2x8s to the 6x6 posts with 16d galvanized nails driven at an angle (toenailed). Mark the location of the 2x8 joists on the 12-ft. long perimeter beams, with the centers of the joists positioned every 16 in.
Nail each joist to its mark with a couple of 8d nails, then secure them to the beam with joist hangers (Photo 4). Use special joist hanger nails; ordinary or shingle nails aren’t strong enough.
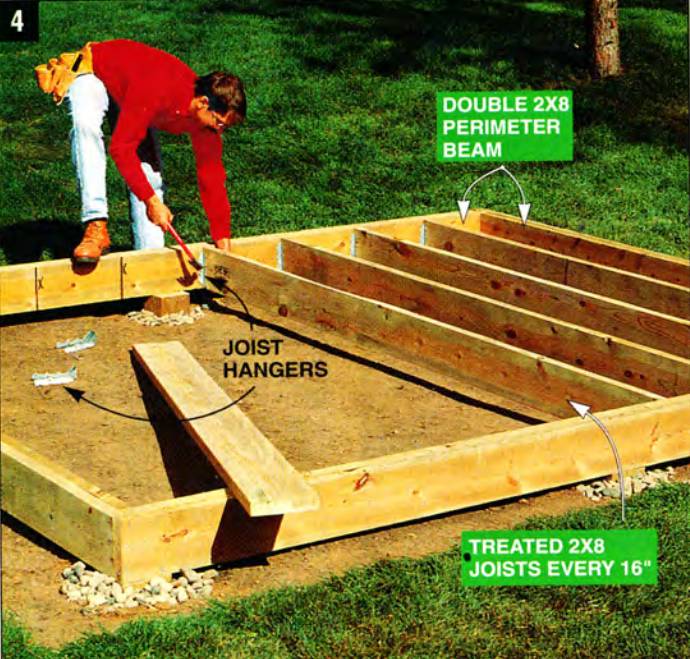
Build the framework for the platform floor. First, install the double 2x8 perimeter, then secure the treated joists every 16 in. using joist hangers.
Nail the 3/4-in, treated plywood flooring to the joists (Photo 5). Stagger the joints so the ends of the plywood don’t end up on the same joist.

Install the 3/4-in. treated plywood floor using 8d galvanized nails. Stagger the ends on different joists for the greatest strength.
Building The Trusses
You may be thinking, “Wait a minute, we’re leaving out a critical part here — the walls.” You’re right, but the smooth, flat platform you just finished provides the ideal place to build the roof trusses.
Cut the 2x6s, 2x4s, and 1/2-in. plywood needed to build one “test” roof truss (Fig. 13).
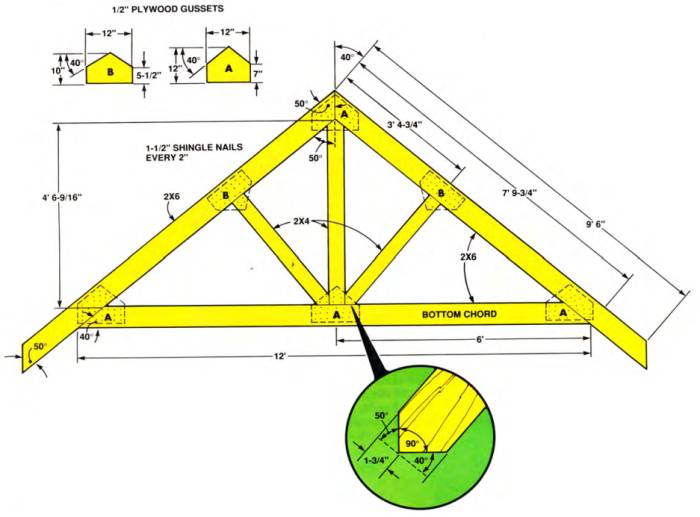
Fig. B: Truss Detail
Use a saw protractor or Speed square to mark the angles. Select straight boards for this since you’ll be using these pieces as patterns; severely bowed ones will make joints and angles look like they don’t fit when they really do.
Position the 2x6s into a triangular shape (with overhanging tails), insert the shorter 2x4s and check the fit. If an angle or joint appears radically wrong, check the individual pieces again to make sure you haven’t turned a 40-degree angle into a 50-degree angle or vice versa (a common mistake).
Once your test truss fits together, use the individual pieces as patterns to trace identical pieces for the other four trusses (Photo 6).
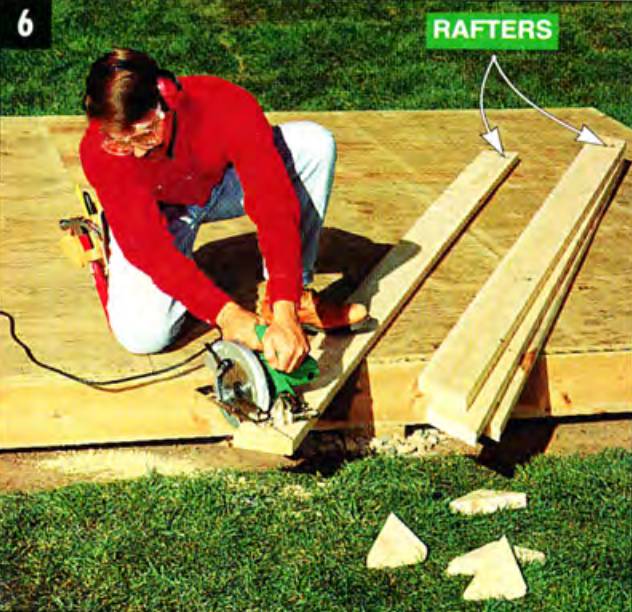
Precut the truss components to length. First cut all the pieces for one truss and assemble it. Check it for accuracy, then use the individual pans as patterns.
Lay out the components for a truss on the floor, then use plywood gussets to secure the pieces to one another (Photo 7).
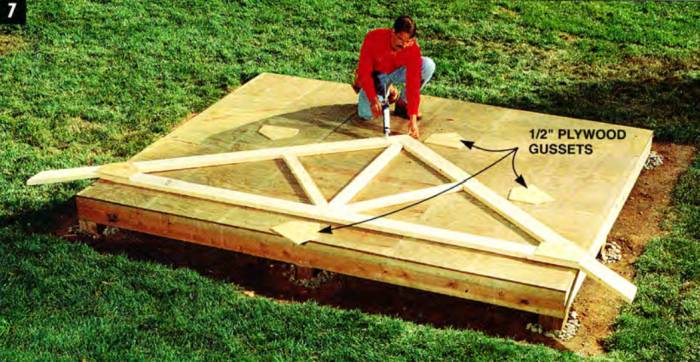
Assemble the trusses using the floor as an assembly table. Glue and nail the plywood gusset plates on both sides where the 2x4s and 2x6s join. Set the completed trusses aside on a flat area.
Plywood gussets, with a large nailing surface, are a strong, convenient method of joining truss components (direct nailing would only splinter the ends of the boards and weaken the truss).
Use construction adhesive and 1-1/2 in. shingle nails to secure all six gussets on one side, then carefully flip the truss over and glue and nail the gussets to the other side on three trusses. (Leave off the gussets on one face of the two gable trusses so they don’t interfere with the outer plywood sheathing.)
As you complete each truss, stack it on a flat surface off the platform.
All Right! Not The Walls
Cut to length and temporarily nail together four pairs of 2x4 nailing plates (Photo 8).
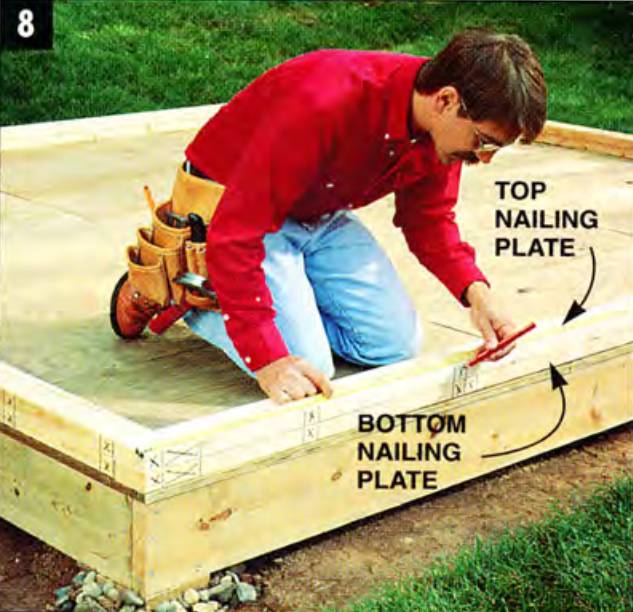
Mark the position of the studs, doors, and windows on the double sets of nailing plates. Locate the 7-ft. studs every 16 in.
Two pairs are 12 ft. long and two pairs are 9 ft., 5 in. (10 ft. minus two 3-1/2 in. wide walls).
Mark the position of the windows and doors and use a square to transfer the marks onto both top and bottom nailing plates.
Mark the stud locations every 16 in.
Split apart one pair of nailing plates and “fill in the blanks” with studs, cripples, trimmers, and headers (Photo 9).
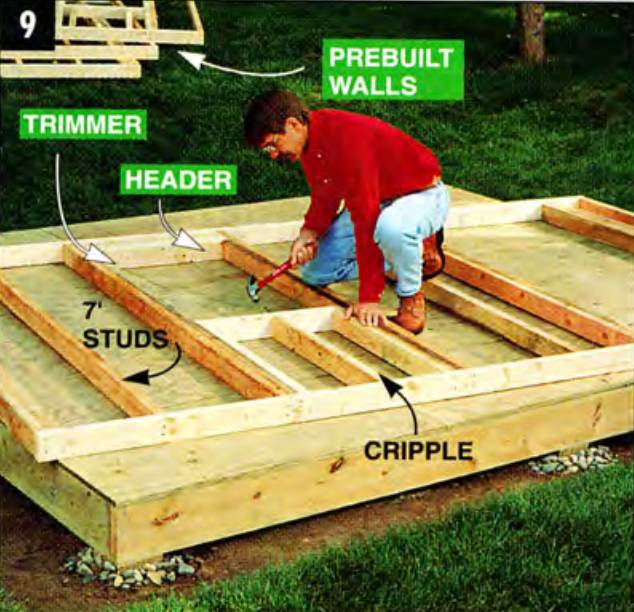
Nail the walls together. Install headers and trimmers at all door and window openings for support.
Secure each 7-ft. stud with two 16d nails at each end. Again, use the wood floor as a building stage, carrying each completed wall off to make room for the next.
When all four walls are built, stand them in place. Nail them to the platform with 16d nails, then to each other at the corners. With an assistant holding a 4-ft. level at the corner, nail diagonal cross braces to hold the walls vertical.
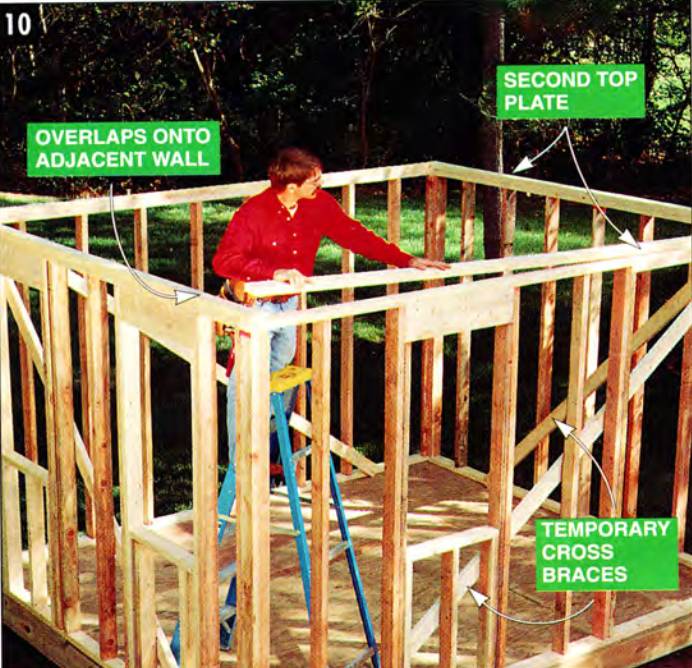
Secure walls to one another. Nail corners together, then level and hold them vertical with cross braces. Add a second top plate for strength.
Install the overlapping top plates (Photo 11) to lock the wall tops to one another, then cut and install ply-wood sheathing to complete the rough wall framing.
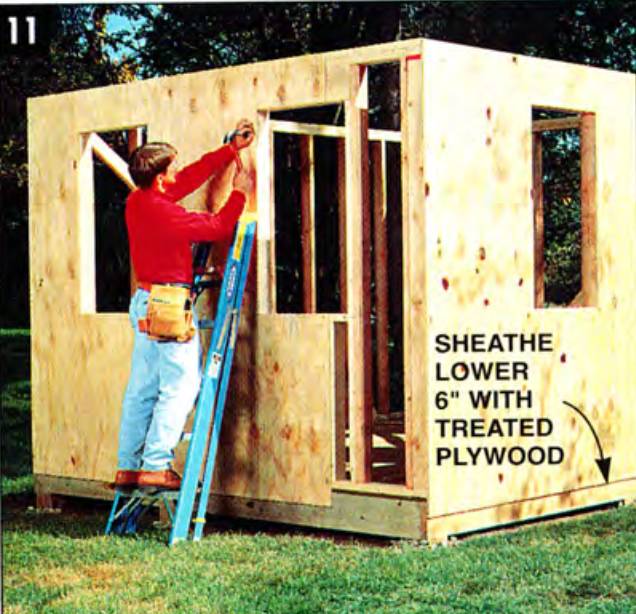
Sheathe walls with 1/2-in. plywood (or wafer board). Overlap plywood onto 2x8 platform perimeter and nail to firmly anchor walls to floor.
Trusses And Purlins
This metal roof involves more than nailing down steel panels in place of asphalt shingles; it’s an entire system.
The trusses are sturdier than ordinary rafters, but spaced farther apart; 2x4 purlins, rather than sheets of plywood, are used to support the metal; and the 2-ft. wide roofing panels are installed with special nails. It’s a system often used for agricultural buildings and pole barns.
The completed building isn’t as weathertight as “normal” buildings, and finishing the interior is difficult (but usually isn’t done anyway), but it’s a quick, economical way to build a sturdy structure.
Installing your prebuilt trusses is a two-person job — better yet, a three- or four-person job. First, make marks along the tops of the 10 ft. long walls at
- 2 ft., 6 in.;
- 5 ft.; and
- 7 ft., 6 in.,
so you know where to position the three intermediate trusses.
Lift the two end trusses into place and nail them even with the wall framing. Use a level to plumb them, then temporarily brace them to the floor with long 2x4s. Slide the intermediate trusses onto the walls (Photo 12).
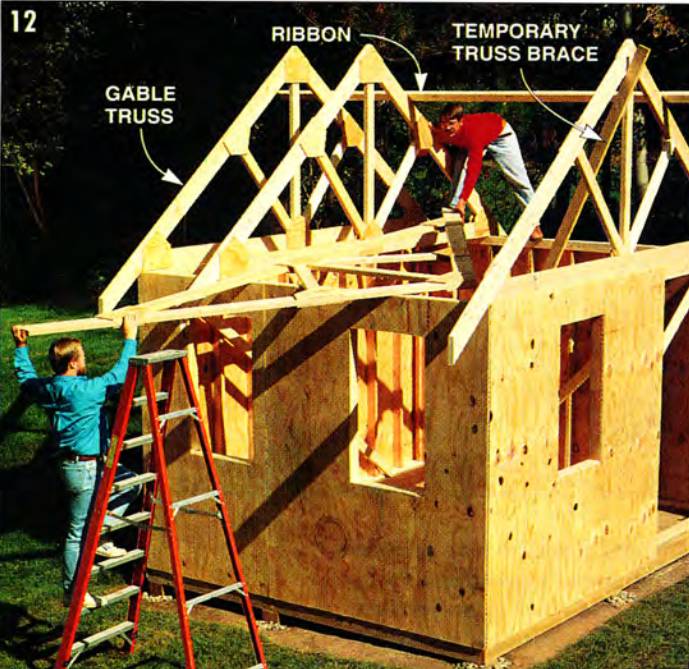
Lift trusses in place and nail to wall tops. Set and brace both gable-end trusses first. Then position and nail intermediate trusses to the 2x4 ribbon.
Lift each peak and nail it to a 2x4 ribbon marked at the same intervals as the wall tops. Toenail the trusses to the walls, keeping the ends of the 12-ft. bottom board (chord) even with the outside of the wall framing.
Next “mass mark” all 12 purlins and five trusses. Mark the location of each purlin (Fig. A) on both end gables, then snap chalk lines so all the trusses have identical marks on them. Next, measuring from the end of one 2x4 purlin, mark the length of the front gable overhang, the position of the five trusses and the length of the back gable overhang.
Use this as a pattern for marking the other purlins. Nail the purlins to the trusses, using the layout marks on each as a guide. Take special care to position the second purlin from the bottom, so the siding can butt directly to the bottom of it.
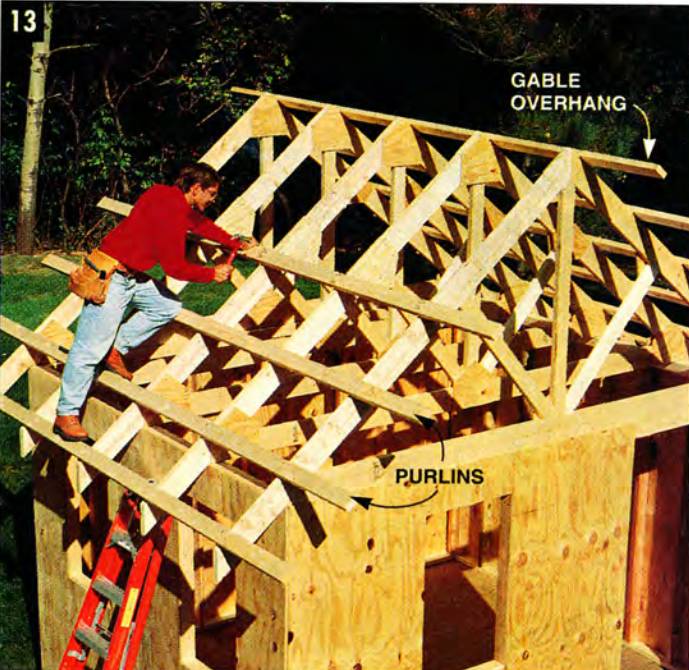
Nail the purlins to the trusses with 16d nails, making sure the overhang remains consistent. Use installed purlins for a ladder as you work.
Finally, nail the 2x6 cedar fascia (Photo 14) across the free ends of the purlins.
Metal Roofing
First, determine the overall length of the roof panels. They should fall short of the peak by about an inch (the ridge cap will cover the gap) and run past the truss tails another inch (for protection).
Cut the metal roofing with a circular saw and special metal-cutting blade or with aviation snips. Lots of old-timers use a plain steel blade turned backward in a circular saw for cutting — but it’s noisy, sparky and I don’t recommend it.
Position the first panel so it overhangs the fascia by about 1/2 in. Secure the panel to the purlins by driving the special nails through every third “peak” in the corrugated roofing. Don’t install nails in the very last peak, where the next piece will overlap it. Pound in each nail until the washer flattens out to seal around the nail-head (Photo 14).
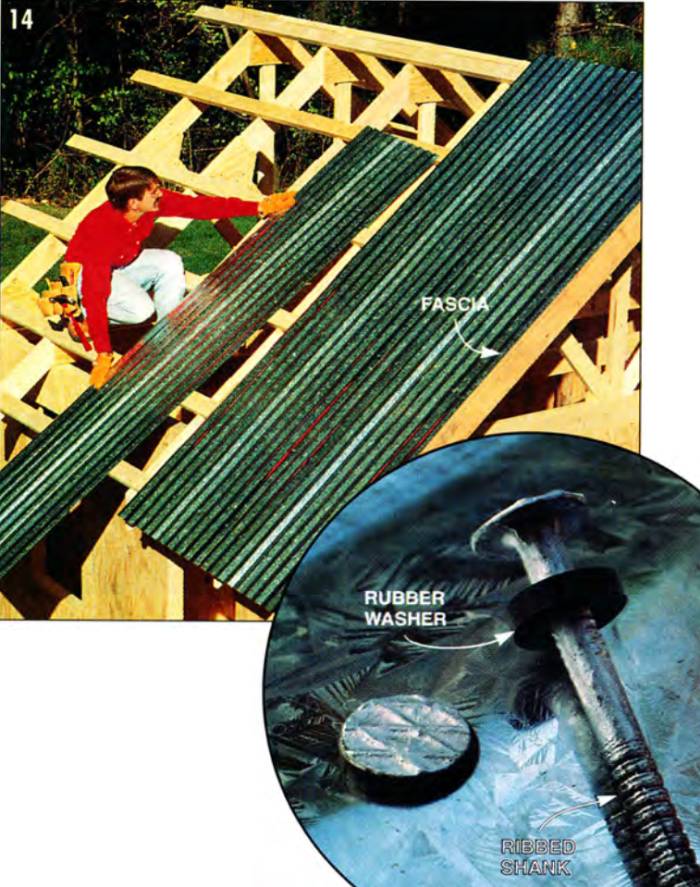
Secure the metal panels to the purlins using special nails. Overlap sheets by one corrugation. The rubber washer flattens and seals around the nail hole.
Predrill the holes if you have trouble driving in the nails without crushing the metal.
This can be a problem, especially near ends and edges. If you do distort the metal, wedge a small pry bar between the purlin and back side of the sheet to pop it back out. Installing metal roofing is noisy; keep peace with your neighbors by not doing this early on a Sunday morning.
Self-tapping metal screws with washers can also be used to secure the panels.
Overlap the next panel onto the one just installed by one rib (Fig. A). Drive nails into the purlins at that over-lap and every third peak after that. The purlins provide a convenient ladder to work from, so complete all your nailing before you move on to the next panel. When you reach the far end, either cut your panel to the width or increase the overlap so it fits.
To install translucent sky-light panels, first cut and install the small bottom metal panel. Overlap the translucent panel 3 in. onto it (breaking the seams on purlins, as shown in Photo 15) then install the top metal panel, overlapping the trans-lucent panel again by 3 in.
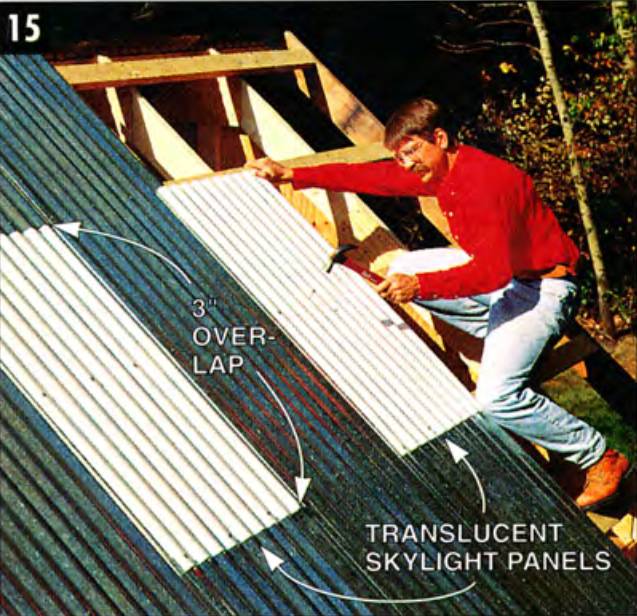
Install translucent skylight panels, overlapping them onto lower metal panels by 3 or 4 in. Start and stop all panel ends on purlins.
Install the ridge cap and foam strips (Photo 16) to keep driving rains and insects out and complete the peak.
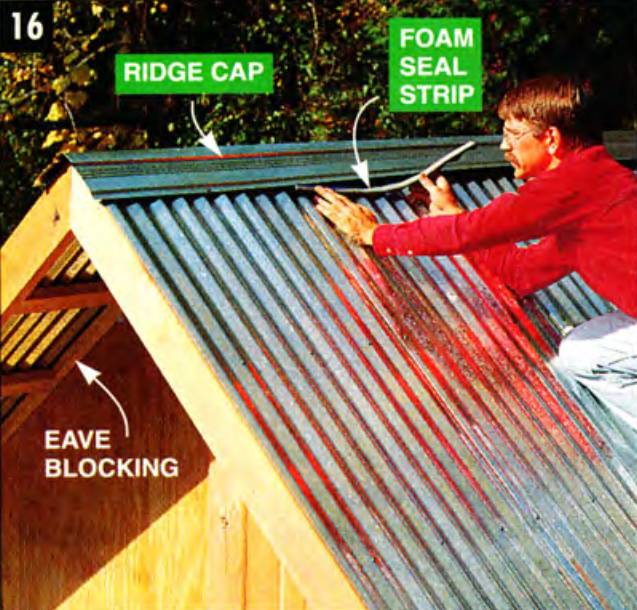
Add ridge cap and foam strip to keep out rain and insects. Nail cap into every third rib. The 2x4 eave blocking at the top of the wall seals gable ends.
Tuck each 2-ft. long seal strip between the ridge cap and metal panel, then nail the ridge at every second or third peak. To reach the peak, secure triangular roof brackets through the metal roofing and into the purlins using rubber washer nails.
Lay 2x6s across the brackets to stand on. When finished, remove the brackets and pound in the nails. Metal roofing is slippery, especially on steep slopes like this — don’t take chances!
DIY Double Dutch Door
Study Fig. C, Photos 17 through 19 and the text below, then mentally walk through this door project.
If you understand the basic procedure (it is out of the ordinary), give it a whirl — you’ll be rewarded with a door that’s quaint, unusual, even functional. But if you’re not sure, use a square or pre-hung exterior door — they install quickly, are secure and when painted, still look pretty darn good.
Begin by drawing a 36-in. radius arc on two 2x8s. Cut them to shape with a jigsaw, then nail them into the door opening so each is flush with one side of the 2x4 framing.
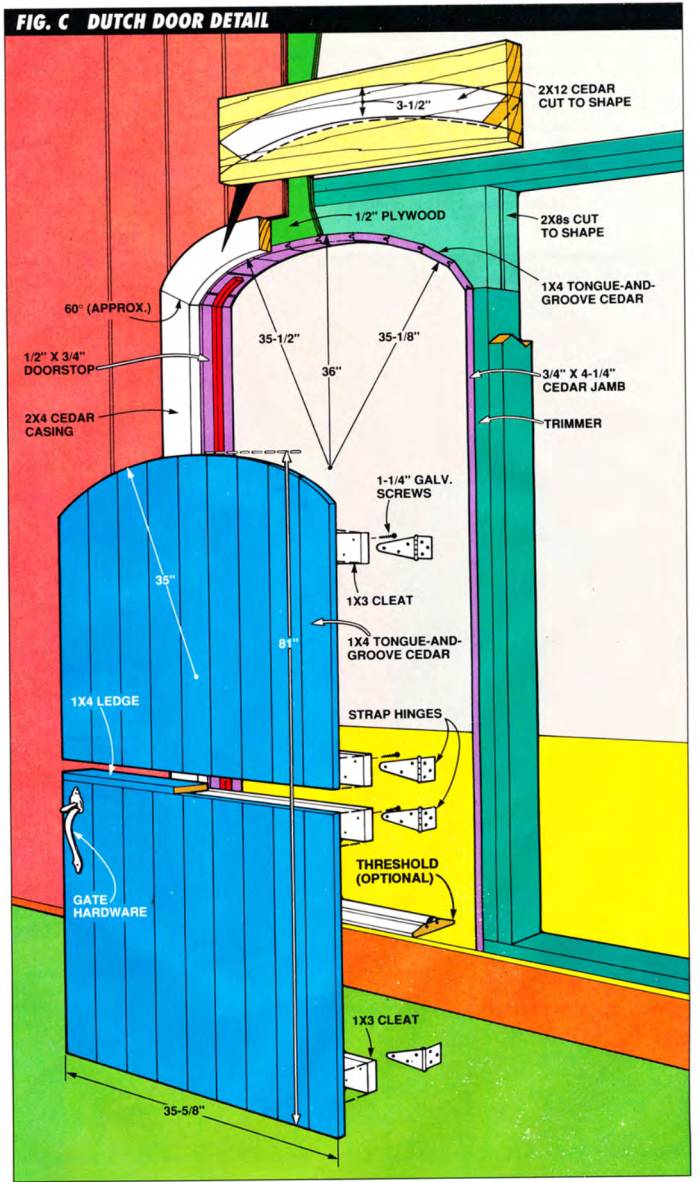
Fig. C: Dutch Door Detail
Sheathe the outer curved 2x8 with 1/2-in. plywood. Nail the two cedar side jambs in place. Create the top jamb by nailing tongue-and-groove cedar lx4s, each 4-1/4 in. long, to the bottom of the curve (Photo 18).
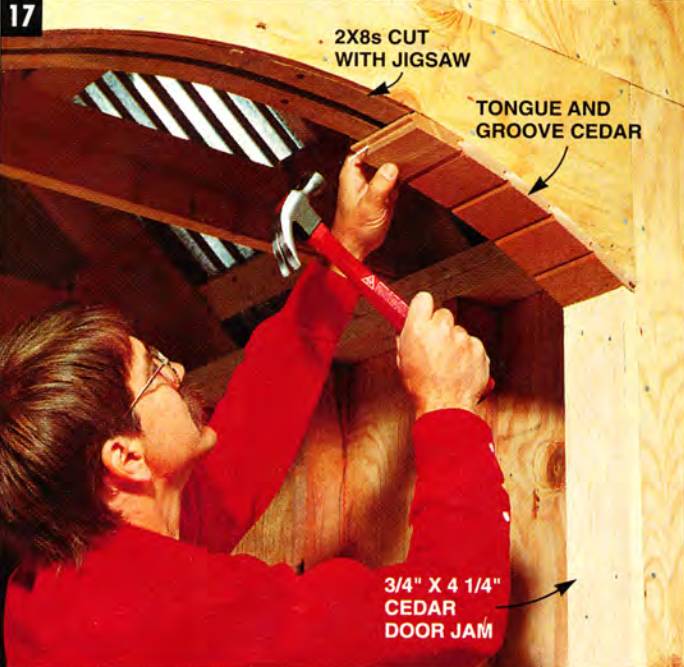
Create the framework and jamb for the arched-top Dutch door. Short pieces of tongue-and-groove cedar conform to the curve of the arch.
Nail the 2x4 cedar door trim along each side. Create the top trim by cutting a cedar 2x12 into a “curved 2x4” as shown in Fig. C. Add the 1/2 x 3/4-in. doorstops as shown in Photo 18.

Install the doorstop and exterior casing. Soak doorstop in water and fabric softener to increase flexibility. The arched casing is cut from 2x12 cedar.
Soak the upper piece in warm water and fabric softener for 30 minutes beforehand to make it more flexible.
Build the double door by first creating an oversized one-piece door, then cutting it to size and then finally in half. Secure a dozen 7-ft. long tongue-and-groove 1x4s to one another using four 1x3 battens and galvanized dry-wall screws.
Position the middle two battens 36 and 37 in. from the door bottom. Place this oversized door blank in the door opening and trace the opening’s shape onto it. Cut the curved top with a jigsaw (Photo 19).
Cut door to size. First, copy the outline of opening onto door blank by holding it in the opening, then trace. Cut the curved top, then cut the door in half between the middle two battens.
Use a circular saw to cut the door to width, then make two cuts to remove the 1-in. space between the two middle battens. Secure the 1x4 ledge to the top of the lower door half. If you want a threshold, install a store-bought or DIY one, then cut off the bottom of the door accordingly.
Set the two door halves in the opening, use shims to separate the top and bottom doors by 1/4 in., then secure the door halves to the jamb with two pairs of strap hinges. Install gate hardware for the latch.
Simple Windows And Working Shutters
This project used inexpensive windows — barn sashes ($25 each) — secured to hand-built frames with hinges. They’re built and operate like a swinging door.
Use a portable table saw, hybrid table saw or hand plane to taper the bottom sill of the frame at 5 degrees to aid water run-off (Fig. D). Build the rest of the frame so the window will sit inside it with a 1/8-in. gap all around. Nail 3/4 x 3/4-in. cedar stops to the sides and top of the frame for the window to close against.
Secure the window to the window frame with face mount hinges (Photo 20), then set this pre-built unit in the window rough opening. Drive wood shims between the rough opening and the window’s frame so the 1/8-in. gap remains even around the window sash, then nail the window frame to the surrounding framework.
Secure the handle and simple hook-and-eye latch. Nail 2x4 cedar boards around the outside for trim.
Screw hinges to the barn sash and window frame. Leave a 1/8-in. gap on all sides so the window can open and close freely. Shim and nail the entire unit into rough window opening.
The shutters are decorative, but with the use of pintle hinges (Fig. D), can be closed to protect the glass and secure the shed during the off-season. (Pintle hinges can be found in the gate hardware section of your home center.)

Fig. D: Window And Shutter Detail
Build the shutters from three tongue-and-groove cedar boards, fastened side by side, using galvanized screws and 1x3 cleats. Use lag bolts to secure the “spool” part of the pintle hinges to the back side of the shutter and screw the two pins into the window casing.
Position these so the closed shutter will overlap onto the 2x4 cedar casings by about 1 in. Slide the spool over the pin to mount the shutter. Keep them flat against the shed with shutterdogs.
Siding And Fancy Cuts
You could apply lap or sheet siding like T1-11, but vertical tongue-and-groove siding gave us the look we wanted. Install the cedar boards starting from the corner. Leave the tongue edge exposed for nailing and for the groove of the next board to slide over (Photo 21).

Install the tongue-and-groove siding, cutting notches for rafter tails and the door and window trim. Nail siding to studs with 8d galvanized casing nails.
Notch the boards to slide up and around the rafter tails or around the windows and doors as necessary. Let the siding “run wild” (extra-long at the bottom), then go back, snap a chalk line on the siding 5 in. up from the bottom of the plywood wall sheathing and trim with a circular saw. Nail 2x6s to cover the end grain at the bottom of the siding.
The geometric shingles, shown in Photo 22, are purely for decoration. Use them as accents at gable ends or below windows. They’re available in a variety of shapes and can be applied in many eye-catching patterns.
Nail the decorative shingles on gable ends. Apply two coats of paint, stain or clear preservative to all siding, then caulk.
Preserve the natural appearance of the cedar by coating it with clear wood finish — or prime the exterior, then paint it with two coats of high-quality latex paint.
The Shed Interior
For a solid, smooth floor, add a layer of 5/8 in. plywood over the treated plywood. Stagger the seams and secure it to the joists with 2-in. drywall screws.
Paint the floor to protect it from water and gardening messes.
Prime and paint the interior walls to brighten them and cover the inevitable lumber stamps and color variations.
Customize the interior of your shed with workbenches, shelves, hooks, storage bins, and cabinets (click here for more ideas and detailed instructions).

The space above and between the trusses can be used to store lightweight, seldom used items. Electricity and water can be run to the shed for your convenience.
Kick back and light up a carrot — you’re done.

Materials List
| QTY. | DIMENSIONS | ITEM |
|---|---|---|
| 4 | 6x6 x 8' | .60 pressure-treated lumber |
| 12 | 2x8 x 10' | .40 pressure-treated lumber |
| 4 | 2x8 x 12' | .40 pressure-treated lumber |
| 4 | 3/4" x 4x8 | Pressure-treated plywood |
| 50 | 2x4 x 7' | Pine studs |
| 17 | 1/2" x 4x8 | CDX plywood |
| 15 | 2x4 x 10' | Pine |
| 12 | 2x4 x 12' | Pine |
| 12 | 2x4 x 14' | Pine |
| 12 | 2x6 x 10' | Pine |
| 5 | 2x6 x 12' | Pine |
| 14 | 26" x 10' | Metal roof panels |
| 1 | 26" x 10' | Translucent panels |
| 14 ft. | Metal ridge cap | |
| 28 ft. | Foam sealing strips | |
| 6 | 1x6 x 12' | Cedar |
| 5 | 2x4 x 12' | Cedar |
| 4 | 2x6 x 10' | Cedar |
| 1 | 2x12 x 4' | Cedar |
| 160 li. ft. | 3/4" x 4" | T&G cedar |
| 800 li. ft. | 3/4" x 6" | T&G cedar |
| 3 | 22" x 41" | Window sash |
| 16 | Single joist hangers | |
| 16 | 60-lb. bags | Concrete |
| 20 lbs. | 16d | Common nails |
| 15 lbs. | 8d | Galvanized siding nails |
| 15 lbs. | Gasketed roofing nails | |
| 10 lbs. | 1-1/2" | Shingle nails |
| Construction adhesive | ||
| Pintle hinges | ||
| Door & window hardware | ||
| Geometric cedar shingles | ||
| Paint | ||
| Caulk | ||
| Misc. | Nails | |
| Misc. | Screws | |
| Misc. | Bolts |
Note: This is a close estimate of the materials used for the shed. Temporary braces, mistakes, bad lumber and building methods will alter the amount of material actually needed.
The number one pastime in America? It’s not jogging, bowling or collecting Elvis memorabilia. It’s puttering in our yards and gardens. And we putter with a vengeance. Flowers, grass, and vegetables over-take our yards. Tillers, trimmers and tomato stakes overrun our garages.
Sometimes half the battle is just finding and untangling things before we can get down to pleasure (or business, as the case might be).
What you need is a shed big enough to hold all your stuff, sturdy enough to last for generations, and quaint enough to be a place you’ll want to spend all afternoon. That’s the garden shed I’ll show you how to build.
What Makes This Garden Shed Unique?
Those slap-‘em-up storage sheds displayed in home center parking lots across America are quickly built and affordable but are notoriously boxy, flimsy and small.
This shed, by comparison, is sturdy, attractive and unique from floor to roof. It includes:
- A post-supported wood floor. It allows you to build the shed on a slope, low area or the top of a hill.
- A metal roof. The old-fashioned corrugated roofing may have caught your eye first. But the underlying framework — the hand-built roof trusses and support purlins — are part of this unique building system too.
- A Dutch door. Part window, part door; this arched-top door is functional. But most people will build it simply because they love the quaint look.
This shed isn’t for those who need quick storage in a weekend. It’s for those willing to invest the time, money and energy to create a permanent, well-built structure.
Altering This Garden Shed Design
This design features a 10x12-ft. shed with three windows and a 3-ft. wide door; you may have different needs or ideas.
You can change this design in the following ways:
- Shed size. You can lengthen the 10-ft. side of the shed as long as the perimeter beam is supported by additional posts (with a 6-ft. maximum spacing). However, increasing the width of the 12-ft. side requires changing the truss design.
- Door and window size. You can install wider windows and doors, but you must increase the header size (Photo 9). Your building inspector or a structural engineer should be consulted before you modify the plans.
- Metal roofing. Various colors and styles are available. The 18-in. purlin spacing (Photo 13) we used will support most types of metal roofing, but consult the roof-ing manufacturer before making changes. You can also use more, or longer, translucent roof panels (Photo 15) to bring in more light.
Material Matters: Plan Ahead
You need to track down or special order a few oddball items:
The metal corrugated roofing is stocked at some home centers and lumberyards, but you may need to order it through a metal building supplier (search for metal building specialists, roofing materials stores, siding material distributors). This is also the time to order the special roof nails (Photo 14), ridge cap and foam strips (Photo 16).
The 6x6 posts that support the floor must be pressure treated to a .60 or “foundation grade” level. Common 6x6 landscape timbers (usually treated to .40) are less resistant to rot and insects. Buy your posts from a lumberyard or metal roofing supplier; if they specialize in farm building materials, they’ll have access to them.
The floor framing and plywood, which is open to the ground below (but in this design, isn’t in direct contact with the ground), should be pressure treated to .25 or “above ground” levels.
What Does It Take To Build This Garden Shed?
This isn’t a project for the novice; you’ll need to feel comfortable working with angles, power tools, heights, and the trials of a long project.
On the other hand, you’re not building a nuclear reactor. If you’ve built a deck or undertaken a large remodeling project, you can handle this one — no sweat.
How Long Will It Take To Build This Garden Shed?
Working mostly alone, you could easily spend a total of six weekends, splitting a weekend each on:
- constructing the platform floor
- cutting and building the trusses
- building the walls
- installing trusses and roofing
- installing the siding
- building the doors, windows, and workbench. And painting.
How Much Will It Cost To Build A 10x12 Shed?
The total cost to build this garden shed varies between $2,400 and $2,900.
The material costs were the following:
- $505 for the bagged concrete and pressure-treated posts, lumber, and plywood used for the floor;
- $600 for the 2x4s, 2x6s and plywood used to build the walls and roof system;
- $280 for the metal roofing, ridge cap, skylight panels and nails;
- windows were an irresistible $25 each, for a total of $75; and
- hardware and paint added $240.
The total cost for the rough structure at about $1,700.
I also splurged and spent $1,200 for the clear cedar used for siding, fascia, doors, shutters and outside trim – you could get by for half that by using knotty cedar or pine.
For the exact cost of materials, bring the illustration of the shed (fig. A) and materials list to a full-service lumberyard where they’ll make up a cost estimate for you.
What Tools Do I Need To Build This Garden Shed?
You’ll need just basic tools:
- circular saw
- drill
- 4-ft. level, and
- standard hand tools.
Sturdy step and extension ladders, plus a set of metal roofing brackets, are a must.
Do I Need A Permit Before Building A Shed In My Backyard?
Most communities have regulations on “outbuildings” such as this. Some have strict ordinances as to the size and style of sheds; you’ll need to submit plans, purchase a building permit, and have your project inspected as you proceed. Other areas won’t require a permit at all unless the shed exceeds a certain number of square feet (often around 100).
Permit or not, almost every community has setback regulations governing how far from the property line the shed can be located.
Call your local building inspector to let him or her know what you’re planning to build.
Also ask your local utility companies to come out and mark underground electrical, telephone, gas or water lines. This project requires digging, hitting one of these lines can be dangerous (and expensive)!
Ground Work
Use a garden hose to loosely outline the shape of your shed. Move it around until you find the best space in your yard, then remove the sod from the shed’s footprint with a square-nose shovel.
Next, establish the corners of the shed. It’s important to lay out an exact rectangle with square corners; everything from your floor plywood to the metal roof panels will give you fits if you cheat on this step.
The key is to use batter boards (Photo 1). Drive in a trio of 2x2 stakes about 1 ft. beyond each approximate shed corner. Connect these stakes with 2-ft. long 1x2s. Stretch a string between the batter boards to establish one shed side, then stretch a line exactly parallel to this 10 ft. away to indicate the opposite wall (the batter boards let you slide the string along the 1x2 to fine-tune the distances).
Use a carpenter’s square to position a third-string roughly perpendicular to the first two. Set this third line exactly square by marking 3 ft. along this string and 4 ft. along the adjacent string from where the two intersect.
Measure diagonally between the two marks (Photo 1) and move the third string (the hypotenuse) until you get a measurement of exactly 5 ft. between the two marks; this will give you a precise, square corner. Finally, set your fourth string parallel to the third.
Check the shed’s perimeter for squareness. Measure 3 ft. and 4 ft. along intersecting strings, then shift the strings along the batter boards until you arrive at a 5-ft. hypotenuse.
Dig 12-in. dia. holes where the strings cross at each corner and at halfway points between. The depth of the holes will vary according to frost depth (how deep the ground freezes in your area). Consult your building inspector on this.
Mix concrete, then place enough at the bottom of each hole to create 8-in. thick pads (I used two 60-lb. bags of concrete mix per hole). Cover the holes with plywood so kids, frogs, and other critters don’t fall in, then let the concrete harden overnight.
Shovel concrete into 12-in. dia. holes dug to frost depth. Add enough concrete to create an 8-in. thick pad. Let the concrete harden overnight.
Building The Floor
If you’ve built a deck, you’ll be familiar with this procedure.
Place a 6x6 treated post in the hole located at the highest ground level. Mark the post 2 in. above ground level, remove it from the hole, cut it to length, then place it back in the hole. Position the post’s outside corner exactly where the strings intersect, level it, then partially surround it with gravel.
Place an overly long post in another corner hole and use a level and straight 2x4 to mark it level with the top of the already installed post (Photo 3).
Mark the posts, then cut them at a uniform height. Set the post located at the highest corner of the site first, then use it as a reference to level from.
Withdraw this post, cut it to length, then reinstall it at the string intersection and partially fill the hole with gravel. Repeat this at all the corners.
Determine the height of the intermediate posts by placing overly long posts in the intermediate holes, stringing lines from corner post to corner post, then marking and cutting the posts level with the corner posts they’re located between.
Cut and install the pressure-treated 2x8s that create the double beam perimeter (Fig A).
Fig. A: Shed Overview
Fasten the 2x8s to the 6x6 posts with 16d galvanized nails driven at an angle (toenailed). Mark the location of the 2x8 joists on the 12-ft. long perimeter beams, with the centers of the joists positioned every 16 in.
Nail each joist to its mark with a couple of 8d nails, then secure them to the beam with joist hangers (Photo 4). Use special joist hanger nails; ordinary or shingle nails aren’t strong enough.
Build the framework for the platform floor. First, install the double 2x8 perimeter, then secure the treated joists every 16 in. using joist hangers.
Nail the 3/4-in, treated plywood flooring to the joists (Photo 5). Stagger the joints so the ends of the plywood don’t end up on the same joist.
Install the 3/4-in. treated plywood floor using 8d galvanized nails. Stagger the ends on different joists for the greatest strength.
Building The Trusses
You may be thinking, “Wait a minute, we’re leaving out a critical part here — the walls.” You’re right, but the smooth, flat platform you just finished provides the ideal place to build the roof trusses.
Cut the 2x6s, 2x4s, and 1/2-in. plywood needed to build one “test” roof truss (Fig. 13).
Fig. B: Truss Detail
Use a saw protractor or Speed square to mark the angles. Select straight boards for this since you’ll be using these pieces as patterns; severely bowed ones will make joints and angles look like they don’t fit when they really do.
Position the 2x6s into a triangular shape (with overhanging tails), insert the shorter 2x4s and check the fit. If an angle or joint appears radically wrong, check the individual pieces again to make sure you haven’t turned a 40-degree angle into a 50-degree angle or vice versa (a common mistake).
Once your test truss fits together, use the individual pieces as patterns to trace identical pieces for the other four trusses (Photo 6).
Precut the truss components to length. First cut all the pieces for one truss and assemble it. Check it for accuracy, then use the individual pans as patterns.
Lay out the components for a truss on the floor, then use plywood gussets to secure the pieces to one another (Photo 7).
Assemble the trusses using the floor as an assembly table. Glue and nail the plywood gusset plates on both sides where the 2x4s and 2x6s join. Set the completed trusses aside on a flat area.
Plywood gussets, with a large nailing surface, are a strong, convenient method of joining truss components (direct nailing would only splinter the ends of the boards and weaken the truss).
Use construction adhesive and 1-1/2 in. shingle nails to secure all six gussets on one side, then carefully flip the truss over and glue and nail the gussets to the other side on three trusses. (Leave off the gussets on one face of the two gable trusses so they don’t interfere with the outer plywood sheathing.)
As you complete each truss, stack it on a flat surface off the platform.
All Right! Not The Walls
Cut to length and temporarily nail together four pairs of 2x4 nailing plates (Photo 8).
Mark the position of the studs, doors, and windows on the double sets of nailing plates. Locate the 7-ft. studs every 16 in.
Two pairs are 12 ft. long and two pairs are 9 ft., 5 in. (10 ft. minus two 3-1/2 in. wide walls).
Mark the position of the windows and doors and use a square to transfer the marks onto both top and bottom nailing plates.
Mark the stud locations every 16 in.
Split apart one pair of nailing plates and “fill in the blanks” with studs, cripples, trimmers, and headers (Photo 9).
Nail the walls together. Install headers and trimmers at all door and window openings for support.
Secure each 7-ft. stud with two 16d nails at each end. Again, use the wood floor as a building stage, carrying each completed wall off to make room for the next.
When all four walls are built, stand them in place. Nail them to the platform with 16d nails, then to each other at the corners. With an assistant holding a 4-ft. level at the corner, nail diagonal cross braces to hold the walls vertical.
Secure walls to one another. Nail corners together, then level and hold them vertical with cross braces. Add a second top plate for strength.
Install the overlapping top plates (Photo 11) to lock the wall tops to one another, then cut and install ply-wood sheathing to complete the rough wall framing.
Sheathe walls with 1/2-in. plywood (or wafer board). Overlap plywood onto 2x8 platform perimeter and nail to firmly anchor walls to floor.
Trusses And Purlins
This metal roof involves more than nailing down steel panels in place of asphalt shingles; it’s an entire system.
The trusses are sturdier than ordinary rafters, but spaced farther apart; 2x4 purlins, rather than sheets of plywood, are used to support the metal; and the 2-ft. wide roofing panels are installed with special nails. It’s a system often used for agricultural buildings and pole barns.
The completed building isn’t as weathertight as “normal” buildings, and finishing the interior is difficult (but usually isn’t done anyway), but it’s a quick, economical way to build a sturdy structure.
Installing your prebuilt trusses is a two-person job — better yet, a three- or four-person job. First, make marks along the tops of the 10 ft. long walls at
- 2 ft., 6 in.;
- 5 ft.; and
- 7 ft., 6 in.,
so you know where to position the three intermediate trusses.
Lift the two end trusses into place and nail them even with the wall framing. Use a level to plumb them, then temporarily brace them to the floor with long 2x4s. Slide the intermediate trusses onto the walls (Photo 12).
Lift trusses in place and nail to wall tops. Set and brace both gable-end trusses first. Then position and nail intermediate trusses to the 2x4 ribbon.
Lift each peak and nail it to a 2x4 ribbon marked at the same intervals as the wall tops. Toenail the trusses to the walls, keeping the ends of the 12-ft. bottom board (chord) even with the outside of the wall framing.
Next “mass mark” all 12 purlins and five trusses. Mark the location of each purlin (Fig. A) on both end gables, then snap chalk lines so all the trusses have identical marks on them. Next, measuring from the end of one 2x4 purlin, mark the length of the front gable overhang, the position of the five trusses and the length of the back gable overhang.
Use this as a pattern for marking the other purlins. Nail the purlins to the trusses, using the layout marks on each as a guide. Take special care to position the second purlin from the bottom, so the siding can butt directly to the bottom of it.
Nail the purlins to the trusses with 16d nails, making sure the overhang remains consistent. Use installed purlins for a ladder as you work.
Finally, nail the 2x6 cedar fascia (Photo 14) across the free ends of the purlins.
Metal Roofing
First, determine the overall length of the roof panels. They should fall short of the peak by about an inch (the ridge cap will cover the gap) and run past the truss tails another inch (for protection).
Cut the metal roofing with a circular saw and special metal-cutting blade or with aviation snips. Lots of old-timers use a plain steel blade turned backward in a circular saw for cutting — but it’s noisy, sparky and I don’t recommend it.
Position the first panel so it overhangs the fascia by about 1/2 in. Secure the panel to the purlins by driving the special nails through every third “peak” in the corrugated roofing. Don’t install nails in the very last peak, where the next piece will overlap it. Pound in each nail until the washer flattens out to seal around the nail-head (Photo 14).
Secure the metal panels to the purlins using special nails. Overlap sheets by one corrugation. The rubber washer flattens and seals around the nail hole.
Predrill the holes if you have trouble driving in the nails without crushing the metal.
This can be a problem, especially near ends and edges. If you do distort the metal, wedge a small pry bar between the purlin and back side of the sheet to pop it back out. Installing metal roofing is noisy; keep peace with your neighbors by not doing this early on a Sunday morning.
Self-tapping metal screws with washers can also be used to secure the panels.
Overlap the next panel onto the one just installed by one rib (Fig. A). Drive nails into the purlins at that over-lap and every third peak after that. The purlins provide a convenient ladder to work from, so complete all your nailing before you move on to the next panel. When you reach the far end, either cut your panel to the width or increase the overlap so it fits.
To install translucent sky-light panels, first cut and install the small bottom metal panel. Overlap the translucent panel 3 in. onto it (breaking the seams on purlins, as shown in Photo 15) then install the top metal panel, overlapping the trans-lucent panel again by 3 in.
Install translucent skylight panels, overlapping them onto lower metal panels by 3 or 4 in. Start and stop all panel ends on purlins.
Install the ridge cap and foam strips (Photo 16) to keep driving rains and insects out and complete the peak.
Add ridge cap and foam strip to keep out rain and insects. Nail cap into every third rib. The 2x4 eave blocking at the top of the wall seals gable ends.
Tuck each 2-ft. long seal strip between the ridge cap and metal panel, then nail the ridge at every second or third peak. To reach the peak, secure triangular roof brackets through the metal roofing and into the purlins using rubber washer nails.
Lay 2x6s across the brackets to stand on. When finished, remove the brackets and pound in the nails. Metal roofing is slippery, especially on steep slopes like this — don’t take chances!
DIY Double Dutch Door
Study Fig. C, Photos 17 through 19 and the text below, then mentally walk through this door project.
If you understand the basic procedure (it is out of the ordinary), give it a whirl — you’ll be rewarded with a door that’s quaint, unusual, even functional. But if you’re not sure, use a square or pre-hung exterior door — they install quickly, are secure and when painted, still look pretty darn good.
Begin by drawing a 36-in. radius arc on two 2x8s. Cut them to shape with a jigsaw, then nail them into the door opening so each is flush with one side of the 2x4 framing.
Fig. C: Dutch Door Detail
Sheathe the outer curved 2x8 with 1/2-in. plywood. Nail the two cedar side jambs in place. Create the top jamb by nailing tongue-and-groove cedar lx4s, each 4-1/4 in. long, to the bottom of the curve (Photo 18).
Create the framework and jamb for the arched-top Dutch door. Short pieces of tongue-and-groove cedar conform to the curve of the arch.
Nail the 2x4 cedar door trim along each side. Create the top trim by cutting a cedar 2x12 into a “curved 2x4” as shown in Fig. C. Add the 1/2 x 3/4-in. doorstops as shown in Photo 18.
Install the doorstop and exterior casing. Soak doorstop in water and fabric softener to increase flexibility. The arched casing is cut from 2x12 cedar.
Soak the upper piece in warm water and fabric softener for 30 minutes beforehand to make it more flexible.
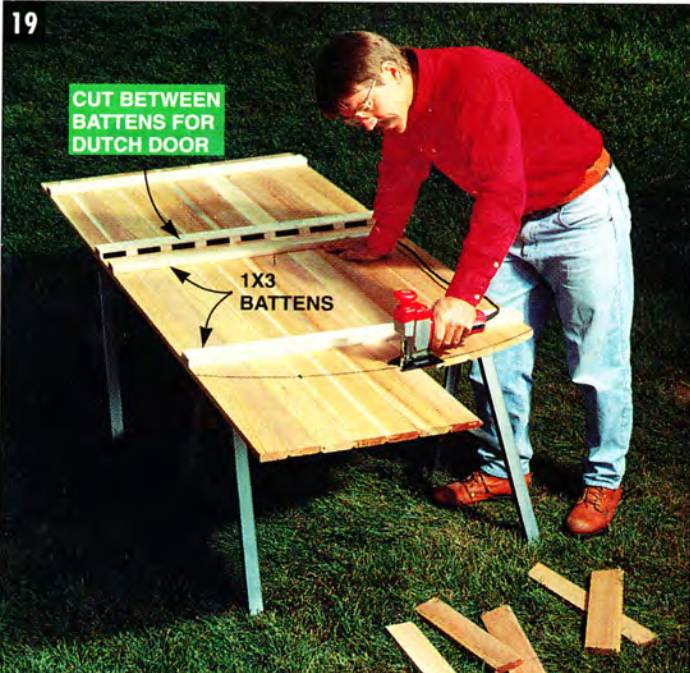
Build the double door by first creating an oversized one-piece door, then cutting it to size and then finally in half. Secure a dozen 7-ft. long tongue-and-groove 1x4s to one another using four 1x3 battens and galvanized dry-wall screws.
Position the middle two battens 36 and 37 in. from the door bottom. Place this oversized door blank in the door opening and trace the opening’s shape onto it. Cut the curved top with a jigsaw (Photo 19).
Cut door to size. First, copy the outline of opening onto door blank by holding it in the opening, then trace. Cut the curved top, then cut the door in half between the middle two battens.
Use a circular saw to cut the door to width, then make two cuts to remove the 1-in. space between the two middle battens. Secure the 1x4 ledge to the top of the lower door half. If you want a threshold, install a store-bought or DIY one, then cut off the bottom of the door accordingly.
Set the two door halves in the opening, use shims to separate the top and bottom doors by 1/4 in., then secure the door halves to the jamb with two pairs of strap hinges. Install gate hardware for the latch.
Simple Windows And Working Shutters
This project used inexpensive windows — barn sashes ($25 each) — secured to hand-built frames with hinges. They’re built and operate like a swinging door.
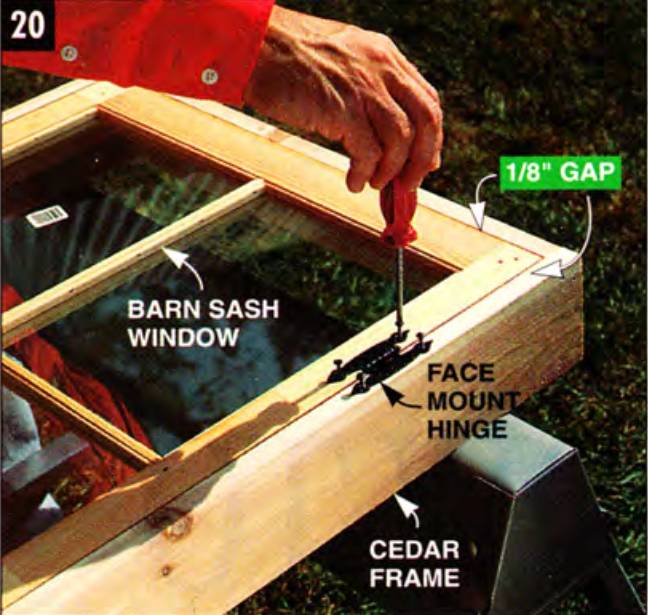
Use a portable table saw, hybrid table saw or hand plane to taper the bottom sill of the frame at 5 degrees to aid water run-off (Fig. D). Build the rest of the frame so the window will sit inside it with a 1/8-in. gap all around. Nail 3/4 x 3/4-in. cedar stops to the sides and top of the frame for the window to close against.
Secure the window to the window frame with face mount hinges (Photo 20), then set this pre-built unit in the window rough opening. Drive wood shims between the rough opening and the window’s frame so the 1/8-in. gap remains even around the window sash, then nail the window frame to the surrounding framework.
Secure the handle and simple hook-and-eye latch. Nail 2x4 cedar boards around the outside for trim.
Screw hinges to the barn sash and window frame. Leave a 1/8-in. gap on all sides so the window can open and close freely. Shim and nail the entire unit into rough window opening.
The shutters are decorative, but with the use of pintle hinges (Fig. D), can be closed to protect the glass and secure the shed during the off-season. (Pintle hinges can be found in the gate hardware section of your home center.)
Fig. D: Window And Shutter Detail
Build the shutters from three tongue-and-groove cedar boards, fastened side by side, using galvanized screws and 1x3 cleats. Use lag bolts to secure the “spool” part of the pintle hinges to the back side of the shutter and screw the two pins into the window casing.
Position these so the closed shutter will overlap onto the 2x4 cedar casings by about 1 in. Slide the spool over the pin to mount the shutter. Keep them flat against the shed with shutterdogs.
Siding And Fancy Cuts
You could apply lap or sheet siding like T1-11, but vertical tongue-and-groove siding gave us the look we wanted. Install the cedar boards starting from the corner. Leave the tongue edge exposed for nailing and for the groove of the next board to slide over (Photo 21).
Install the tongue-and-groove siding, cutting notches for rafter tails and the door and window trim. Nail siding to studs with 8d galvanized casing nails.
Notch the boards to slide up and around the rafter tails or around the windows and doors as necessary. Let the siding “run wild” (extra-long at the bottom), then go back, snap a chalk line on the siding 5 in. up from the bottom of the plywood wall sheathing and trim with a circular saw. Nail 2x6s to cover the end grain at the bottom of the siding.
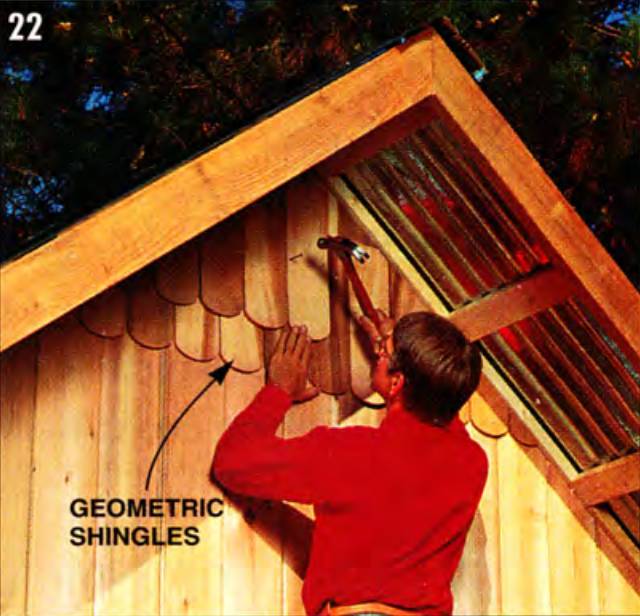
The geometric shingles, shown in Photo 22, are purely for decoration. Use them as accents at gable ends or below windows. They’re available in a variety of shapes and can be applied in many eye-catching patterns.
Nail the decorative shingles on gable ends. Apply two coats of paint, stain or clear preservative to all siding, then caulk.
Preserve the natural appearance of the cedar by coating it with clear wood finish — or prime the exterior, then paint it with two coats of high-quality latex paint.
The Shed Interior
For a solid, smooth floor, add a layer of 5/8 in. plywood over the treated plywood. Stagger the seams and secure it to the joists with 2-in. drywall screws.
Paint the floor to protect it from water and gardening messes.
Prime and paint the interior walls to brighten them and cover the inevitable lumber stamps and color variations.
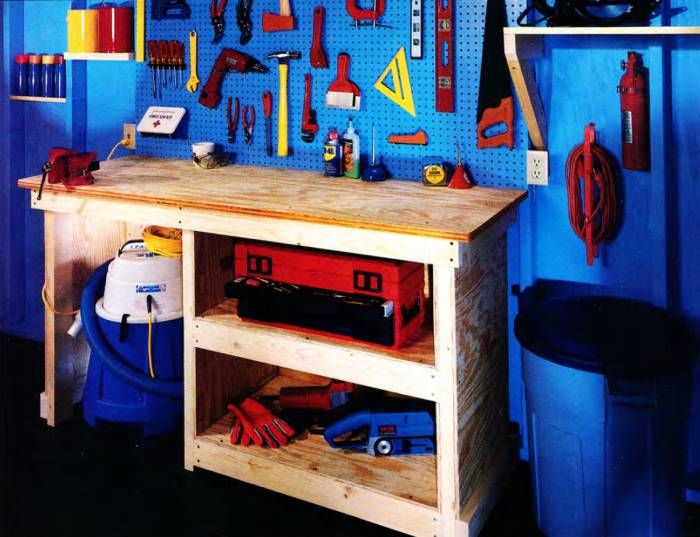
Customize the interior of your shed with workbenches, shelves, hooks, storage bins, and cabinets (click here for more ideas and detailed instructions).
The space above and between the trusses can be used to store lightweight, seldom used items. Electricity and water can be run to the shed for your convenience.
Kick back and light up a carrot — you’re done.
Materials List
| QTY. | DIMENSIONS | ITEM |
|---|---|---|
| 4 | 6x6 x 8' | .60 pressure-treated lumber |
| 12 | 2x8 x 10' | .40 pressure-treated lumber |
| 4 | 2x8 x 12' | .40 pressure-treated lumber |
| 4 | 3/4" x 4x8 | Pressure-treated plywood |
| 50 | 2x4 x 7' | Pine studs |
| 17 | 1/2" x 4x8 | CDX plywood |
| 15 | 2x4 x 10' | Pine |
| 12 | 2x4 x 12' | Pine |
| 12 | 2x4 x 14' | Pine |
| 12 | 2x6 x 10' | Pine |
| 5 | 2x6 x 12' | Pine |
| 14 | 26" x 10' | Metal roof panels |
| 1 | 26" x 10' | Translucent panels |
| 14 ft. | Metal ridge cap | |
| 28 ft. | Foam sealing strips | |
| 6 | 1x6 x 12' | Cedar |
| 5 | 2x4 x 12' | Cedar |
| 4 | 2x6 x 10' | Cedar |
| 1 | 2x12 x 4' | Cedar |
| 160 li. ft. | 3/4" x 4" | T&G cedar |
| 800 li. ft. | 3/4" x 6" | T&G cedar |
| 3 | 22" x 41" | Window sash |
| 16 | Single joist hangers | |
| 16 | 60-lb. bags | Concrete |
| 20 lbs. | 16d | Common nails |
| 15 lbs. | 8d | Galvanized siding nails |
| 15 lbs. | Gasketed roofing nails | |
| 10 lbs. | 1-1/2" | Shingle nails |
| Construction adhesive | ||
| Pintle hinges | ||
| Door & window hardware | ||
| Geometric cedar shingles | ||
| Paint | ||
| Caulk | ||
| Misc. | Nails | |
| Misc. | Screws | |
| Misc. | Bolts |
Note: This is a close estimate of the materials used for the shed. Temporary braces, mistakes, bad lumber and building methods will alter the amount of material actually needed.