
How to Design and Build a Raised Deck Step by Step
Here’s a handbook that outlines the best ways to build a high-quality elevated deck. Keep it at your side as you plan, design, and complete your own.
Basic steps for building a raised deck (the TL;DR version)
- Foundation. Dig the holes for your posts - make sure to go beyond the frost line.
- Pour concrete.
- Ledger. Install the ledger first, and slip proper flashing to stop rot.
- Place steel connectors - the strongest way to attach posts to concrete.
- Cut posts using your ledger as a height reference.
- Set the beam on top of your posts and check beam alignment.
- Attach joists using galvanized joist hanger (truss) nails.
- Bolt rail posts to joists and build your guardrail. Make sure it feels safe, and not just "safe enough".
- Lay decking, bark side up for improved drainage.
- Enjoy your new deck with family and friends!
- (Optional) Add clear penetrating sealer or exterior stain every couple of years for protection against water and increased durability.
The finer details
Everyone knows how pleasant a deck can be, but as the builder, you get an additional reward — the pleasure of knowing you’ve made a first-class addition to your home. You will sense it every time you step out on your deck listen. Your footsteps on the deck boards sound crisp and firm, like the floor in your house. Its structure remains rigid and doesn’t sway as kids run across it. The guardrail feels firm, too, so you can lean against it confidently. And year after year it serves you well, virtually maintenance-free, a good investment for your home.
Fortunately, the path from the deck of your imagination to a real one isn’t hard, because there’s nothing complicated about building a quality deck. Like a childhood Erector set, its exposed structure reveals how all the pieces fit together, from the bottom up.

Keeping an eye on that structure, you will understand the entire deck-building process. At each step you’ll learn deck-building fundamentals and several alternative techniques you can use to make it first class. By the end you’ll be able to design, plan and construct your own deck like a pro.
Building a solid foundation
As you know, decks are versatile; you can put them almost anywhere and build them almost any way you want. However, starting with a good foundation will prepare your deck for years of hard use. In fact, in most regions the local building inspector will insist on this, and a few other structural guide lines, too. Don’t panic here; your building inspector’s job is to make sure you build a solid, safe deck.
The foundation shoulders all the weight of the deck and people on it, so it should be strong. Usually 4x4 posts spaced every 6 in. provide enough support when they rest on a good base.
The foundation securely anchors the deck posts and rests on solid ground below the frost line.
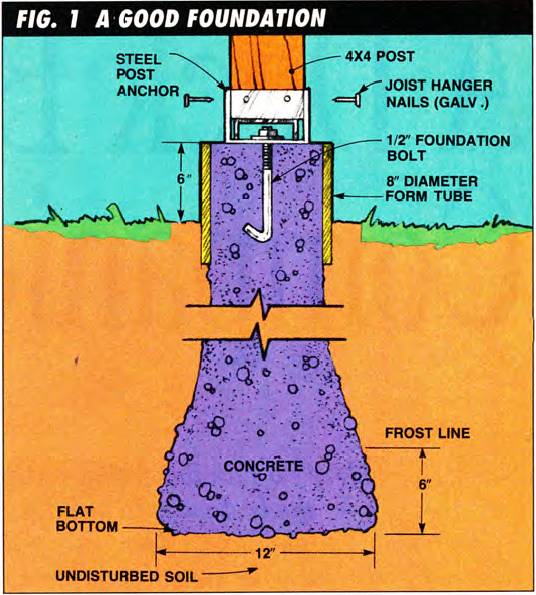
Examine the foundation details in Fig. 1, and some alternative styles in Fig. 2. Notice that the bottom 6-in. section of concrete, called the “footing,” must rest on undisturbed soil (disturbed soil compresses too easily), have a flat bottom to transfer weight evenly, and be completely below your local frost line.
That’s to keep it from sinking or lilting and throwing your deck askew. Your building inspector will tell you how deep frost extends in your area. Sink foundation holes using a posthole digger or an 8-in. power auger if you have to dig a lot of them. Widen and flatten the bottoms to get a wide support base.
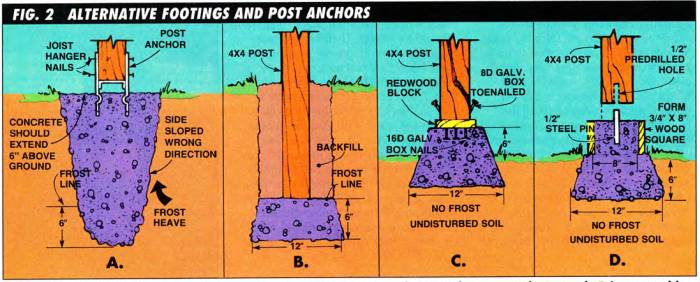
A good footing is wider at the bottom and narrower at the top to avoid frost heaves, and extends 6 in. above the ground to drain off water. Example A fails on both counts, but C and D are good. Example B is acceptable, but will rot sooner than the others. The wood/concrete connections are good in A, C and D.
Before you mix and pour the concrete, decide how you want to attach the posts to it. Figs. 1 and 2 show five examples.
Generally, steel connectors, available from lumberyards and home centers, are the strongest. They, like the wood posts themselves, should be set at least 6 in. above the ground to help them dry off faster after rain. Continual moisture from ground contact rusts steel and rots wood posts faster, so avoid that situation if you can. In addition, for posts use rot-resistant wood like pressure-treated (a .40-lb. or, even better, a .60-lb. rating), or the heartwood of redwood or cedar.
Although it’s acceptable, setting the posts directly into the ground (Fig. 2B) like fence posts invites eventual rot. They’re also much harder to replace should rot occur.
Notice the two weaknesses in Fig. 2A that make this detail unacceptable:
- First, the metal connector is a good one, but it won’t last long because water can easily puddle around it and rust it. The concrete should extend 6 in. higher so water will run off.
- Second, the concrete foundation widens toward the top, inviting frost to catch its sides and heave it upward. Good footing holes have vertical sides or slope inward toward the top.
Should you mix your own concrete or buy ready-mixed from a truck? Calculate the volume needed, and compare the prices.
Then ask yourself these questions:
- Is the site directly accessible to the truck?
- How far will you have to wheelbarrow the load?
- How long will it take? (Concrete dealers limit their offload time and charge beyond that limit.)
Then consider how long it will take to mix your own.
Normally, if you need 1 cubic yard or more, it’s easier and faster to buy ready-mixed concrete, and invite (or bribe!) some neighbors to help you dump it quickly.
Erecting posts and beams
Once the concrete hardens, you’re ready to build.
Posts, beams, ledgers, and joists support the deck’s weight. Make them strong and fasten them securely.
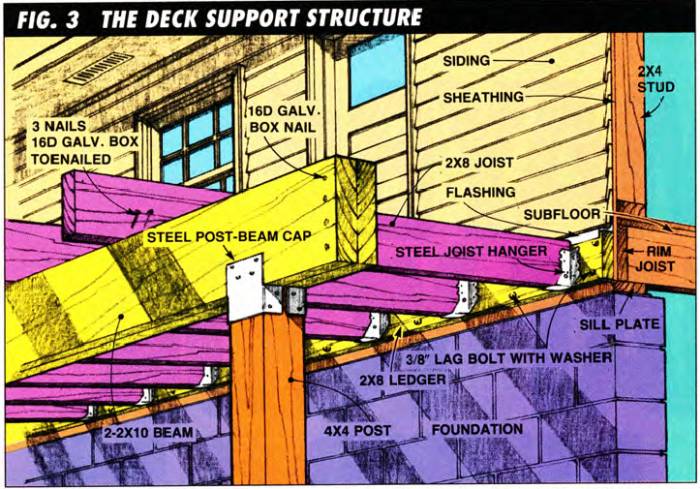
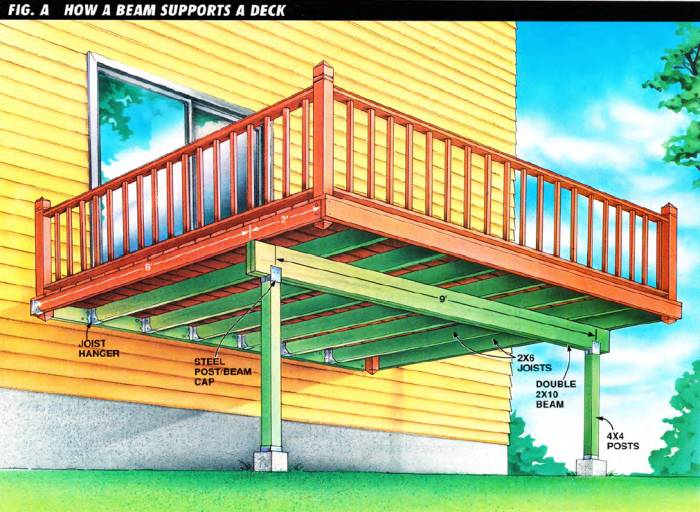
Think of your deck as a rigid platform set across two or more very strong parallel beams. You can see one of those beams in Fig. 3 from two 2x10s spiked together with 16d galvanized nails. It sits atop the 4x4 posts.
The other beam, called a “ledger,” is bolted to the rim joist (or wall studs) of the house.
The ledger
Install the ledger first, especially if you have a door opening onto the deck. In that case. make the finished deck 1/2 in. lower than the door’s sill, so you won’t have an awkward step as you go out the door.
After finding the ledger height, remove the siding to about 1 in. above that point (you may have to cut it with your power saw) so you can screw the ledger tightly against the sheathing and house frame (Fig. 3).
Then slip aluminum flashing up under the siding and against the sheathing later you’ll bend the flashing over the top of the ledger to keep water from collecting against the house and causing rot.
Next, tack the ledger in place temporarily with 16d nails, then level and lag bolt it permanently, spacing the bolts about every 16 in. Use 3/8-in. bolts 3-1/2 in. long to completely penetrate the rim joist. Predrill the screw holes and use longer bolts if necessary.
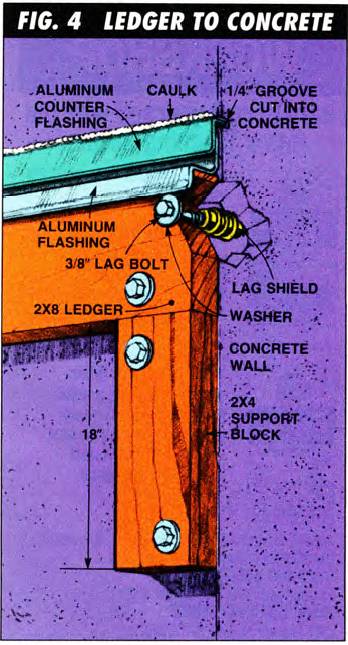
Use support blocks to reinforce the ends of a ledger board when bolting it to concrete. Proper flashing stops rot.
On occasion you may need to bolt the ledger to a concrete foundation (Fig. 4). Predrill your holes for lead lag shields or expansion bolts with a hammer drill and special carbide drilling bit to make this job easy.
For additional support, bolt blocks under both ends. Not so easy, but no less important, is to cut a groove for the flashing. Snap a chalk line and cut the 1/4-in. deep groove with a corundum (not carbide) blade on your circular saw. Wear goggles to protect your eyes, a dust mask, and gloves.
Posts and beams
With your ledger in place, you can use it as a height reference for the other beam. Cut the 4x4 posts to length, fasten them to their concrete foundations, plumb them with a level and temporarily brace them in place with boards.
Then set the beam on top and nail it. (If you’re working more than a few feet off the ground, lifting a heavy beam can be dangerous. Ask another person to help lift and hold it in place.) The metal post/beam cap shown in Fig. 3 is strongest, along with the one shown in Fig. 5A. Both spread the deck weight over the entire end of the post, and so stress the wood fibers least. The connections in Fig. 5B and 5C are okay, but will weaken sooner.
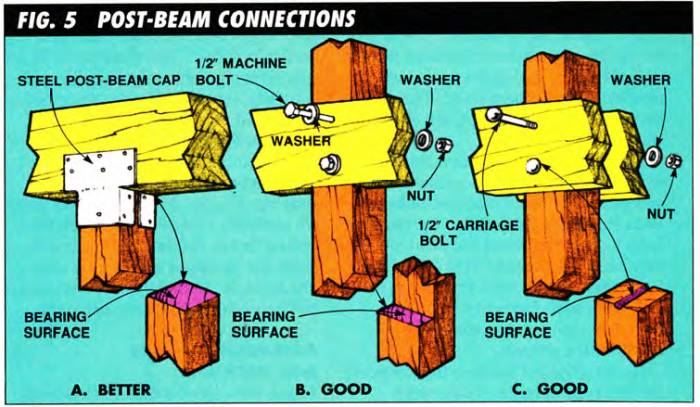
A named steel cap (A) is strongest. Examples B and C are okay, but their smaller bearing area mean more strain on the wood fibers.
Figs. 5B and 5C also show two kinds of bolts —— smooth-head carriage bolts and hexagonal-head machine bolts. Both should be galvanized. Carriage bolts look neater when the head must be visible, but at times they slip while tightening, so you can’t draw them up firmly. In such cases use machine bolts, because you can steady their heads with a wrench.
Decks often fail because their beams aren‘t strong enough. Undersized beams also make a deck feel soft underfoot and bounce rather than remaining rigid.
To correctly size a beam, consider these three factors:
- the weight or load it must carry,
- its span (distance between posts), and
- its wood type (tree species).
For most decks, two 2x10s nailed together will be strong enough if you support them with posts every 6 ft. But always ask your building inspector to confirm your design in advance.
From experience, I never hesitate to increase the strength of deck beams by one lumber size, unless it makes the design look bad. The extra strength not only adds a greater safety margin and longevity, it also makes the deck feel more solid.
UPDATE: I added a span table below referencing minimum beam sizes in the section Avoid Common Deck-Building Mistakes.
Except for very low decks, it’s a good idea to stiffen your posts and beams with diagonal braces to prevent deck swaying (Fig. 9 below). Make sure your posts are perfectly vertical with a level, then bolt on 2x4 or 2x6 braces between the posts and beams at a 45-degree angle. The triangle created by the beam, post, and brace keeps the structure rigid.
Assembling joists and decking
You’ve completed the main structural work. Now add the platform.
First, nail on the joists. Where they butt directly into a beam or ledger, fasten them with metal joist hangers, and where they rest on top of the beam, toenail them with three 16d galvanized nails (Fig. 3).
Be sure to buy the proper size joist hangers and nail through all the holes with galvanized joist hanger nails (sometimes called galvanized truss nails). Cap the ends of the joists with a band joist (Fig. 6), nailing it securely to each joist with galvanized 16d nails, three nails per 2x6, four per 2x8, five per 2x10, etc.
As with beams, joist size depends on the weight to be supported, the length the joists have to span and their wood type. Again, always confirm your joist size with your building inspector.
As a rule of thumb. If you space joists 16 in. on center (from the center of one to the center of the next. or o.c.), a 2x6 spans 8 ft. a 2x8 spans 10 ft., and a 2x10 spans 12 ft.
But your deck will feel more solid if you limit your joist span to 8 ft. Remember, you can always add another beam to support the joists mid-span if you need to.
Before adding the deck boards, set the posts for your guardrail. Strength and safety are first priority here. So attach the posts securely to the joists with bolts (Fig. 6). One big advantage of bolts over nails here is that you can easily retighten them should they loosen.
If your 4x4 deck support posts extend above the beams (as in Figs 5B and 5C). you can use them for rail posts.
Don’t skimp in your rail design. Answer the following questions:
- Did you bolt your rail posts to the joists or beam?
- Are the posts at least 2x6s or stronger?
- Are there enough of them, at least one every 6 ft.?
- Do they feel solidly connected to the framework when you push on them?
- Do they have your confidence?

Bolt rail posts to joists. The 2x8 block behind the post adds strength. Use 2x4s or larger lumber for guardrail. The maximum permitted opening in the guardrail varies from 4 in. to 6 in. from region to region.
Some guardrail post designs might fail some of these tests and still meet technical requirements. But they won‘t feel safe. Confidence is the key. Your deck will not feel right until you’re sure your railing is strong.
Finally. your deck nears completion. It’s time to lay the decking. Nail the first board alongside, but not touching, the house, driving two 16d galvanized nails at each joist. Fig. 7 shows proper nailing technique and several types of decking. All work well.
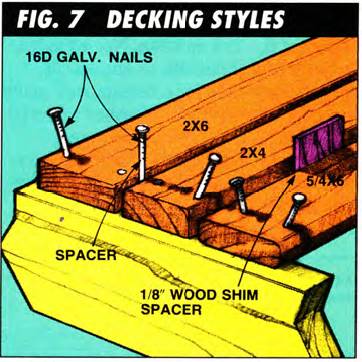
Lay the three common decking boards — 2x6, 2x4 and 5/4x6 — bark side up for better drainage. Drive nails 3/4 in. from board edge.

Cut guardrail accurately, then nail and screw it to the post. Predrill holes to mid splitting ends.

Deck Board Spacer: It’s easy to space deck boards evenly. Just insert 3/8-in. wooden dowels, or the diameter of the spacing you desire, into several scrap 2x4 pieces. Place the dowels between adjacent deck boards and fasten the boards in place.
Here are some other decking tips:
- Space each board with a 16d nail.
- Nail the ends of bowed boards first, forcing the bow against the previous row. Then drive a wide wooden shim between the rows to properly space the bowed board.
- Make clean joints by cutting boards off perfectly square and butting them together over the center of a joist.
- Predrill nail holes near board ends to avoid splitting, Make these slightly smaller than the diameter of the nail passing through them.
- Let the boards extend beyond the edge of the deck. You can cut them all off evenly after nailing them all down.
Install the railing
Design your railing so it’s at least 36 in. high and so that a 6-in. ball (soon to be 4-in. in some regions) cannot pass through any opening (Fig. 6). The top rail should be the strongest, a 2x4 at minimum. It’s also most visible, so select your best-looking material for it.
Rails that pass over the tops of the posts are strongest and easiest to fasten. Simply nail them into the posts with 16d galvanized box nails. Other designs, like the one in Fig. 8, require careful nailing to ensure strength. Predrill both the nail and screw holes. Use 10d galvanized casing nails on the edges of the 2x4 and 2-in. No. 10 galvanized screws beneath, as shown. If your design calls for a bottom rail, make sure it is at least 2x4. All other material should be at least 2x2 or stronger.
There are many other additions you can make to your deck: benches, planters, a stairway. Let your imagination run.

A well-built deck: an attractive, permanent addition to your home.
Miscellaneous tips for getting started:
- Pull out a pad of paper and a pencil, and sketch the deck you'd like to add to your home. You don't have to be an artist. Just jot those ideas down.
- Fill out the details, using other decks for examples. Chock magazines and books for ideas.
- Go out to your proposed deck site and with a tape measure, figure out the rough dimensions: length, width, height. Note any unusual features and potential problems. Add your measurements to a more detailed sketch.
- Take your design to your local building inspector’s office. They’ll review your plan, help size beams and joists, check the railing and generally be a good source of technical information. Go ahead and discuss your ideas in detail. They, too, are interested in your building a high-quality, safe dock. They’ll tell you if you need a permit.
- Review your plan and draw up a material list. Count every board and bolt. 0n custom projects even the professionals do this.
- With materials list and plan in hand, visit your favorite lumberyard to get an estimate for the cost of materials. The yard personnel can be very helpful. Respect their time. Avoid Saturdays, when they're likely to be most busy. Explain your plan, listen for new ideas and techniques, and go out into the yard and chock the wood.
Avoid lumber that appears wet. It will shrink excessively and might twist and warp as it dries. Good material is dry, straight and free from splits and cracks. Compare the different kinds of deck boards and railing material. Does it meet your expectations? Check several lumberyards, since quality varies.
Finally, price all your material and add it up. Check for extra expenses like delivery fees. Then, well, why not... ask for a discount! - When the lumber comes, you're ready to go. Lay out the post and foundation locations. This can be tricky, especially on sloped sites. And it needs to be accurate. So if you aren’t fully confident, look at several deck-building books. Most contain a section on layout; or ask someone who understands layout principles to help you check your work.
- Finally, give yourself plenty of time to complete the dock. Typically, projects take longer than you first imagine, but the quality you achieve is worth it.
UPDATE: Avoid Common Deck-Building Mistakes
One of the pleasures of building a good, solid deck is believing that it’ll last forever. Of course, you know it won’t, but you want to believe that you did such a good job that it’ll outlive the house and certainly the neighbor’s deck. And it might if you put it together right.
But despite your skills and patience, three enemies eagerly wait to reduce your new deck to a pile of waste wood in just a few years:
- A weak design can cause it to collapse;
- Rot can steadily erode its strength; and
- Harsh weathering can crack the wood and weaken its joints.
You’ll learn how these foes attack your deck and also how to keep them at bay.
When you dive into your next deck project, plan to stop these enemies right from the start, and you’ll keep your deck healthy for a long, long time.
Design it right
Building inspectors have found that many homeowners, designing by “rules of thumb,” make beams too small. A “beam” is usually the biggest chunk of wood that lies horizontally like a spine under or at the ends of the rib-like spacing row. You can choose from either of the two beam sizes shown there, either three 2x8s or two 2x10s nailed together.
The beam, here consisting of two 2x10s, must be strong enough to support the weight of the deck, plus the weight of all the activity that takes place in it. If it bends too much, your deck will feel unstable underfoot.
| 6' | 7' | 8' | 9' | 10' | 11' | 12' | 13' | 14' | |
|---|---|---|---|---|---|---|---|---|---|
| 4' | 1-2x6 | 1-2x6 1-2x8 | 1-2x6 1-2x8 | 1-2x8 1-2x10 | 1-2x8 1-2x10 | 1-2x8 1-2x10 | 1-2x8 1-2x10 | 1-2x10 1-2x12 | 1-2x10 1-2x12 |
| 5' | 1-2x6 | 2-2x6 1-2x8 | 2-2x6 1-2x8 | 1-2x8 1-2x10 | 1-2x8 1-2x10 | 1-2x8 1-2x10 | 1-2x8 1-2x10 | 1-2x10 1-2x12 | 1-2x10 1-2x12 |
| 6' | 2-2x6 | 2-2x6 1-2x8 | 2-2x6 2-2x8 | 2-2x8 1-2x10 | 2-2x8 1-2x10 | 2-2x8 1-2x10 | 2-2x8 1-2x10 | 2-2x10 1-2x12 | 2-2x10 1-2x12 |
| 7' | 2-2x6 | 3-2x6 2-2x8 | 3-2x6 2-2x8 | 2-2x8 2-2x10 | 2-2x8 2-2x10 | 2-2x8 2-2x10 | 3-2x8 2-2x10 | 2-2x10 1-2x12 | 2-2x10 2-2x12 |
| 8' | 3-2x6 2-2x8 | 3-2x6 2-2x8 | 3-2x6 2-2x8 | 3-2x8 2-2x10 | 3-2x8 2-2x10 | 3-2x8 2-2x10 | 3-2x8 2-2x10 | 2-2x10 2-2x12 | 3-2x10 2-2x12 |
| 9' | 3-2x6 2-2x8 | 4-2x6 3-2x8 | 4-2x6 3-2x8 | 3-2x8 2-2x10 | 3-2x8 2-2x10 | 3-2x8 2-2x10 | 4-2x8 3-2x10 | 3-2x10 2-2x12 | 3-2x10 2-2x12 |
| 10' | 4-2x6 3-2x8 | 3-2x8 2-2x10 | 3-2x8 2-2x10 | 3-2x8 3-2x10 | 4-2x8 3-2x10 | 4-2x8 3-2x10 | 4-2x8 3-2x10 | 3-2x10 2-2x12 | 3-2x10 3-2x12 |
| 11' | 3-2x8 2-2x10 | 3-2x8 2-2x10 | 4-2x8 3-2x10 | 4-2x8 3-2x10 | 3-2x10 2-2x12 | 3-2x10 3-2x12 | 3-2x10 3-2x12 | 4-2x10 3-2x12 | 4-2x10 3-2x12 |
| 12' | 3-2x8 2-2x10 | 4-2x8 3-2x10 | 4-2x8 3-2x10 | 3-2x10 2-2x12 | 3-2x10 3-2x12 | 4-2x10 3-2x12 | 4-2x10 3-2x12 | 4-2x10 3-2x12 | 3-2x12 |
Use the above span table to determine the minimum size (strength) of your beam. Beam sizes in this table are based on the strength of Ponderosa pine, a relatively weak species. Beams made from stronger wood can often be smaller.
As you might expect, longer joists put more weight on a beam, so you have to make it bigger and stronger. The same thing happens when you space your posts farther apart. When your post spacing reaches about 10 ft., the beams get big and heavy, sometimes four 2x8s, three 2x10s or larger. In reality, these beams are simply too heavy to handle. They also require wider posts, 4x6s or 4x8s, to rest on.
Fortunately, there’s an easy way to make them smaller without sacrificing the overall strength of your deck. Simply add more posts (Fig. C). Adding posts shortens the spans, and as you can see in the table, sharply reduces the beam size needed. Even in this example, you could reduce the beam size from two 2x10s in Fig. A down to one 2x8 in Fig. C. I used two 2x8s rather than one in Fig. C, simply because they make the deck feel a bit stiffer underfoot and fit better atop 4x4 posts.
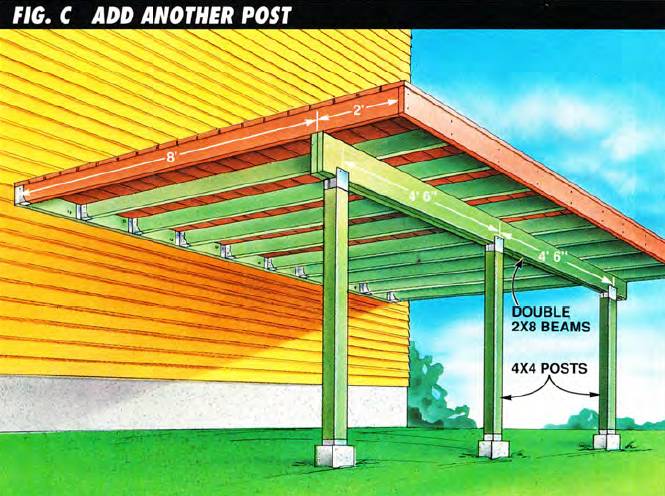
A third post shortens the distance the beam must span, so the beam doesn’t have to be as large. According to the span table, one 2x8 does the job, though a second 2x8 was added for additional stiffness.
In general, your deck will feel firmer if you space your posts no more than 6 in. apart.
Build to stop rot
The most damaging weapon nature uses to attack your deck is virtually invisible — rot-causing fungus.
Fungus spreads in the form of thousands of microscopic spores that float through the air. If they find enough moisture, the spores that settle on your freshly built deck will root and grow, slowly dissolving the wood fiber. You’ll see it happen as your deck “weathers” to a silver gray in a few years. The surface fungus that causes the color change is a mold that really does no significant damage. But other types of fungus will destroy the wood fiber and weaken your deck’s structure.
Fungus needs moisture to grow, so rot won’t occur in any type of wood if the wood can dry out easily after rainstorms. Most deck wood dries quickly, but a few places remain wet for a long time (Fig. D). That’s where fungus takes root.
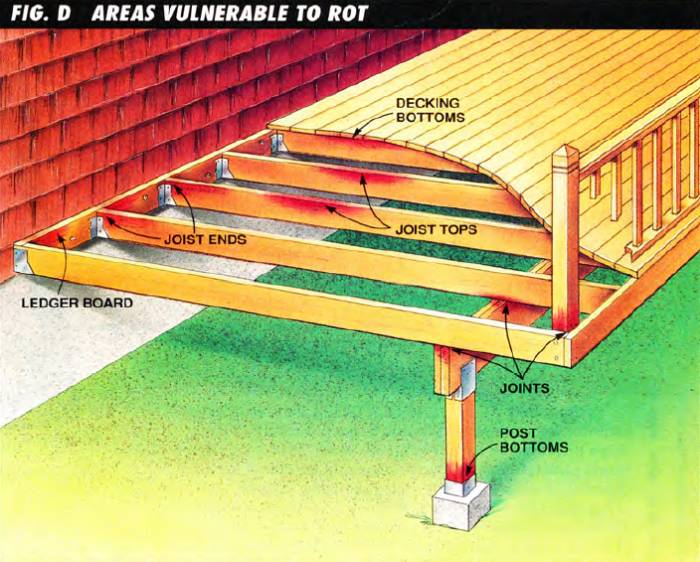
Areas of deck wood that absorb water readily yet dry slowly will rot first. Fungus quickly takes root in moist areas. The ends of boards and joints are common trouble spots.
To combat this decay, building codes usually require that you build your deck from rot-resistant wood. You’ll find three types of wood readily available to do the job:
- heart redwood,
- heart cedar, and
- pressure-treated.
Heartwood
The “heartwood” of redwood and cedar is the deeper-colored core of a tree as compared to the cream-colored outer wood called “sapwood.”
The heartwood contains natural chemicals that are toxic to fungus. They’ll hold decay at bay until water slowly leaches these chemicals out of the wood.
Depending on rainfall and moisture conditions in your region, serious signs of decay can begin within 10 years.
Pressure-treated wood
Pressure-treated wood lasts longer — almost indefinitely, no matter what species of wood is used. Pressure treatment is a process that forces chemicals that are toxic to fungus (termites, too) virtually throughout the wood fiber of your lumber. The chemicals bond to the fiber and remain there.
The longevity of pressure-treated wood plus its lower cost (20 to 50 percent less than cedar or redwood, depending on your region) make it an excellent choice for most deck projects You can even bury properly treated posts without worrying about them disintegrating.
How do I buy treated lumber?
A “.40” rating should be stamped right on the board, which means it contains .40 pounds of preservative per cubic foot of wood.
Inspect the boards to make sure they’re dry. The preservative permanently bonds with the wood only when it dries. So don’t buy boards that seem waterlogged or unusually heavy.
You might have trouble finding dry 4x4s and larger timbers. These take longer to dry after the treatment process, so treatment facilities often ship them out before they’re dry. If you have to use them while they’re still wet, be sure to observe the safety precautions below.
Also reject wood with chemical residue on its surface; you should see what looks like an even coat of green or brown stain. As a sign of quality, look for the American Wood Protection Association (AWPA) stamp or a lifetime guarantee on each board. But make a visual inspection and use your own judgment, too.
Good quality treated lumber will contain no more than a trace of heartwood, the darker center of a tree. Preservative chemicals often won’t penetrate heartwood, so it can quickly rot.
Safety precautions for dealing with pressure-treated wood
Handle treated wood cautiously.
- Wear goggles when cutting it to keep sawdust away from your eyes.
- Wash your hands after working with it, and don’t burn leftover scraps.
- Burning the scraps can release the toxic chemical as fumes. Put scraps in the trash instead.
Other tips
Many deck builders don’t like the green color or knotty appearance of treated wood. So they keep it out of sight, using it for the joists, beams and posts. Then they switch to cedar or redwood for the highly visible decking and railing.
If you prefer to use redwood or cedar, you can make them last longer by treating them with a chemical preservative yourself. You don’t have to treat the entire deck, only the vulnerable areas (Fig. D), especially joints where moisture sinks in and dries out slowly.
Dunk the critical ends of posts and other lumber into a bucket of wood preservative (formulated to resist fungus) for an hour or even a day to let as much preservative as possible soak into the wood. (Wear rubber gloves when you work with preservative to keep it off your skin.)
Homeowners can no longer buy powerful commercial preservatives, so this method won’t make your wood as rot resistant as pressure-treated wood. But it can delay rot for several additional years.
Control wood movement
Deck surfaces exposed to direct sun and rain take a terrific beating. Every time water soaks them, the wood swells. Then when the sun bakes them dry, the wood shrinks. Over time these repeated movements can cause boards to crack and split. In addition, nails loosen and pop up. Gaps appear at joints. And boards warp. The result is a shabby deck.
On this point, redwood and cedar usually have the edge on pressure-treated wood. Redwood and cedar are relatively soft and light. They don’t react as much to wetting/drying cycles as several of the denser types used for pressure treating, like Southern yellow pine. What’s more, the chemicals in treated wood tend to attract moisture, causing treated wood to swell more readily than redwood and cedar.
To solve the problem caused by wetting/drying cycles. processors of top-quality treated wood impregnate some of their wood products with a water repellent so they absorb less moisture, swell less, and therefore crack and warp less. This wood costs 10 to 20 percent more but often comes with a lifetime guarantee. When shopping for deck material, ask your local lumber dealer about this type of treated wood.
Most treated wood doesn’t contain a water repellent, but you can brush one on to accomplish the same thing. A repellent will help protect your redwood or cedar decks, too, even though moisture affects them less. (Water repellents are often confused with wood preservatives. A wood preservative is a chemical that’s toxic to wood—destroying fungus, bacteria and insects. A water repellent simply keeps the water out.)
Unfortunately, brushed-on water repellents last only two to three years. You’ll need to recoat your deck as soon as you notice water drops soaking into the wood rather than “beading” and remaining on the surface.
Types of water repellents
Paint is the best repellent because it forms a protective skin over the wood. It lasts the longest too. Unfortunately, though, repainting a deck is difficult once the first coat peels, because you have to scrape and sand the wood to prepare for a new coat. The extra effort usually isn’t worth the trouble.
Clear, skin-forming finishes like varnish and polyurethane also protect well but don’t last long. Even special formulations break down and peel under intense sunlight, causing the same recoating problems as paint.
For recoating ease, your best bet is to apply a clear penetrating sealer or an exterior stain that also seals. Neither of these forms a skin on the wood surface that can peel. Penetrating sealers and stains contain resins that partially fill the wood pores and repel water. Because they form a thinner coat than paint, sealers and stains usually last only a few years. They soon wear off high-traffic areas and weather away from areas exposed to direct sun and rain. But when you recoat the deck, you don’t have to scrape off the old finish, so sealers and stains are much easier to reapply than paint.
Moreover, stains come in many colors, so you can blend your deck into the color scheme of your home. For more protection or when the stain doesn’t contain a water repellent, apply a clear sealer (or other water repellent) first. Check the containers to make sure the stain and repellent are compatible.
Here’s a handbook that outlines the best ways to build a high-quality elevated deck. Keep it at your side as you plan, design, and complete your own.
Basic steps for building a raised deck (the TL;DR version)
- Foundation. Dig the holes for your posts - make sure to go beyond the frost line.
- Pour concrete.
- Ledger. Install the ledger first, and slip proper flashing to stop rot.
- Place steel connectors - the strongest way to attach posts to concrete.
- Cut posts using your ledger as a height reference.
- Set the beam on top of your posts and check beam alignment.
- Attach joists using galvanized joist hanger (truss) nails.
- Bolt rail posts to joists and build your guardrail. Make sure it feels safe, and not just "safe enough".
- Lay decking, bark side up for improved drainage.
- Enjoy your new deck with family and friends!
- (Optional) Add clear penetrating sealer or exterior stain every couple of years for protection against water and increased durability.
The finer details
Everyone knows how pleasant a deck can be, but as the builder, you get an additional reward — the pleasure of knowing you’ve made a first-class addition to your home. You will sense it every time you step out on your deck listen. Your footsteps on the deck boards sound crisp and firm, like the floor in your house. Its structure remains rigid and doesn’t sway as kids run across it. The guardrail feels firm, too, so you can lean against it confidently. And year after year it serves you well, virtually maintenance-free, a good investment for your home.
Fortunately, the path from the deck of your imagination to a real one isn’t hard, because there’s nothing complicated about building a quality deck. Like a childhood Erector set, its exposed structure reveals how all the pieces fit together, from the bottom up.
Keeping an eye on that structure, you will understand the entire deck-building process. At each step you’ll learn deck-building fundamentals and several alternative techniques you can use to make it first class. By the end you’ll be able to design, plan and construct your own deck like a pro.
Building a solid foundation
As you know, decks are versatile; you can put them almost anywhere and build them almost any way you want. However, starting with a good foundation will prepare your deck for years of hard use. In fact, in most regions the local building inspector will insist on this, and a few other structural guide lines, too. Don’t panic here; your building inspector’s job is to make sure you build a solid, safe deck.
The foundation shoulders all the weight of the deck and people on it, so it should be strong. Usually 4x4 posts spaced every 6 in. provide enough support when they rest on a good base.
The foundation securely anchors the deck posts and rests on solid ground below the frost line.
Examine the foundation details in Fig. 1, and some alternative styles in Fig. 2. Notice that the bottom 6-in. section of concrete, called the “footing,” must rest on undisturbed soil (disturbed soil compresses too easily), have a flat bottom to transfer weight evenly, and be completely below your local frost line.
That’s to keep it from sinking or lilting and throwing your deck askew. Your building inspector will tell you how deep frost extends in your area. Sink foundation holes using a posthole digger or an 8-in. power auger if you have to dig a lot of them. Widen and flatten the bottoms to get a wide support base.
A good footing is wider at the bottom and narrower at the top to avoid frost heaves, and extends 6 in. above the ground to drain off water. Example A fails on both counts, but C and D are good. Example B is acceptable, but will rot sooner than the others. The wood/concrete connections are good in A, C and D.
Before you mix and pour the concrete, decide how you want to attach the posts to it. Figs. 1 and 2 show five examples.
Generally, steel connectors, available from lumberyards and home centers, are the strongest. They, like the wood posts themselves, should be set at least 6 in. above the ground to help them dry off faster after rain. Continual moisture from ground contact rusts steel and rots wood posts faster, so avoid that situation if you can. In addition, for posts use rot-resistant wood like pressure-treated (a .40-lb. or, even better, a .60-lb. rating), or the heartwood of redwood or cedar.
Although it’s acceptable, setting the posts directly into the ground (Fig. 2B) like fence posts invites eventual rot. They’re also much harder to replace should rot occur.
Notice the two weaknesses in Fig. 2A that make this detail unacceptable:
- First, the metal connector is a good one, but it won’t last long because water can easily puddle around it and rust it. The concrete should extend 6 in. higher so water will run off.
- Second, the concrete foundation widens toward the top, inviting frost to catch its sides and heave it upward. Good footing holes have vertical sides or slope inward toward the top.
Should you mix your own concrete or buy ready-mixed from a truck? Calculate the volume needed, and compare the prices.
Then ask yourself these questions:
- Is the site directly accessible to the truck?
- How far will you have to wheelbarrow the load?
- How long will it take? (Concrete dealers limit their offload time and charge beyond that limit.)
Then consider how long it will take to mix your own.
Normally, if you need 1 cubic yard or more, it’s easier and faster to buy ready-mixed concrete, and invite (or bribe!) some neighbors to help you dump it quickly.
Erecting posts and beams
Once the concrete hardens, you’re ready to build.
Posts, beams, ledgers, and joists support the deck’s weight. Make them strong and fasten them securely.
Think of your deck as a rigid platform set across two or more very strong parallel beams. You can see one of those beams in Fig. 3 from two 2x10s spiked together with 16d galvanized nails. It sits atop the 4x4 posts.
The other beam, called a “ledger,” is bolted to the rim joist (or wall studs) of the house.
The ledger
Install the ledger first, especially if you have a door opening onto the deck. In that case. make the finished deck 1/2 in. lower than the door’s sill, so you won’t have an awkward step as you go out the door.
After finding the ledger height, remove the siding to about 1 in. above that point (you may have to cut it with your power saw) so you can screw the ledger tightly against the sheathing and house frame (Fig. 3).
Then slip aluminum flashing up under the siding and against the sheathing later you’ll bend the flashing over the top of the ledger to keep water from collecting against the house and causing rot.
Next, tack the ledger in place temporarily with 16d nails, then level and lag bolt it permanently, spacing the bolts about every 16 in. Use 3/8-in. bolts 3-1/2 in. long to completely penetrate the rim joist. Predrill the screw holes and use longer bolts if necessary.
Use support blocks to reinforce the ends of a ledger board when bolting it to concrete. Proper flashing stops rot.
On occasion you may need to bolt the ledger to a concrete foundation (Fig. 4). Predrill your holes for lead lag shields or expansion bolts with a hammer drill and special carbide drilling bit to make this job easy.
For additional support, bolt blocks under both ends. Not so easy, but no less important, is to cut a groove for the flashing. Snap a chalk line and cut the 1/4-in. deep groove with a corundum (not carbide) blade on your circular saw. Wear goggles to protect your eyes, a dust mask, and gloves.
Posts and beams
With your ledger in place, you can use it as a height reference for the other beam. Cut the 4x4 posts to length, fasten them to their concrete foundations, plumb them with a level and temporarily brace them in place with boards.
Then set the beam on top and nail it. (If you’re working more than a few feet off the ground, lifting a heavy beam can be dangerous. Ask another person to help lift and hold it in place.) The metal post/beam cap shown in Fig. 3 is strongest, along with the one shown in Fig. 5A. Both spread the deck weight over the entire end of the post, and so stress the wood fibers least. The connections in Fig. 5B and 5C are okay, but will weaken sooner.
A named steel cap (A) is strongest. Examples B and C are okay, but their smaller bearing area mean more strain on the wood fibers.
Figs. 5B and 5C also show two kinds of bolts —— smooth-head carriage bolts and hexagonal-head machine bolts. Both should be galvanized. Carriage bolts look neater when the head must be visible, but at times they slip while tightening, so you can’t draw them up firmly. In such cases use machine bolts, because you can steady their heads with a wrench.
Decks often fail because their beams aren‘t strong enough. Undersized beams also make a deck feel soft underfoot and bounce rather than remaining rigid.
To correctly size a beam, consider these three factors:
- the weight or load it must carry,
- its span (distance between posts), and
- its wood type (tree species).
For most decks, two 2x10s nailed together will be strong enough if you support them with posts every 6 ft. But always ask your building inspector to confirm your design in advance.
From experience, I never hesitate to increase the strength of deck beams by one lumber size, unless it makes the design look bad. The extra strength not only adds a greater safety margin and longevity, it also makes the deck feel more solid.
UPDATE: I added a span table below referencing minimum beam sizes in the section Avoid Common Deck-Building Mistakes.
Except for very low decks, it’s a good idea to stiffen your posts and beams with diagonal braces to prevent deck swaying (Fig. 9 below). Make sure your posts are perfectly vertical with a level, then bolt on 2x4 or 2x6 braces between the posts and beams at a 45-degree angle. The triangle created by the beam, post, and brace keeps the structure rigid.
Assembling joists and decking
You’ve completed the main structural work. Now add the platform.
First, nail on the joists. Where they butt directly into a beam or ledger, fasten them with metal joist hangers, and where they rest on top of the beam, toenail them with three 16d galvanized nails (Fig. 3).
Be sure to buy the proper size joist hangers and nail through all the holes with galvanized joist hanger nails (sometimes called galvanized truss nails). Cap the ends of the joists with a band joist (Fig. 6), nailing it securely to each joist with galvanized 16d nails, three nails per 2x6, four per 2x8, five per 2x10, etc.
As with beams, joist size depends on the weight to be supported, the length the joists have to span and their wood type. Again, always confirm your joist size with your building inspector.
As a rule of thumb. If you space joists 16 in. on center (from the center of one to the center of the next. or o.c.), a 2x6 spans 8 ft. a 2x8 spans 10 ft., and a 2x10 spans 12 ft.
But your deck will feel more solid if you limit your joist span to 8 ft. Remember, you can always add another beam to support the joists mid-span if you need to.
Before adding the deck boards, set the posts for your guardrail. Strength and safety are first priority here. So attach the posts securely to the joists with bolts (Fig. 6). One big advantage of bolts over nails here is that you can easily retighten them should they loosen.
If your 4x4 deck support posts extend above the beams (as in Figs 5B and 5C). you can use them for rail posts.
Don’t skimp in your rail design. Answer the following questions:
- Did you bolt your rail posts to the joists or beam?
- Are the posts at least 2x6s or stronger?
- Are there enough of them, at least one every 6 ft.?
- Do they feel solidly connected to the framework when you push on them?
- Do they have your confidence?
Bolt rail posts to joists. The 2x8 block behind the post adds strength. Use 2x4s or larger lumber for guardrail. The maximum permitted opening in the guardrail varies from 4 in. to 6 in. from region to region.
Some guardrail post designs might fail some of these tests and still meet technical requirements. But they won‘t feel safe. Confidence is the key. Your deck will not feel right until you’re sure your railing is strong.
Finally. your deck nears completion. It’s time to lay the decking. Nail the first board alongside, but not touching, the house, driving two 16d galvanized nails at each joist. Fig. 7 shows proper nailing technique and several types of decking. All work well.
Lay the three common decking boards — 2x6, 2x4 and 5/4x6 — bark side up for better drainage. Drive nails 3/4 in. from board edge.
Cut guardrail accurately, then nail and screw it to the post. Predrill holes to mid splitting ends.
Deck Board Spacer: It’s easy to space deck boards evenly. Just insert 3/8-in. wooden dowels, or the diameter of the spacing you desire, into several scrap 2x4 pieces. Place the dowels between adjacent deck boards and fasten the boards in place.
Here are some other decking tips:
- Space each board with a 16d nail.
- Nail the ends of bowed boards first, forcing the bow against the previous row. Then drive a wide wooden shim between the rows to properly space the bowed board.
- Make clean joints by cutting boards off perfectly square and butting them together over the center of a joist.
- Predrill nail holes near board ends to avoid splitting, Make these slightly smaller than the diameter of the nail passing through them.
- Let the boards extend beyond the edge of the deck. You can cut them all off evenly after nailing them all down.
Install the railing
Design your railing so it’s at least 36 in. high and so that a 6-in. ball (soon to be 4-in. in some regions) cannot pass through any opening (Fig. 6). The top rail should be the strongest, a 2x4 at minimum. It’s also most visible, so select your best-looking material for it.
Rails that pass over the tops of the posts are strongest and easiest to fasten. Simply nail them into the posts with 16d galvanized box nails. Other designs, like the one in Fig. 8, require careful nailing to ensure strength. Predrill both the nail and screw holes. Use 10d galvanized casing nails on the edges of the 2x4 and 2-in. No. 10 galvanized screws beneath, as shown. If your design calls for a bottom rail, make sure it is at least 2x4. All other material should be at least 2x2 or stronger.
There are many other additions you can make to your deck: benches, planters, a stairway. Let your imagination run.
A well-built deck: an attractive, permanent addition to your home.
Miscellaneous tips for getting started:
- Pull out a pad of paper and a pencil, and sketch the deck you'd like to add to your home. You don't have to be an artist. Just jot those ideas down.
- Fill out the details, using other decks for examples. Chock magazines and books for ideas.
- Go out to your proposed deck site and with a tape measure, figure out the rough dimensions: length, width, height. Note any unusual features and potential problems. Add your measurements to a more detailed sketch.
- Take your design to your local building inspector’s office. They’ll review your plan, help size beams and joists, check the railing and generally be a good source of technical information. Go ahead and discuss your ideas in detail. They, too, are interested in your building a high-quality, safe dock. They’ll tell you if you need a permit.
- Review your plan and draw up a material list. Count every board and bolt. 0n custom projects even the professionals do this.
- With materials list and plan in hand, visit your favorite lumberyard to get an estimate for the cost of materials. The yard personnel can be very helpful. Respect their time. Avoid Saturdays, when they're likely to be most busy. Explain your plan, listen for new ideas and techniques, and go out into the yard and chock the wood.
Avoid lumber that appears wet. It will shrink excessively and might twist and warp as it dries. Good material is dry, straight and free from splits and cracks. Compare the different kinds of deck boards and railing material. Does it meet your expectations? Check several lumberyards, since quality varies.
Finally, price all your material and add it up. Check for extra expenses like delivery fees. Then, well, why not... ask for a discount! - When the lumber comes, you're ready to go. Lay out the post and foundation locations. This can be tricky, especially on sloped sites. And it needs to be accurate. So if you aren’t fully confident, look at several deck-building books. Most contain a section on layout; or ask someone who understands layout principles to help you check your work.
- Finally, give yourself plenty of time to complete the dock. Typically, projects take longer than you first imagine, but the quality you achieve is worth it.
UPDATE: Avoid Common Deck-Building Mistakes
One of the pleasures of building a good, solid deck is believing that it’ll last forever. Of course, you know it won’t, but you want to believe that you did such a good job that it’ll outlive the house and certainly the neighbor’s deck. And it might if you put it together right.
But despite your skills and patience, three enemies eagerly wait to reduce your new deck to a pile of waste wood in just a few years:
- A weak design can cause it to collapse;
- Rot can steadily erode its strength; and
- Harsh weathering can crack the wood and weaken its joints.
You’ll learn how these foes attack your deck and also how to keep them at bay.
When you dive into your next deck project, plan to stop these enemies right from the start, and you’ll keep your deck healthy for a long, long time.
Design it right
Building inspectors have found that many homeowners, designing by “rules of thumb,” make beams too small. A “beam” is usually the biggest chunk of wood that lies horizontally like a spine under or at the ends of the rib-like spacing row. You can choose from either of the two beam sizes shown there, either three 2x8s or two 2x10s nailed together.
The beam, here consisting of two 2x10s, must be strong enough to support the weight of the deck, plus the weight of all the activity that takes place in it. If it bends too much, your deck will feel unstable underfoot.
| 6' | 7' | 8' | 9' | 10' | 11' | 12' | 13' | 14' | |
|---|---|---|---|---|---|---|---|---|---|
| 4' | 1-2x6 | 1-2x6 1-2x8 | 1-2x6 1-2x8 | 1-2x8 1-2x10 | 1-2x8 1-2x10 | 1-2x8 1-2x10 | 1-2x8 1-2x10 | 1-2x10 1-2x12 | 1-2x10 1-2x12 |
| 5' | 1-2x6 | 2-2x6 1-2x8 | 2-2x6 1-2x8 | 1-2x8 1-2x10 | 1-2x8 1-2x10 | 1-2x8 1-2x10 | 1-2x8 1-2x10 | 1-2x10 1-2x12 | 1-2x10 1-2x12 |
| 6' | 2-2x6 | 2-2x6 1-2x8 | 2-2x6 2-2x8 | 2-2x8 1-2x10 | 2-2x8 1-2x10 | 2-2x8 1-2x10 | 2-2x8 1-2x10 | 2-2x10 1-2x12 | 2-2x10 1-2x12 |
| 7' | 2-2x6 | 3-2x6 2-2x8 | 3-2x6 2-2x8 | 2-2x8 2-2x10 | 2-2x8 2-2x10 | 2-2x8 2-2x10 | 3-2x8 2-2x10 | 2-2x10 1-2x12 | 2-2x10 2-2x12 |
| 8' | 3-2x6 2-2x8 | 3-2x6 2-2x8 | 3-2x6 2-2x8 | 3-2x8 2-2x10 | 3-2x8 2-2x10 | 3-2x8 2-2x10 | 3-2x8 2-2x10 | 2-2x10 2-2x12 | 3-2x10 2-2x12 |
| 9' | 3-2x6 2-2x8 | 4-2x6 3-2x8 | 4-2x6 3-2x8 | 3-2x8 2-2x10 | 3-2x8 2-2x10 | 3-2x8 2-2x10 | 4-2x8 3-2x10 | 3-2x10 2-2x12 | 3-2x10 2-2x12 |
| 10' | 4-2x6 3-2x8 | 3-2x8 2-2x10 | 3-2x8 2-2x10 | 3-2x8 3-2x10 | 4-2x8 3-2x10 | 4-2x8 3-2x10 | 4-2x8 3-2x10 | 3-2x10 2-2x12 | 3-2x10 3-2x12 |
| 11' | 3-2x8 2-2x10 | 3-2x8 2-2x10 | 4-2x8 3-2x10 | 4-2x8 3-2x10 | 3-2x10 2-2x12 | 3-2x10 3-2x12 | 3-2x10 3-2x12 | 4-2x10 3-2x12 | 4-2x10 3-2x12 |
| 12' | 3-2x8 2-2x10 | 4-2x8 3-2x10 | 4-2x8 3-2x10 | 3-2x10 2-2x12 | 3-2x10 3-2x12 | 4-2x10 3-2x12 | 4-2x10 3-2x12 | 4-2x10 3-2x12 | 3-2x12 |
Use the above span table to determine the minimum size (strength) of your beam. Beam sizes in this table are based on the strength of Ponderosa pine, a relatively weak species. Beams made from stronger wood can often be smaller.
As you might expect, longer joists put more weight on a beam, so you have to make it bigger and stronger. The same thing happens when you space your posts farther apart. When your post spacing reaches about 10 ft., the beams get big and heavy, sometimes four 2x8s, three 2x10s or larger. In reality, these beams are simply too heavy to handle. They also require wider posts, 4x6s or 4x8s, to rest on.
Fortunately, there’s an easy way to make them smaller without sacrificing the overall strength of your deck. Simply add more posts (Fig. C). Adding posts shortens the spans, and as you can see in the table, sharply reduces the beam size needed. Even in this example, you could reduce the beam size from two 2x10s in Fig. A down to one 2x8 in Fig. C. I used two 2x8s rather than one in Fig. C, simply because they make the deck feel a bit stiffer underfoot and fit better atop 4x4 posts.
A third post shortens the distance the beam must span, so the beam doesn’t have to be as large. According to the span table, one 2x8 does the job, though a second 2x8 was added for additional stiffness.
In general, your deck will feel firmer if you space your posts no more than 6 in. apart.
Build to stop rot
The most damaging weapon nature uses to attack your deck is virtually invisible — rot-causing fungus.
Fungus spreads in the form of thousands of microscopic spores that float through the air. If they find enough moisture, the spores that settle on your freshly built deck will root and grow, slowly dissolving the wood fiber. You’ll see it happen as your deck “weathers” to a silver gray in a few years. The surface fungus that causes the color change is a mold that really does no significant damage. But other types of fungus will destroy the wood fiber and weaken your deck’s structure.
Fungus needs moisture to grow, so rot won’t occur in any type of wood if the wood can dry out easily after rainstorms. Most deck wood dries quickly, but a few places remain wet for a long time (Fig. D). That’s where fungus takes root.
Areas of deck wood that absorb water readily yet dry slowly will rot first. Fungus quickly takes root in moist areas. The ends of boards and joints are common trouble spots.
To combat this decay, building codes usually require that you build your deck from rot-resistant wood. You’ll find three types of wood readily available to do the job:
- heart redwood,
- heart cedar, and
- pressure-treated.
Heartwood
The “heartwood” of redwood and cedar is the deeper-colored core of a tree as compared to the cream-colored outer wood called “sapwood.”
The heartwood contains natural chemicals that are toxic to fungus. They’ll hold decay at bay until water slowly leaches these chemicals out of the wood.
Depending on rainfall and moisture conditions in your region, serious signs of decay can begin within 10 years.
Pressure-treated wood
Pressure-treated wood lasts longer — almost indefinitely, no matter what species of wood is used. Pressure treatment is a process that forces chemicals that are toxic to fungus (termites, too) virtually throughout the wood fiber of your lumber. The chemicals bond to the fiber and remain there.
The longevity of pressure-treated wood plus its lower cost (20 to 50 percent less than cedar or redwood, depending on your region) make it an excellent choice for most deck projects You can even bury properly treated posts without worrying about them disintegrating.
How do I buy treated lumber?
A “.40” rating should be stamped right on the board, which means it contains .40 pounds of preservative per cubic foot of wood.
Inspect the boards to make sure they’re dry. The preservative permanently bonds with the wood only when it dries. So don’t buy boards that seem waterlogged or unusually heavy.
You might have trouble finding dry 4x4s and larger timbers. These take longer to dry after the treatment process, so treatment facilities often ship them out before they’re dry. If you have to use them while they’re still wet, be sure to observe the safety precautions below.
Also reject wood with chemical residue on its surface; you should see what looks like an even coat of green or brown stain. As a sign of quality, look for the American Wood Protection Association (AWPA) stamp or a lifetime guarantee on each board. But make a visual inspection and use your own judgment, too.
Good quality treated lumber will contain no more than a trace of heartwood, the darker center of a tree. Preservative chemicals often won’t penetrate heartwood, so it can quickly rot.
Safety precautions for dealing with pressure-treated wood
Handle treated wood cautiously.
- Wear goggles when cutting it to keep sawdust away from your eyes.
- Wash your hands after working with it, and don’t burn leftover scraps.
- Burning the scraps can release the toxic chemical as fumes. Put scraps in the trash instead.
Other tips
Many deck builders don’t like the green color or knotty appearance of treated wood. So they keep it out of sight, using it for the joists, beams and posts. Then they switch to cedar or redwood for the highly visible decking and railing.
If you prefer to use redwood or cedar, you can make them last longer by treating them with a chemical preservative yourself. You don’t have to treat the entire deck, only the vulnerable areas (Fig. D), especially joints where moisture sinks in and dries out slowly.
Dunk the critical ends of posts and other lumber into a bucket of wood preservative (formulated to resist fungus) for an hour or even a day to let as much preservative as possible soak into the wood. (Wear rubber gloves when you work with preservative to keep it off your skin.)
Homeowners can no longer buy powerful commercial preservatives, so this method won’t make your wood as rot resistant as pressure-treated wood. But it can delay rot for several additional years.
Control wood movement
Deck surfaces exposed to direct sun and rain take a terrific beating. Every time water soaks them, the wood swells. Then when the sun bakes them dry, the wood shrinks. Over time these repeated movements can cause boards to crack and split. In addition, nails loosen and pop up. Gaps appear at joints. And boards warp. The result is a shabby deck.
On this point, redwood and cedar usually have the edge on pressure-treated wood. Redwood and cedar are relatively soft and light. They don’t react as much to wetting/drying cycles as several of the denser types used for pressure treating, like Southern yellow pine. What’s more, the chemicals in treated wood tend to attract moisture, causing treated wood to swell more readily than redwood and cedar.
To solve the problem caused by wetting/drying cycles. processors of top-quality treated wood impregnate some of their wood products with a water repellent so they absorb less moisture, swell less, and therefore crack and warp less. This wood costs 10 to 20 percent more but often comes with a lifetime guarantee. When shopping for deck material, ask your local lumber dealer about this type of treated wood.
Most treated wood doesn’t contain a water repellent, but you can brush one on to accomplish the same thing. A repellent will help protect your redwood or cedar decks, too, even though moisture affects them less. (Water repellents are often confused with wood preservatives. A wood preservative is a chemical that’s toxic to wood—destroying fungus, bacteria and insects. A water repellent simply keeps the water out.)
Unfortunately, brushed-on water repellents last only two to three years. You’ll need to recoat your deck as soon as you notice water drops soaking into the wood rather than “beading” and remaining on the surface.
Types of water repellents
Paint is the best repellent because it forms a protective skin over the wood. It lasts the longest too. Unfortunately, though, repainting a deck is difficult once the first coat peels, because you have to scrape and sand the wood to prepare for a new coat. The extra effort usually isn’t worth the trouble.
Clear, skin-forming finishes like varnish and polyurethane also protect well but don’t last long. Even special formulations break down and peel under intense sunlight, causing the same recoating problems as paint.
For recoating ease, your best bet is to apply a clear penetrating sealer or an exterior stain that also seals. Neither of these forms a skin on the wood surface that can peel. Penetrating sealers and stains contain resins that partially fill the wood pores and repel water. Because they form a thinner coat than paint, sealers and stains usually last only a few years. They soon wear off high-traffic areas and weather away from areas exposed to direct sun and rain. But when you recoat the deck, you don’t have to scrape off the old finish, so sealers and stains are much easier to reapply than paint.
Moreover, stains come in many colors, so you can blend your deck into the color scheme of your home. For more protection or when the stain doesn’t contain a water repellent, apply a clear sealer (or other water repellent) first. Check the containers to make sure the stain and repellent are compatible.