
3 Solutions For Wet Basements (With Costs)
There aren’t many house problems more frustrating or upsetting than water in the basement. Whether it’s water dribbling through your foundation, standing puddles or worse, it’s a nuisance and a mess.
But you know what? You can have a dry basement.
Sometimes the problem is easy to fix and you can make the repair yourself; other times the problem and the fix are quite complicated and you need to call in a professional. Some of the repairs are fairly inexpensive; others can run into big bucks.
But no matter what you decide to do, a dry basement brings peace of mind. And as far as I’m concerned, that’s worth every dollar. You see, at one time (yes, it’s tough to admit) I was a wet-basement homeowner.
If your home is built on a slab or has a crawl space, you should still read this article. Why? Because I bet you know someone who has had water in their basement. So, read the information and pass it along to someone who needs it. They’ll thank you for it!
Choosing The Correct Wet Basement Repair
Drying up a wet basement can be one of the trickiest repairs to make to a house because you need to determine how and why the water is getting in before you can stop it. And the cause isn’t always obvious.
Begin by looking at the material that was used to construct your basement walls, either concrete block or poured concrete. (In this article, I’m skipping over the all-wood foundations now available.) The wall material determines the type of repair you can make.
For that reason, the story is divided into three sections; each section illustrates a progressively more complicated repair. These are the most widely used repair methods no matter what region you live in.
By the way, I won’t be discussing the use of waterproofing paint or hydraulic cement; my focus is on water problems that require more complex solutions.
The first repair shown, installing gutters and sloping your yard away from the foundation, can be made to a home with either type of basement wall material.
The second repair, installing interior drain tile, can be done only to homes with concrete block walls.
The third repair, exterior drain tile, is for homes with poured concrete walls. This fix is also the one to choose if your home has block walls and you don’t want to disturb the interior.
Each section tells you when you can make the repair or when it’s time to call a professional, along with the estimated costs and how long it’ll take you or a professional to complete the project.
The Easy Stuff – Gutters And Grade
If your home has block walls and the top one-third of the wall is wet after a heavy rain, this fix will probably do the trick. Water that pools on the ground near your home’s foundation and soaks into the soil can seep into your basement.
Start by examining the edge of the roof and the landscaping around the foundation. If your house doesn’t have gutters, downspouts, and extensions (a section of downspout that directs the water away from the house), the rain that runs off the roof has nowhere to go but straight down from the roof to the ground right next to the foundation.
Couple that with a grade that slopes toward the foundation and you’re bound to have water problems sooner or later.
Begin by installing gutters, downspouts, and extensions (Fig. A).
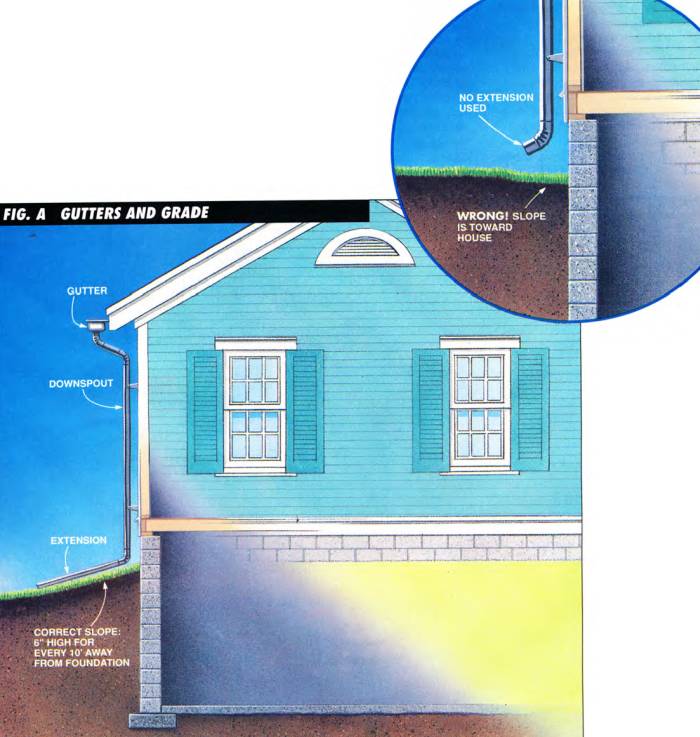
The extensions must move water away from the house to prevent it from soaking into the ground near the foundation.
Gutters cost around $5 a linear foot for either vinyl or metal (this includes all the necessary brackets and connectors, which are what drive up the per-foot cost). You can usually install them in one weekend. If you have them installed by a professional, you’ll spend an additional $4 per linear ft.
Next, check the grade or slope around the foundation. The downward slope should be at least 6 in. for every 10 it. away from the house (Fig. A). If the slope is less than 6 in. or there’s no slope at all (inset to Fig. A), correct it.
A layer of water-impervious soil, such as clay, covered with topsoil and sod is the best way to shed water on a sloped area.
Once you’ve made both of these changes, you need to wait for the next heavy rain or two to see if they solve the problem. And in most cases, they will.
If they don’t, you’ll need to consider making one of the more complex and expensive repairs described in the next two sections.
More Work, More Money – Interior Drain Tile
If your home has poured concrete walls, you can skip this section. But if your foundation is concrete block, read on.
This repair intentionally draws the water in through the blocks, channels it to a central location, and then pumps it outside.
Fig. B shows how it works.
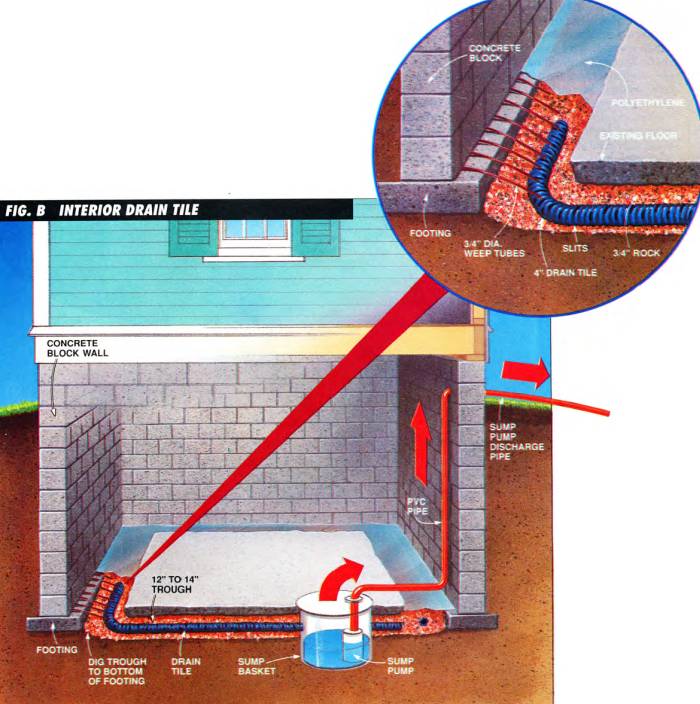
The water is directed through weep tubes (short lengths of 3/4-in. diameter plastic tubing) inserted into holes drilled into each cavity of each bottom concrete block. This includes the cavity formed when the ends of two blocks are mortared together, and the corner joint cavities.
The weep tubes drain onto a drain tile pipe (a 4-in. diameter flexible plastic pipe with slits), which channels the water into a sump basket (3 large plastic barrel).
The sump pump, located in the sump basket, pumps the water up and out of the basement through a PVC pipe.
The PVC discharge pipe must extend far enough away from the foundation so that the pumped water will drain away from the house and not find its way back into the basement.
This repair can be done by a homeowner, but it’s very labor intensive.
You’d probably be better off hiring a pro. However, it’s the best way to eliminate a water problem because it brings the water in at the wall’s lowest point — where the block rests on the footing.
Here’s a quick overview of the steps involved with this installation:
First, you need to break up and remove a 12- to 14-in. wide section of the concrete floor where it meets the wall. Next, dig a trough around the basement’s entire perimeter in the area you just broke up, all the way down to the bottom of the footing (inset to Fig. B).
Breaking up a concrete floor with a jack-hammer and hauling the old concrete and dirt out is slow, back-breaking work, especially if your basement is not a walkout and you have to carry the stuff up the steps.
Breaking up the floor with hand tools alone is out of the question, except for very large, very strong people with little else to do!
Next. you need to spread about a 2- to 3-in. layer of 3/4-in. rock in the trough you just excavated. Again, a slow, labor-intensive job.
Now, drill 3/4-in. diameter holes in every cavity of each block. These holes need to be flushed out with water (you use a garden hose) so the water you do invite into and through the block can flow freely into the weep tubes, which are inserted into the drilled holes.
Concrete blocks have either two or three empty cavities inside them and you need to know which type of block you have so that you can drill a hole into each cavity.
The easiest way to determine the number of cavities is to drill a hole in the center of one of the blocks along the bottom row (where you’ll install the weep tubes). If you run into an obstruction, you’ve hit the center core of a two-cavity block. If you drill through easily, you’ve drilled into the empty center cavity of a three-cavity block.
Next. lay the 4-in. diameter continuous plastic drain tile (it’s sold in 50-ft. or 100-ft. rolls) on the layer of gravel. Then you install the weep tubes into the holes in the block.
Now, spread a layer of 3/ 4-in. diameter rock over the drain tile you just put in — more lifting and hauling.
Finally, put down a layer of polyethylene film to cover the rock and weep tubes and then fill in the area with concrete (that you have to mix and haul) to finish the floor. Whew!
A professional basement waterproofing company charges $40 to $50 a linear foot to do the work. You can do it yourself for between $15 and $20 a foot—a savings of around 60%, but you’ll pay for it with your time and effort.
The pros will also have the job done in two to three days. It could take you two to three weekends, weeks, months? Most professional installations also come with a guarantee.
Either way, interior drain tile is the best fix for homes with concrete block walls.
An alternative to interior drain tile is the interior water dam system (Fig. C).
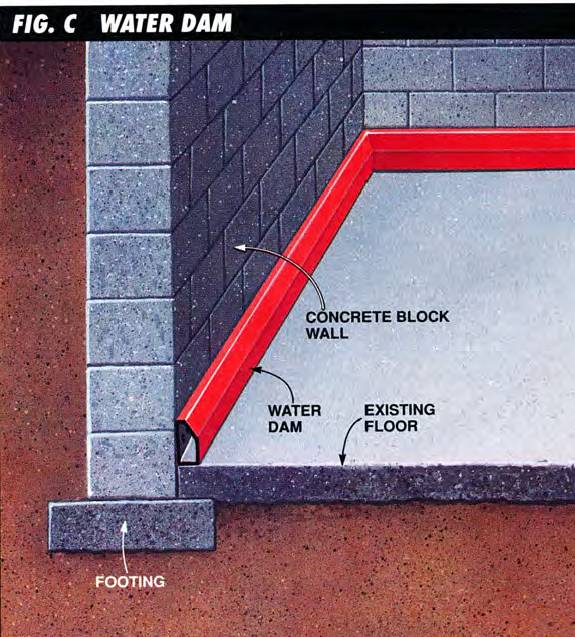
This type of system catches or traps water at the base of the wall on the existing basement floor, not below the floor at the footing. The enclosed channel then carries the water to a sump basket where it’s pumped outside by a sump pump.
For Professionals Only – Exterior Drainage System
If your basement walls are poured concrete. this is the repair you’ll need to make. It’s also the fix if the walls are concrete block and you don’t want to tear up the basement floor.
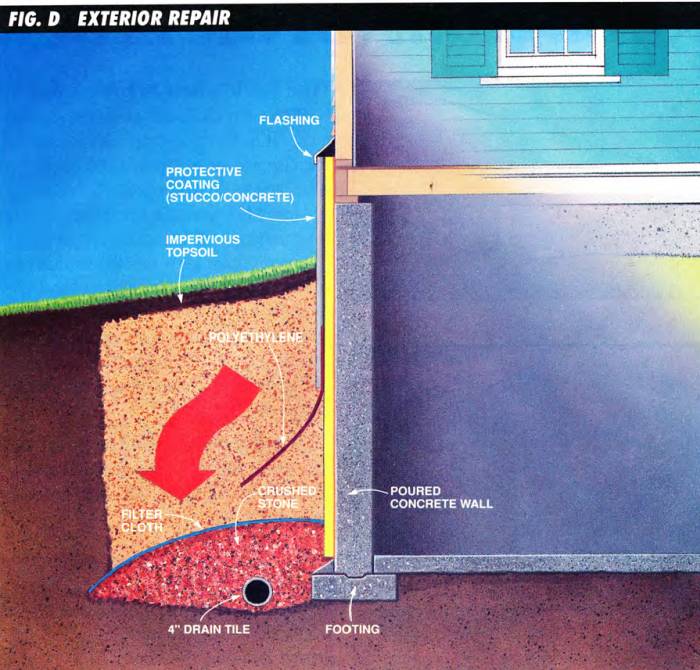
With this repair, you prevent the water from getting to the foundation in the first place by using the correct type of fill gravel around the foundation and footings, filter cloth, exterior insulation, backfill, topsoil, and, finally, the correct slope.
I won’t go into all the details of this procedure, because it’s generally an expensive, “pros-only” repair. It’s expensive because you need heavy equipment to dig up the soil around the foundation, all the way down to the house footings (often 8 ft. below grade).
Once everything is excavated, you need to spread a layer of 3/4-in. rock and install the 4-in. drain tile pipe.
Onto the foundation, you install a rigid insulation board, polyethylene sheeting and a protective coating over the insulation board.
Then you fill the area with a granular (water-porous) backfill, so the water that does get through the layer of properly sloped sod and impervious topsoil (the next layer) will filter directly down to the drain tile (Fig. D).
Be prepared for much of your yard to be torn up by the digging equipment. There’s just no neat, simple way to dig around a foundation without causing a great deal of damage to your lawn and landscaping.
It’s expensive too. Plan to pay between $40 and $45 a linear foot just for the digging. New landscaping will add thousands of dollars to the final cost.
A contractor will complete a repair even this complex in less than one week. If you want to do the job yourself (after someone digs everything out), plan on it taking one month — minimum! Better yet, make this your only project for the summer.
There aren’t many house problems more frustrating or upsetting than water in the basement. Whether it’s water dribbling through your foundation, standing puddles or worse, it’s a nuisance and a mess.
But you know what? You can have a dry basement.
Sometimes the problem is easy to fix and you can make the repair yourself; other times the problem and the fix are quite complicated and you need to call in a professional. Some of the repairs are fairly inexpensive; others can run into big bucks.
But no matter what you decide to do, a dry basement brings peace of mind. And as far as I’m concerned, that’s worth every dollar. You see, at one time (yes, it’s tough to admit) I was a wet-basement homeowner.
If your home is built on a slab or has a crawl space, you should still read this article. Why? Because I bet you know someone who has had water in their basement. So, read the information and pass it along to someone who needs it. They’ll thank you for it!
Choosing The Correct Wet Basement Repair
Drying up a wet basement can be one of the trickiest repairs to make to a house because you need to determine how and why the water is getting in before you can stop it. And the cause isn’t always obvious.
Begin by looking at the material that was used to construct your basement walls, either concrete block or poured concrete. (In this article, I’m skipping over the all-wood foundations now available.) The wall material determines the type of repair you can make.
For that reason, the story is divided into three sections; each section illustrates a progressively more complicated repair. These are the most widely used repair methods no matter what region you live in.
By the way, I won’t be discussing the use of waterproofing paint or hydraulic cement; my focus is on water problems that require more complex solutions.
The first repair shown, installing gutters and sloping your yard away from the foundation, can be made to a home with either type of basement wall material.
The second repair, installing interior drain tile, can be done only to homes with concrete block walls.
The third repair, exterior drain tile, is for homes with poured concrete walls. This fix is also the one to choose if your home has block walls and you don’t want to disturb the interior.
Each section tells you when you can make the repair or when it’s time to call a professional, along with the estimated costs and how long it’ll take you or a professional to complete the project.
The Easy Stuff – Gutters And Grade
If your home has block walls and the top one-third of the wall is wet after a heavy rain, this fix will probably do the trick. Water that pools on the ground near your home’s foundation and soaks into the soil can seep into your basement.
Start by examining the edge of the roof and the landscaping around the foundation. If your house doesn’t have gutters, downspouts, and extensions (a section of downspout that directs the water away from the house), the rain that runs off the roof has nowhere to go but straight down from the roof to the ground right next to the foundation.
Couple that with a grade that slopes toward the foundation and you’re bound to have water problems sooner or later.
Begin by installing gutters, downspouts, and extensions (Fig. A).
The extensions must move water away from the house to prevent it from soaking into the ground near the foundation.
Gutters cost around $5 a linear foot for either vinyl or metal (this includes all the necessary brackets and connectors, which are what drive up the per-foot cost). You can usually install them in one weekend. If you have them installed by a professional, you’ll spend an additional $4 per linear ft.
Next, check the grade or slope around the foundation. The downward slope should be at least 6 in. for every 10 it. away from the house (Fig. A). If the slope is less than 6 in. or there’s no slope at all (inset to Fig. A), correct it.
A layer of water-impervious soil, such as clay, covered with topsoil and sod is the best way to shed water on a sloped area.
Once you’ve made both of these changes, you need to wait for the next heavy rain or two to see if they solve the problem. And in most cases, they will.
If they don’t, you’ll need to consider making one of the more complex and expensive repairs described in the next two sections.
More Work, More Money – Interior Drain Tile
If your home has poured concrete walls, you can skip this section. But if your foundation is concrete block, read on.
This repair intentionally draws the water in through the blocks, channels it to a central location, and then pumps it outside.
Fig. B shows how it works.
The water is directed through weep tubes (short lengths of 3/4-in. diameter plastic tubing) inserted into holes drilled into each cavity of each bottom concrete block. This includes the cavity formed when the ends of two blocks are mortared together, and the corner joint cavities.
The weep tubes drain onto a drain tile pipe (a 4-in. diameter flexible plastic pipe with slits), which channels the water into a sump basket (3 large plastic barrel).
The sump pump, located in the sump basket, pumps the water up and out of the basement through a PVC pipe.
The PVC discharge pipe must extend far enough away from the foundation so that the pumped water will drain away from the house and not find its way back into the basement.
This repair can be done by a homeowner, but it’s very labor intensive.
You’d probably be better off hiring a pro. However, it’s the best way to eliminate a water problem because it brings the water in at the wall’s lowest point — where the block rests on the footing.
Here’s a quick overview of the steps involved with this installation:
First, you need to break up and remove a 12- to 14-in. wide section of the concrete floor where it meets the wall. Next, dig a trough around the basement’s entire perimeter in the area you just broke up, all the way down to the bottom of the footing (inset to Fig. B).
Breaking up a concrete floor with a jack-hammer and hauling the old concrete and dirt out is slow, back-breaking work, especially if your basement is not a walkout and you have to carry the stuff up the steps.
Breaking up the floor with hand tools alone is out of the question, except for very large, very strong people with little else to do!
Next. you need to spread about a 2- to 3-in. layer of 3/4-in. rock in the trough you just excavated. Again, a slow, labor-intensive job.
Now, drill 3/4-in. diameter holes in every cavity of each block. These holes need to be flushed out with water (you use a garden hose) so the water you do invite into and through the block can flow freely into the weep tubes, which are inserted into the drilled holes.
Concrete blocks have either two or three empty cavities inside them and you need to know which type of block you have so that you can drill a hole into each cavity.
The easiest way to determine the number of cavities is to drill a hole in the center of one of the blocks along the bottom row (where you’ll install the weep tubes). If you run into an obstruction, you’ve hit the center core of a two-cavity block. If you drill through easily, you’ve drilled into the empty center cavity of a three-cavity block.
Next. lay the 4-in. diameter continuous plastic drain tile (it’s sold in 50-ft. or 100-ft. rolls) on the layer of gravel. Then you install the weep tubes into the holes in the block.
Now, spread a layer of 3/ 4-in. diameter rock over the drain tile you just put in — more lifting and hauling.
Finally, put down a layer of polyethylene film to cover the rock and weep tubes and then fill in the area with concrete (that you have to mix and haul) to finish the floor. Whew!
A professional basement waterproofing company charges $40 to $50 a linear foot to do the work. You can do it yourself for between $15 and $20 a foot—a savings of around 60%, but you’ll pay for it with your time and effort.
The pros will also have the job done in two to three days. It could take you two to three weekends, weeks, months? Most professional installations also come with a guarantee.
Either way, interior drain tile is the best fix for homes with concrete block walls.
An alternative to interior drain tile is the interior water dam system (Fig. C).
This type of system catches or traps water at the base of the wall on the existing basement floor, not below the floor at the footing. The enclosed channel then carries the water to a sump basket where it’s pumped outside by a sump pump.
For Professionals Only – Exterior Drainage System
If your basement walls are poured concrete. this is the repair you’ll need to make. It’s also the fix if the walls are concrete block and you don’t want to tear up the basement floor.
With this repair, you prevent the water from getting to the foundation in the first place by using the correct type of fill gravel around the foundation and footings, filter cloth, exterior insulation, backfill, topsoil, and, finally, the correct slope.
I won’t go into all the details of this procedure, because it’s generally an expensive, “pros-only” repair. It’s expensive because you need heavy equipment to dig up the soil around the foundation, all the way down to the house footings (often 8 ft. below grade).
Once everything is excavated, you need to spread a layer of 3/4-in. rock and install the 4-in. drain tile pipe.
Onto the foundation, you install a rigid insulation board, polyethylene sheeting and a protective coating over the insulation board.
Then you fill the area with a granular (water-porous) backfill, so the water that does get through the layer of properly sloped sod and impervious topsoil (the next layer) will filter directly down to the drain tile (Fig. D).
Be prepared for much of your yard to be torn up by the digging equipment. There’s just no neat, simple way to dig around a foundation without causing a great deal of damage to your lawn and landscaping.
It’s expensive too. Plan to pay between $40 and $45 a linear foot just for the digging. New landscaping will add thousands of dollars to the final cost.
A contractor will complete a repair even this complex in less than one week. If you want to do the job yourself (after someone digs everything out), plan on it taking one month — minimum! Better yet, make this your only project for the summer.