
How to use a wood chisel safely (with pictures)
You may not need one often, but when it comes time to carve out a recess for a hinge or strike plate, nothing beats a razor-sharp chisel.
Keep on reading and I’ll show you basic chiseling techniques and sharpening tips so you’ll be ready for any chiseling task.
What chisels AREN’T made for
I learned what chisels shouldn’t be used for long before I learned what they should be used for.
My father informed me, during one memorable tirade, that chisels (especially his) were not to be used as screwdrivers, paint can openers, or stakes for my camping tent.
What are chisels good for?
Well then, what is the purpose of these simple little tools? Are they only for the hands of the skilled cabinet maker and woodcarver? Or do they have some honest, down-to-earth uses for honest, down-to-earth DIYers?
Surely, chisels have lost a lot of ground to power tools: Routers now cut dovetails where Chisels once carved, and belt sanders can fine-tune a curve faster than most of us can wield a chisel.
What if you can’t use a power tool?
Sometimes, working in tight places with a power tool might be too big and awkward. In those scenarios, there’s still no equal to the good old-fashioned chisel:
- making a hinge recess,
- squaring up a corner.
Basic Chiseling Techniques
After that, it’s just a matter of choosing the right technique or combination of techniques to finish the job. Start recesses or mortises by outlining the area with a sharp utility knife or by making a series of shallow chisel cuts perpendicular to the surface. Skip this step and you risk chipping wood outside the mortise. Then remove thin slices by tapping the chisel with a hammer, bevel side down as in Photo 1, to carve out the wood inside the perimeter.
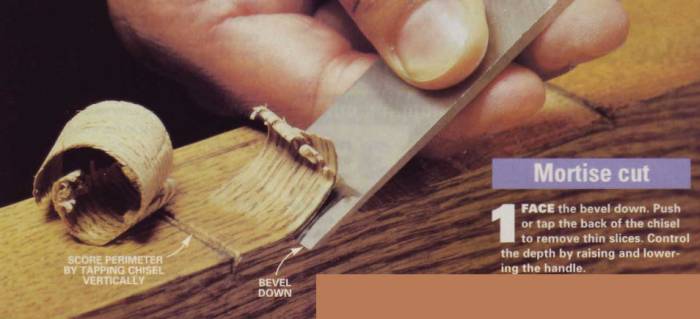
Face the bevel down. Push or tap the back of the chisel to remove thin slices. Control the depth by raising and lowering the handle.
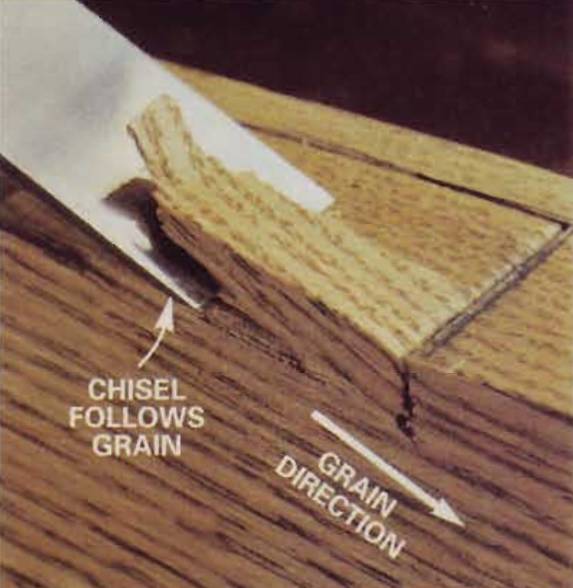
Chiseling with the grain can sometimes have disastrous results. If the grain runs deeper into the wood, it’ll direct the chisel too deep. Stop and chisel from the opposite direction if you feel this happening.
If the recess is open on one side, like a hinge mortise, flatten the bottom by paring off thin slices with the back, unbeveled side of the chisel held flat to the wood (Photo 2 below).
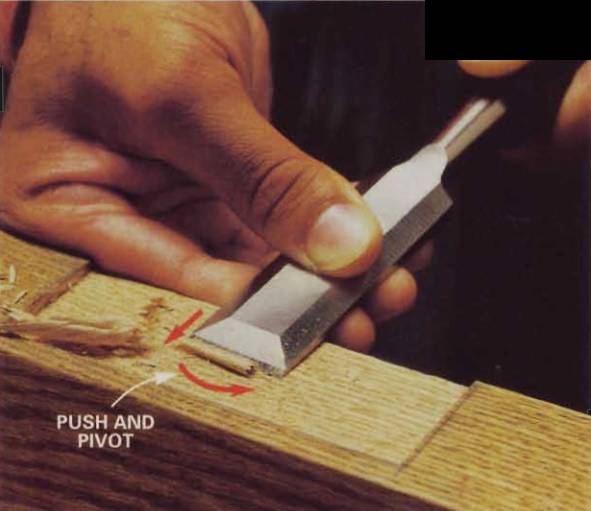
Pare thin slices of wood to flatten the bottom of an open recess. Keep the back of the chisel flat on the wood. For easier slicing, pivot the chisel as you cut to move the blade in an arc.
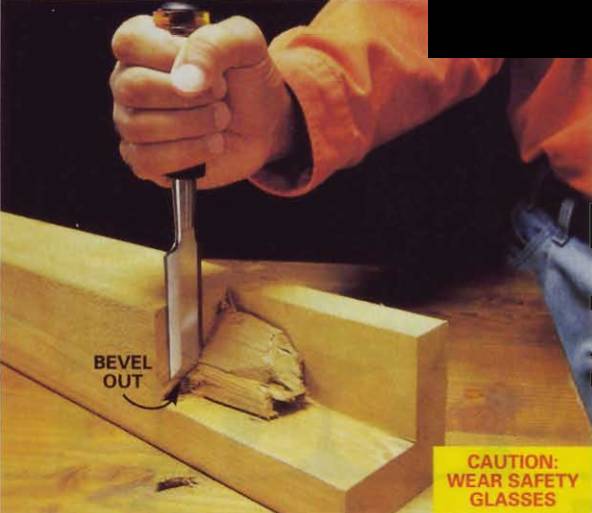
Chop out large amounts of wood by slicing off small amounts with each cut. Strike the chisel with a hammer and chop down about 1/2 in. Then chisel from the end to remove the piece before continuing. Your chisel must be sharp for this cut.
In general, when you’re shaving into a piece of wood, face the bevel down (Photo 1).
When you’re flattening a cut and have access from the side, face the bevel up and hold the back of the chisel tight to the surface (Photos 2 and 5).
Chisel out large chunks of wood a little at a time with a series of shallow cuts rather than driving the chisel too deep (Photo 4).
Use a hammer or mallet for rough work or press with the heel of your hand for lighter cutting chores or finer cuts.
Cut a groove, or dado, by first sawing along both edges to the desired depth. Then break out the wood in the middle with your chisel. Space the chisel cuts about 1/2 in. apart.
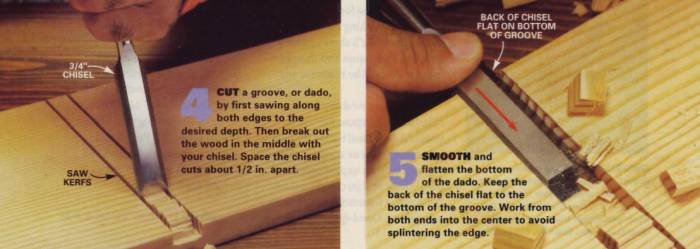
Smooth and flatten the bottom of the dado. Keep the back of the chisel flat to the bottom of the groove. Work from both ends into the center to avoid splintering the edge.
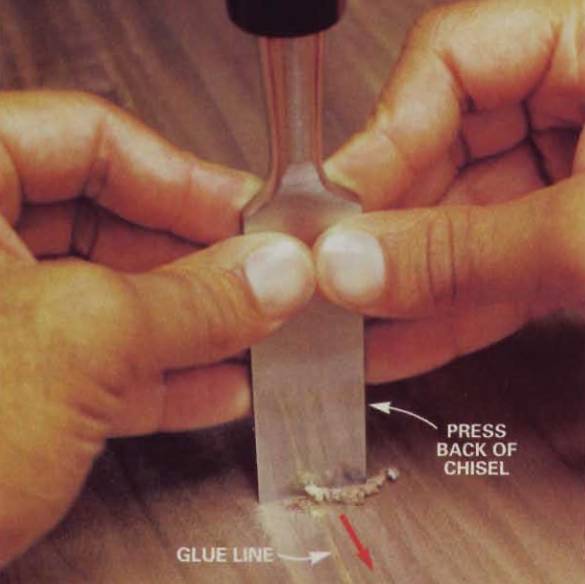
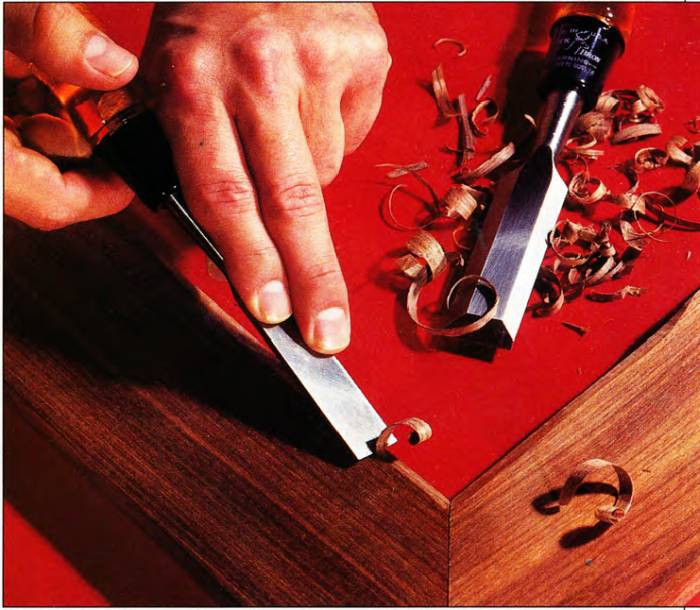
Scrape glue joints or other imperfections from wood projects by holding the blade at a right angle to the wood with the back of the chisel facing you. To remove thin shavings, support the blade with your fingers and press down while you draw the chisel toward you.
What chisels do best
Chisels excel at three tasks: making sharp plunge cuts, removing stock and smoothing. All three techniques — shown in these photos — are used to cut the recess for a door hinge.
Plunge cuts are made with the blade’s beveled edge facing the waste side of the cut. These cuts are used first to outline the hinge shape, then to score the area to a consistent depth (Photo 1) so wood can be removed in small manageable chips rather than one large chunk.
Remove the chips with the bevel side down (Photo 2). so you can control the depth of cut by slightly lowering and raising the handle as you work.
Smooth the area with the chisel bevel facing up (Photo 3). Use angled or circular motions to prevent tearing the grain.
How to chisel a door for hinges
Start with the prep work: screw the hinge to the door (or the jamb), and score around the outline of the hinge with a utility knife to avoid grain tearout.
- Make a series of vertical plunge cuts that are as deep as the hinge is thick. Outline the shape of the recess with plunge cuts first.
- Remove the small wood chips, cutting at a low angle. Keep bevel side down and raise and lower the handle to control the depth of cut.
- Pare the surface smooth using the chisel bevel side up. Hold the chisel flat and use a circular or angular motion to prevent tearing.

More tips on using a chisel
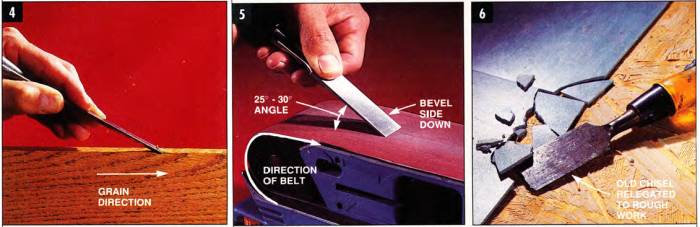
- Chisel with the grain. The blade will have a tendency to follow the grain and dig too deep when worked against the grain.
- Sharpen your chisel. with a belt sander and fine grit paper. Make certain belt is moving away from, rather than into, the chisel.
- Use a beater chisel for rough work. Relegate your badly nicked chisels to these chores so your good ones stay sharp.
Choosing a chisel
Start with a new sharp 3/4-in. chisel for all-purpose use. (Keep your old dull chisel handy for jobs like cutting nails or scraping caulk.) Buy one with an impact-resistant plastic handle. You can pound on these with a hammer without dam-aging them. If you have a little extra cash to buy good-quality chisels, buy three – 1/2-in., 3/4-in. and 1-in. — for a good starter set.
A good all-purpose chisel for the DIYer is the type with an impact-resistant plastic handle, capped with a metal button. These can be driven either by hand or with a hammer, they’re compact enough to fit in a tool pouch, and they don’t cost much. Chisels with wood handles are available, too, but should be struck only with a wooden mallet or pushed by hand. The Stanley 16-150 Short Blade 3-Piece Wood Chisel Set is a great value for the price.
Chisels must be made of steel that’s hard enough so they won’t dull easily during use, yet soft enough so they can be easily sharpened when dull or nicked. Good ones find a balance between these two extremes. Avoid El Cheapo models. The blades dull quickly and the handles shatter easily.
Always keep a nicked-up old “beater” chisel in the toolbox next to your sharp ones (Photo 6). The beater comes in handy for removing moldings, packing insulation into skinny crevices, scraping old caulk out of joints, and demolition work. In my everyday puttering, I probably use my beater chisel as much as I do the sharp one.
Even new chisels need sharpening. Polish the machine marks from the first 1 in. of the back of the chisel and hone a bevel on the face. Put your chisels in a sock or a special canvas roll between uses to protect the cutting edge.
Safety, safety, safety tips
A sharp chisel gives you great control and allows you to remove paper-thin slices of wood, but it can be dangerous if you’re not careful.
- Think safety. Wear safety glasses when striking with a hammer. Never push or drive a chisel toward you. Keep them out of the reach of children.
- Chisel with the grain (Photo 4). You'll have better control and there’s less chance of taking too deep a chunk.
- Always use two hands: one to guide the chisel, the other to push the chisel or to swing a hammer or mallet.
- Never chisel toward your body or place your hand in the path of a chisel.
- Cover the chisel blade when it's not in use.
- Store chisels in a safe place, away from children.
- Keep your project firmly clamped to the workbench. When working on large objects, such as doors, place them on a solid surface.
- Make several shallow passes rather than one huge bite.
Tips for sharpening chisels
A dull chisel is a dangerous chisel — it will lunge and skip. It’s difficult to control and requires more effort to use. Sharp Chisels go where you guide them and leave a smoother surface.
Sharpening is a two-step process. Shaping, with a file or grinding wheel, forms the correct tip angle. This needs to be done only when the tool has been badly nicked or damaged. Honing, on a sharpening stone, forms the razor-sharp cutting edge.
Here is an overview to the sharpening process:
- Shaping: Old chisels with nicked or rounded tips will need to be reshaped. Use a belt sander or grinder to remove nicks and shape the chisel to a 25-degree angle. If you're using a grinder, dip the chisel in water every two or three seconds to prevent the tip from overheating and turning blue. If this happens, the chisel won't hold an edge for long.
- Polishing: Next, polish the back of the chisel by rubbing it back and forth over progressively finer wet/dry sandpaper, pressing the back perfectly flat to the paper. For all sharpening, a good progression of paper is 120, 220, 400 and 600 grit.
- Honing: Finally, set the honing guide to hold the chisel at a 30-degree angle to create a "secondary bevel" and run through the grits, starting at 220. Roll the chisel back and forth over the sandpaper until a burr forms on the back of the blade. Turn the chisel over and stroke it flat on the sandpaper to remove the burr. Then move to a finer-grit paper and repeat the process.
Also, keep these sharpening tips in mind:
- Chisels cut best with a 25- to 30-degree blade bevel. One rough rule of thumb says the bevel face should be about twice as long as the chisel blade is thick.
- Remove major nicks (tsk, tsk — where was that beater chisel?) by first pushing the tool straight into a grinding wheel to resquare the tip, then sharpening to the proper angle.
- Hone the edge razor sharp on a sharpening stone. Hold the tip at a constant angle as you sharpen in a circular or figure-eight motion, Remove the burr that forms on the back of the blade tip by stroking that side flat against the stone.
- You can also use a belt sander (Photo 5) to quickly shape and sharpen chisels. Use a fine-grit paper, hold tight and work in three-second spurts to avoid overheating.

Sharpen your chisels on wet/dry sandpaper that’s lightly glued with spray adhesive to a piece of 1/4-in. glass with smoothed edges. Use a honing guide to maintain the correct angle and speed up the sharpening process.

The Atlin Honing Guide fits mortise chisels (with straight sides) from 1/8” to 1-7/8” on the lower opening and planer blades from 1-3/8” to 3-1/8” in the upper opening.

You may not need one often, but when it comes time to carve out a recess for a hinge or strike plate, nothing beats a razor-sharp chisel.
Keep on reading and I’ll show you basic chiseling techniques and sharpening tips so you’ll be ready for any chiseling task.
What chisels AREN’T made for
I learned what chisels shouldn’t be used for long before I learned what they should be used for.
My father informed me, during one memorable tirade, that chisels (especially his) were not to be used as screwdrivers, paint can openers, or stakes for my camping tent.
What are chisels good for?
Well then, what is the purpose of these simple little tools? Are they only for the hands of the skilled cabinet maker and woodcarver? Or do they have some honest, down-to-earth uses for honest, down-to-earth DIYers?
Surely, chisels have lost a lot of ground to power tools: Routers now cut dovetails where Chisels once carved, and belt sanders can fine-tune a curve faster than most of us can wield a chisel.
What if you can’t use a power tool?
Sometimes, working in tight places with a power tool might be too big and awkward. In those scenarios, there’s still no equal to the good old-fashioned chisel:
- making a hinge recess,
- squaring up a corner.
Basic Chiseling Techniques
After that, it’s just a matter of choosing the right technique or combination of techniques to finish the job. Start recesses or mortises by outlining the area with a sharp utility knife or by making a series of shallow chisel cuts perpendicular to the surface. Skip this step and you risk chipping wood outside the mortise. Then remove thin slices by tapping the chisel with a hammer, bevel side down as in Photo 1, to carve out the wood inside the perimeter.
Face the bevel down. Push or tap the back of the chisel to remove thin slices. Control the depth by raising and lowering the handle.
Chiseling with the grain can sometimes have disastrous results. If the grain runs deeper into the wood, it’ll direct the chisel too deep. Stop and chisel from the opposite direction if you feel this happening.
If the recess is open on one side, like a hinge mortise, flatten the bottom by paring off thin slices with the back, unbeveled side of the chisel held flat to the wood (Photo 2 below).
Pare thin slices of wood to flatten the bottom of an open recess. Keep the back of the chisel flat on the wood. For easier slicing, pivot the chisel as you cut to move the blade in an arc.
Chop out large amounts of wood by slicing off small amounts with each cut. Strike the chisel with a hammer and chop down about 1/2 in. Then chisel from the end to remove the piece before continuing. Your chisel must be sharp for this cut.
In general, when you’re shaving into a piece of wood, face the bevel down (Photo 1).
When you’re flattening a cut and have access from the side, face the bevel up and hold the back of the chisel tight to the surface (Photos 2 and 5).
Chisel out large chunks of wood a little at a time with a series of shallow cuts rather than driving the chisel too deep (Photo 4).
Use a hammer or mallet for rough work or press with the heel of your hand for lighter cutting chores or finer cuts.
Cut a groove, or dado, by first sawing along both edges to the desired depth. Then break out the wood in the middle with your chisel. Space the chisel cuts about 1/2 in. apart.
Smooth and flatten the bottom of the dado. Keep the back of the chisel flat to the bottom of the groove. Work from both ends into the center to avoid splintering the edge.
Scrape glue joints or other imperfections from wood projects by holding the blade at a right angle to the wood with the back of the chisel facing you. To remove thin shavings, support the blade with your fingers and press down while you draw the chisel toward you.
What chisels do best
Chisels excel at three tasks: making sharp plunge cuts, removing stock and smoothing. All three techniques — shown in these photos — are used to cut the recess for a door hinge.
Plunge cuts are made with the blade’s beveled edge facing the waste side of the cut. These cuts are used first to outline the hinge shape, then to score the area to a consistent depth (Photo 1) so wood can be removed in small manageable chips rather than one large chunk.
Remove the chips with the bevel side down (Photo 2). so you can control the depth of cut by slightly lowering and raising the handle as you work.
Smooth the area with the chisel bevel facing up (Photo 3). Use angled or circular motions to prevent tearing the grain.
How to chisel a door for hinges
Start with the prep work: screw the hinge to the door (or the jamb), and score around the outline of the hinge with a utility knife to avoid grain tearout.
- Make a series of vertical plunge cuts that are as deep as the hinge is thick. Outline the shape of the recess with plunge cuts first.
- Remove the small wood chips, cutting at a low angle. Keep bevel side down and raise and lower the handle to control the depth of cut.
- Pare the surface smooth using the chisel bevel side up. Hold the chisel flat and use a circular or angular motion to prevent tearing.
More tips on using a chisel
- Chisel with the grain. The blade will have a tendency to follow the grain and dig too deep when worked against the grain.
- Sharpen your chisel. with a belt sander and fine grit paper. Make certain belt is moving away from, rather than into, the chisel.
- Use a beater chisel for rough work. Relegate your badly nicked chisels to these chores so your good ones stay sharp.
Choosing a chisel
Start with a new sharp 3/4-in. chisel for all-purpose use. (Keep your old dull chisel handy for jobs like cutting nails or scraping caulk.) Buy one with an impact-resistant plastic handle. You can pound on these with a hammer without dam-aging them. If you have a little extra cash to buy good-quality chisels, buy three – 1/2-in., 3/4-in. and 1-in. — for a good starter set.
A good all-purpose chisel for the DIYer is the type with an impact-resistant plastic handle, capped with a metal button. These can be driven either by hand or with a hammer, they’re compact enough to fit in a tool pouch, and they don’t cost much. Chisels with wood handles are available, too, but should be struck only with a wooden mallet or pushed by hand. The Stanley 16-150 Short Blade 3-Piece Wood Chisel Set is a great value for the price.
Chisels must be made of steel that’s hard enough so they won’t dull easily during use, yet soft enough so they can be easily sharpened when dull or nicked. Good ones find a balance between these two extremes. Avoid El Cheapo models. The blades dull quickly and the handles shatter easily.
Always keep a nicked-up old “beater” chisel in the toolbox next to your sharp ones (Photo 6). The beater comes in handy for removing moldings, packing insulation into skinny crevices, scraping old caulk out of joints, and demolition work. In my everyday puttering, I probably use my beater chisel as much as I do the sharp one.
Even new chisels need sharpening. Polish the machine marks from the first 1 in. of the back of the chisel and hone a bevel on the face. Put your chisels in a sock or a special canvas roll between uses to protect the cutting edge.
Safety, safety, safety tips
A sharp chisel gives you great control and allows you to remove paper-thin slices of wood, but it can be dangerous if you’re not careful.
- Think safety. Wear safety glasses when striking with a hammer. Never push or drive a chisel toward you. Keep them out of the reach of children.
- Chisel with the grain (Photo 4). You'll have better control and there’s less chance of taking too deep a chunk.
- Always use two hands: one to guide the chisel, the other to push the chisel or to swing a hammer or mallet.
- Never chisel toward your body or place your hand in the path of a chisel.
- Cover the chisel blade when it's not in use.
- Store chisels in a safe place, away from children.
- Keep your project firmly clamped to the workbench. When working on large objects, such as doors, place them on a solid surface.
- Make several shallow passes rather than one huge bite.
Tips for sharpening chisels
A dull chisel is a dangerous chisel — it will lunge and skip. It’s difficult to control and requires more effort to use. Sharp Chisels go where you guide them and leave a smoother surface.
Sharpening is a two-step process. Shaping, with a file or grinding wheel, forms the correct tip angle. This needs to be done only when the tool has been badly nicked or damaged. Honing, on a sharpening stone, forms the razor-sharp cutting edge.
Here is an overview to the sharpening process:
- Shaping: Old chisels with nicked or rounded tips will need to be reshaped. Use a belt sander or grinder to remove nicks and shape the chisel to a 25-degree angle. If you're using a grinder, dip the chisel in water every two or three seconds to prevent the tip from overheating and turning blue. If this happens, the chisel won't hold an edge for long.
- Polishing: Next, polish the back of the chisel by rubbing it back and forth over progressively finer wet/dry sandpaper, pressing the back perfectly flat to the paper. For all sharpening, a good progression of paper is 120, 220, 400 and 600 grit.
- Honing: Finally, set the honing guide to hold the chisel at a 30-degree angle to create a "secondary bevel" and run through the grits, starting at 220. Roll the chisel back and forth over the sandpaper until a burr forms on the back of the blade. Turn the chisel over and stroke it flat on the sandpaper to remove the burr. Then move to a finer-grit paper and repeat the process.
Also, keep these sharpening tips in mind:
- Chisels cut best with a 25- to 30-degree blade bevel. One rough rule of thumb says the bevel face should be about twice as long as the chisel blade is thick.
- Remove major nicks (tsk, tsk — where was that beater chisel?) by first pushing the tool straight into a grinding wheel to resquare the tip, then sharpening to the proper angle.
- Hone the edge razor sharp on a sharpening stone. Hold the tip at a constant angle as you sharpen in a circular or figure-eight motion, Remove the burr that forms on the back of the blade tip by stroking that side flat against the stone.
- You can also use a belt sander (Photo 5) to quickly shape and sharpen chisels. Use a fine-grit paper, hold tight and work in three-second spurts to avoid overheating.
Sharpen your chisels on wet/dry sandpaper that’s lightly glued with spray adhesive to a piece of 1/4-in. glass with smoothed edges. Use a honing guide to maintain the correct angle and speed up the sharpening process.
The Atlin Honing Guide fits mortise chisels (with straight sides) from 1/8” to 1-7/8” on the lower opening and planer blades from 1-3/8” to 3-1/8” in the upper opening.