How to hang Drywall on walls By Yourself
Cover your walls quickly and inexpensively with drywall.
It’s easy to hang and finish, and you even get to cover up your mistakes! You‘re pretty sure to come out a winner when taking on that drywall project, whether it’s repairing a water damaged wall, building a new closet, or finishing your basement.
Drywall is (Almost) Goof-Proof
Drywall is easy to work with: it comes in large sheets, cuts with a utility knife and nails or screws directly to the framing. Those large sheets cover a lot of wall area, so the project moves quickly.
And whereas an “Oops, I goofed!” exclamation may send chills down the spine of a finish carpenter, drywallers don’t worry. Each 1/2” x 4’ x 8’ sheet costs next to nothing, miscuts can be used elsewhere, and best of all you can cover up your mistakes during the finish process. There’s forgiveness for you!
In addition, drywall can provoke some unusual experiences. You just might find yourself standing on a ladder, balancing a 40 pound section of drywall panel on your head, while trying to catch the ceiling joist with a screw! Or there may be some other surprises. Occasionally, walls aren’t square, or you’ll forget to cut out an electrical box. Sometimes while securing a panel you’ll swear that the stud is back there, but you just can’t seem to hit it with the screw.
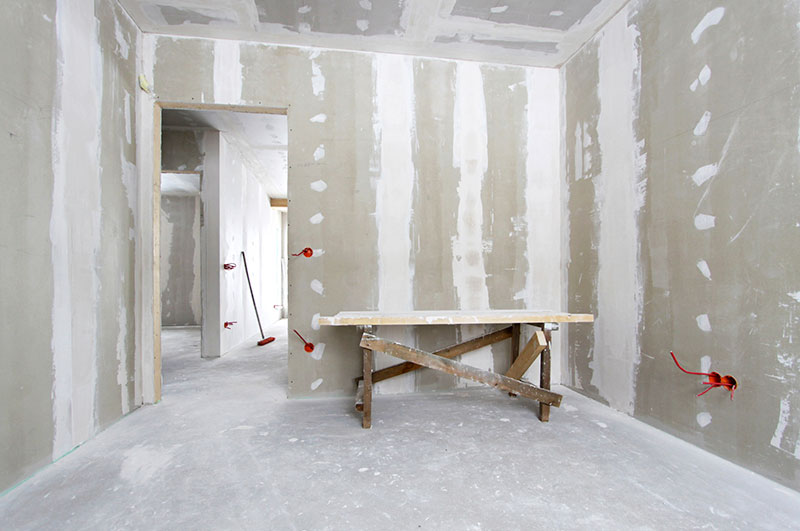
(Image courtesy of Slade Drywall contractor in Virginia Beach.)
But don’t worry. While you can get into some perplexing situations, drywall is tremendously versatile.
You don’t need professional skills. Using a few simple tools and the techniques you’ll see you can make first class flat, smooth walls and ceilings.
Of course there still may be times when you’ll want to hire a pro. Their big advantage is speed. So if tightly scheduled on a larger project, say several rooms, it’s probably worth getting a bid or two from drywall contractors.
Getting Started
All in all, drywall is pretty simple stuff, just a compressed bed of gypsum with heavy paper glued to both sides. Its quality lies primarily in the strength and hardness of the paper, which eventually becomes your wall surface. Without the paper the gypsum core will crumble. However, the core essentially won’t burn, so it’s a good fireproofing material.
Don’t be confused by the fire rated type, Type X, which contains fire retardants to give a higher fire rating. All gypsum drywall is fire rated. Check with your local building inspector for your exact requirements.
The first step in your project is to estimate the amount of material you’ll need. One way is to simply add up the floor and ceiling square footage to be covered. Then add 15 percent for waste and buy that much drywall.
Another way is to visualize laying the drywall sheets (horizontally) on the walls, filling up the spaces like a jig saw puzzle, and count how many full sheets you’ll need, adding a few extra for small sections and errors. Also count your outside corners, and plan to use a single piece of metal corner bead for each one.
Then head off to your local lumber yard or home center. The chart below lists the most commonly used drywall. Half-inch, the residential standard, is most widely used.
| Thickness and Type | Use |
|---|---|
| 1/4", 3/8" regular | Lay over unsightly or damaged walls, ceilings (3/8"); flexes into curves; may be hard to find |
| 1/2" regular or fire resistant | Most common for residential walls, ceilings; readily available 4' x 8', 10', or 12' |
| 1/2" moisture resistant | Base material for non-absorvent tile in baths and showers, moist areas; 4' x 8' sheets. (Use cement-base backer board for very wet areas.) |
| 5/8" regular or fire resistant | Increase fire protection, deaden sound, add greater durability to walls, ceilings; significantly heavier; readily available 4' x 8', 10', or 12' |
Plan to use the longest sheets possible to minimize joints. Unfortunately, however, the practical problem of getting them home and inside undamaged will limit your choice.
Have them delivered if that’s economical. When using an auto rack, try securing 2x4s below and above the drywall to stiffen it, even with the shortest (8 ft.) pieces. Before purchasing the longer (10 ft. and 12 ft.) sheets, be sure you can maneuver them into your house. They’re unwieldy, heavier and can be tough to get around corners and up or down stairs. Finally, avoid sheets with broken edges or corners and water stains. Moisture rapidly deteriorates drywall. Wet drywall is worthless.
Look for the 3/8-in. and 1/4-in. thick drywall, as well as the specialty materials shown, at drywall suppliers. Even if you don’t need specialty items. it’s fun to drop in at one of these places and check out the variety of tools and materials available. If the salespeople aren’t too busy, go ahead and ask for tips on materials. techniques, or special problems.
Hanging Drywall
Successfully hanging drywall requires a curious combination of geometric precision and brute strength. Everything’s in rectangles and perpendiculars as you measure, mark, cut and then hoist each successive heavy piece into place.
List of tools for hanging drywall:
- Drywall hammer
- Nail apron
- Cordless drill/driver
- Utility knife
- Saw
- Chalk line
- Square
- Tape
- Rasp
Wall Preparation for Hanging Drywall
- Just before closing up the walls, make sure everything is just right.
- Add extra studs (photo 1) or blocks (photo 2) to support the drywall edges as necessary:

- Cover wire runs with a 1/16" metal plate when wires come within 1-1/4" of the stud face.
- Mark pipe locations to make sure you won't nail them.
- And finally, adjust the electrical box depth to fit the drywall thickness.

Hanging drywall with nails or screws?
But before you make that first cut, decide which fastening system to use — nails or screws.
Pros use screws, driving them with electric screw guns, which are actually heavy duty drills with special tips which sink the screws to the proper depth. Those tips are also magnetized so the screw sticks right to the screw gun and therefore can be driven with one hand, a great advantage in difficult situations. Screws hold better than nails, so fewer are needed.
Usually, you can place screws a minimum of 12 in. on center (o.c.), whereas nails must be 7 in. o.c. Weighing the advantages, it’s probably easier to use screws if you own the screw gun or can get one. But nails work just fine, especially for small projects and repairs. Keep some nails handy anyway for small pieces and comer beads.
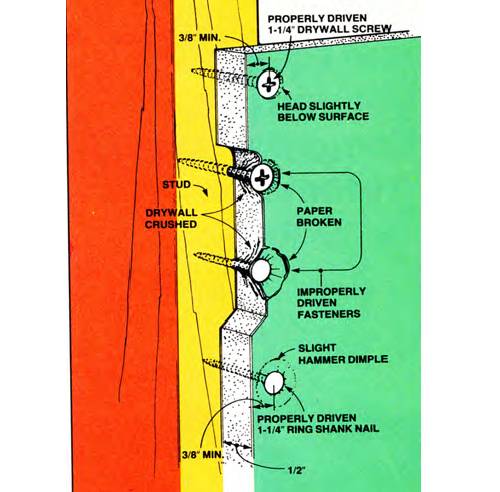
Proper nailing and screwing technique is critical. The trick is to set the fastener just below the surface of the drywall so it can be hidden with joint compound. When you drive a nail or screw too deep so that the paper breaks or the drywall crushes, you compromise the fastener’s holding power. Building inspectors tend to notice this error and may require more frequent fastening to compensate. While the special drywall hammer isn‘t necessary. Its convex head helps set the nails just right. If you use an ordinary hammer, avoid breaking the drywall paper on that last blow. Use 1-1/4 in. drywall screws and 1-1/4 in ring shank nails for both 1/2 in and 5/8 in. drywall.
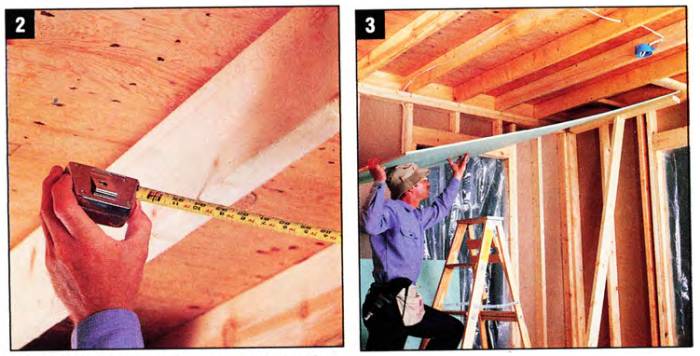
Hang the ceiling panels before the walls and be prepared for some heavy lifting. Ask a friend to help out. A “dead-man” really helps, too. To make one cut a 2x4 2 in. shorter than the ceiling joist height and nail a 3 ft. piece of 2x4 flat on one end. Then simply draw it up under the drywall once you hoist the sheet up into place. Be sure to mark the joists along the walls so you can find them with your fasteners on the first try. Incidentally, to save wear and tear on your head when balancing a drywall sheet on it, try slipping a sponge under your hat.
You won’t have to completely fasten each piece at this stage. A dozen screws will hold it adequately. Concentrate on getting the entire ceiling hung initially, then return and fasten the whole thing off at once. Here‘s a tip: You can skip the fastener on the drywall edge next to the wall. That edge will be adequately supported from beneath by the wall panels and finish taping.
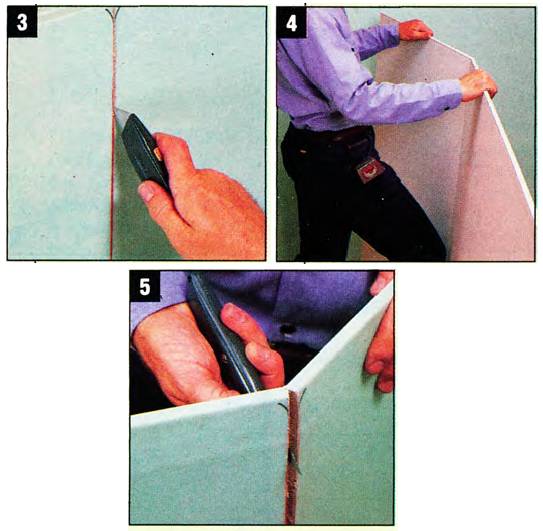
Drywall Cutting Technique
- Lay out the desired drywall size with your measuring tape.
- Mark both edges of the front and snap a chalk line for a guide.

- Score the paper with a sharp utility knife. You can use a straightedge to guide the cut as well.
- Tap the backside at the scored line with your knee to break.
- Slice the paper on the backside with a utility knife.
Drywall hanging procedures
- Keep in mind this illustration of drywall fastening techniques, as I will refer to it later.
- Measure first ceiling panel length to center of joist. Hang panels perpendicular to framing.
- Shove cut end against wall and hoist into place. Notice 2x4 dead-man helps support heavy panels.
- Fasten drywall to frame with 1-1/4" drywall screws 12" o.c. (on center) or ring shank nails 7" o.c.
- Butt factory machined edges for maximum tightness. Drive screws at least 3/8" from edge.

- Hang next row of panels tight to first row, but stagger joints to maximize strength.
- Lift first wall panel tightly against ceiling and screw to studs. Plan panel size to allow fewest joints.

- Saw out foor opening. Avoid making joints at corners of doors and windows to lessen potential cracks.
- Measure and mark electrical box cutouts with tape measure and square. Cut out with drywall saw.

- Pry lower panel up tightly against upper with a prybar and block. Then secure. Fit electrical box closely.
- Overlap outside corners. Use scraps here and in low visibility areas like closets.

- Shave protruding corners with rasp. It's also handy to shave slightly oversized panels.
- Snip metal corner bead with metal cutting shears and nail to outside corners at 9" o.c. on both edges.

- Mark the studs with any handy straight edge to avoid issues when adding remaining fasteners.

Tips for hanging
Don’t worry about gaps up to even 1/2 in. As long as you fasten the drywall securely, these gaps can be filled later and will not create a problem. If the gaps get larger, however, recut the piece, saving any miscuts for slightly smaller sections. And use some of those smaller pieces in closets and other less visible areas.
If all the walls and ceilings are flat and square, everything should go along trouble free.
Unfortunately, as most remodelers know, over the years houses tend to shift: ceilings may sag, foundations settle, and walls go askew. Sometimes studs or joists are simply uneven. When you discover that those factory-cut rectangles of drywall don’t fit or begin to look wavy, stop and assess the problem.
Here it’s nice to be able to unscrew a panel or two if necessary. It’s virtually impossible to pull those ring shank nails without ruining the drywall. A solution for uneven walls is to plane down protruding studs and fur out the receded ones.
To fur out is simply to add spacer pieces. Inexpensive plywood paneling about 3/16 in thick cut into 1-1/2 in. strips works well for this. Apply several layers to the framing if necessary. To flatten a sagging ceiling, fur the joists which are high Above all, try to keep the factory cut edges of the drywall aligned. If one piece becomes crooked, each subsequent piece will be off.
Finishing Drywall
The secret of drywall finishing is (1) patience and (2) a “mud” spattered radio tuned to an oldies station. (“Mud” is the slang term for joint compound.) While taping the joints and smoothing surfaces is repetitious and tedious, here’s where you get to cover up any of those drywall hanging mistakes. In short, a careful job here makes your whole effort look good.
Materials needed for finishing drywall:
- Quick-set compound
- Mud pan
- 6" taping knife
- Sanding block or a random orbit sander
- 100-grit sandpaper
- 12" taping knife
- Paper tape
- Joint compound
Basic drywall taping principle
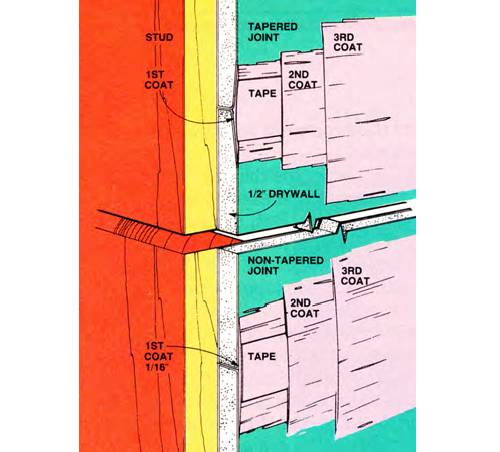
How to finish drywall yourself
- Gather all materials needed.
- Fill joint gaps with quick-set compound using 6" knife. Avoid excess as material dries very hard.
- Load 6" knife with joint compound and fill tapered joint with as few strokes as possible.

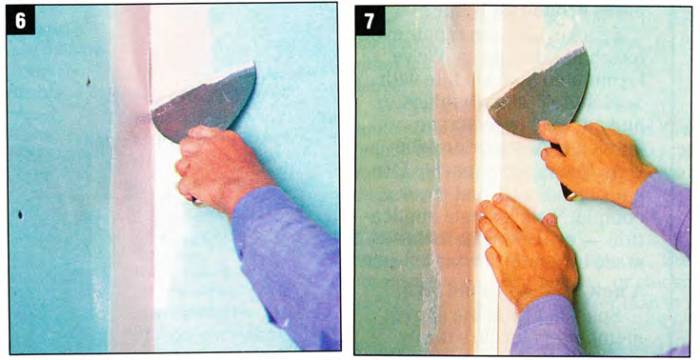
- Press paper tape into mud bed with knife and cover with a smooth, thin layer of compound. Allow to dry.
- Lay paper tape in 1/16" bed of mud for non-tapered joints and cover with thin layer of compound.
Embed the tape in the first coat and fill and smooth with the next two coats. Taping a tapered joint is quite easy. You’re simply filling and smoothing the factory-made depressed edge. The non-tapered joints require more care, since the thickness of the first coat and tape form a bump which needs to be hidden Gradually draw the second and third coats out widely to obscure that rise.

- Apply at least 1/16" of compound to both sides of inside corner with 6" knife.
- Crease paper tape in center and press into corner, covering each side with thin layer of mud.
Of course, the thinner that first coat can be made, the easier you can hide the taped joint. But, problems may arise if you leave the mud bed too thin. The tape won’t stick well. It’ll “bubble” in places. Bubbled tape should be immediately pulled off and retaped. If the tape is already partially dry and the bubbling limited to a few spots, cut them out with a utility knife and retape those sections.
- Press tape into 1/16" mud bed to cover large gaps around electrical boxes. Also mud fastener dimples.
- Apply a second coat of mud to joints with 12" knife after the first coat dries. Feather (taper) edges.
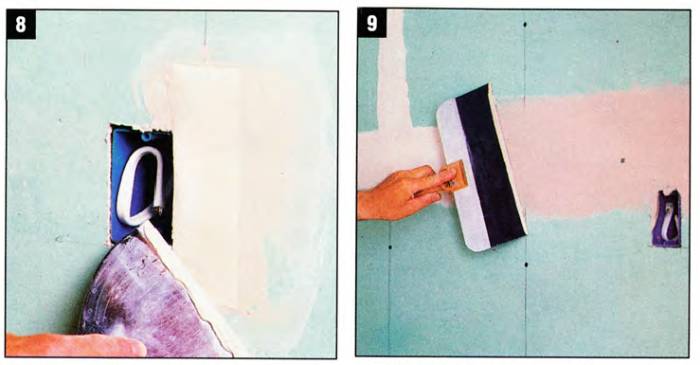
- Feather non-tapered joints 10-12" with second coat to reduce visible hump in the flat wallboard surface.
- Spread second coat of mud on one side of inside corner, allow to dry, then apply second coat to other side.

- Apply successive mud coats to outside corners to cover metal. Bead provides good knife guide.
- Smooth a very light third coat over all mudded areas. Thin the compound slightly with water.

Another common problem is smoothing the third coat. Frequently hard bits of dried mud or grit get on your knife and leave ridges and grooves in the finish surface. Remove the embedded lumps with your finger and resmooth. Prevent the problem by cleaning your mud pan before refilling it, and throw away extra mud rather than returning it to the pail.
Apply three coats of mud to screw and nail dimples as well at to the metal corner bead. The comer head not only withstands the inevitable bumps every corner receives. It also provides a smooth guide for the mudding knife to make the corners flawless and crisp. If a corner bead looks as if it requires a lot of mud, use the quick-set compound for the first coat to avoid shrinkage.
Tips for finishing
To hide the joints and fasteners you’ll need to apply a special paper tape and three coats of joint compound. Why three coats? The mud shrinks as it dries, so it takes three layers to fill up the depressions to make the surface flat. In addition, each coat can be made increasingly smoother.
When you buy the mud, try using one of the new lightweight joint compounds (Gold Bond Lite or US. Gypsum Plus 3, for example.) They shrink less. so in areas not highly visible you may need only two coats. Purchase it pre-mixed in those 5 gallon plastic pails. Use paper tape for the joints.
Fiberglass tape may also be used, but it requires a special hardening joint compound for adequate bonding. Since it does not come pre-mixed and it sets (hardens) rather quickly, you can only mix a little at a time. So using it may not be worth the trouble except, perhaps, for smaller projects.
Use a quick-set compound for filling deep cracks, since it bonds well, doesn’t shrink, and hardens quickly enough to recoat within several hours. Unfortunately, it sets very hard. So try not to leave any protruding above the drywall surface or you’ll need a belt sander to remove the excess material.
Drywall sanding
- Sand lightly to ease any remaining edges, lumps, etc. Wear a dust mask. Wear goggles for overhead work.
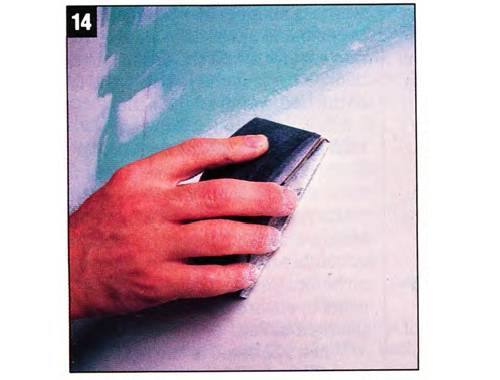
The final step, sanding, is notoriously messy.
Drywall dust seems to infiltrate everything, so seal up doorways with plastic and masking tape, wear a dust mask, and put a fan in a window to draw the dust outside. It’s an incentive to apply mud sparingly and to make that third coat as smooth as possible.
Actually, when mudded carefully the sanding will only be cursory, just to knock off a few lumps and feather some edges. Be careful not to rough up the paper. If you plan to texture, skip the third coat and sanding, since the texture will hide any irregularities.
Then put your work to the test. Prime with a good primer and examine the wall for imperfections. If you find some, mud them, sand lightly, and reprime.
Cover your walls quickly and inexpensively with drywall.
It’s easy to hang and finish, and you even get to cover up your mistakes! You‘re pretty sure to come out a winner when taking on that drywall project, whether it’s repairing a water damaged wall, building a new closet, or finishing your basement.
Drywall is (Almost) Goof-Proof
Drywall is easy to work with: it comes in large sheets, cuts with a utility knife and nails or screws directly to the framing. Those large sheets cover a lot of wall area, so the project moves quickly.
And whereas an “Oops, I goofed!” exclamation may send chills down the spine of a finish carpenter, drywallers don’t worry. Each 1/2” x 4’ x 8’ sheet costs next to nothing, miscuts can be used elsewhere, and best of all you can cover up your mistakes during the finish process. There’s forgiveness for you!
In addition, drywall can provoke some unusual experiences. You just might find yourself standing on a ladder, balancing a 40 pound section of drywall panel on your head, while trying to catch the ceiling joist with a screw! Or there may be some other surprises. Occasionally, walls aren’t square, or you’ll forget to cut out an electrical box. Sometimes while securing a panel you’ll swear that the stud is back there, but you just can’t seem to hit it with the screw.

(Image courtesy of Slade Drywall contractor in Virginia Beach.)
But don’t worry. While you can get into some perplexing situations, drywall is tremendously versatile.
You don’t need professional skills. Using a few simple tools and the techniques you’ll see you can make first class flat, smooth walls and ceilings.
Of course there still may be times when you’ll want to hire a pro. Their big advantage is speed. So if tightly scheduled on a larger project, say several rooms, it’s probably worth getting a bid or two from drywall contractors.
Getting Started
All in all, drywall is pretty simple stuff, just a compressed bed of gypsum with heavy paper glued to both sides. Its quality lies primarily in the strength and hardness of the paper, which eventually becomes your wall surface. Without the paper the gypsum core will crumble. However, the core essentially won’t burn, so it’s a good fireproofing material.
Don’t be confused by the fire rated type, Type X, which contains fire retardants to give a higher fire rating. All gypsum drywall is fire rated. Check with your local building inspector for your exact requirements.
The first step in your project is to estimate the amount of material you’ll need. One way is to simply add up the floor and ceiling square footage to be covered. Then add 15 percent for waste and buy that much drywall.
Another way is to visualize laying the drywall sheets (horizontally) on the walls, filling up the spaces like a jig saw puzzle, and count how many full sheets you’ll need, adding a few extra for small sections and errors. Also count your outside corners, and plan to use a single piece of metal corner bead for each one.
Then head off to your local lumber yard or home center. The chart below lists the most commonly used drywall. Half-inch, the residential standard, is most widely used.
| Thickness and Type | Use |
|---|---|
| 1/4", 3/8" regular | Lay over unsightly or damaged walls, ceilings (3/8"); flexes into curves; may be hard to find |
| 1/2" regular or fire resistant | Most common for residential walls, ceilings; readily available 4' x 8', 10', or 12' |
| 1/2" moisture resistant | Base material for non-absorvent tile in baths and showers, moist areas; 4' x 8' sheets. (Use cement-base backer board for very wet areas.) |
| 5/8" regular or fire resistant | Increase fire protection, deaden sound, add greater durability to walls, ceilings; significantly heavier; readily available 4' x 8', 10', or 12' |
Plan to use the longest sheets possible to minimize joints. Unfortunately, however, the practical problem of getting them home and inside undamaged will limit your choice.
Have them delivered if that’s economical. When using an auto rack, try securing 2x4s below and above the drywall to stiffen it, even with the shortest (8 ft.) pieces. Before purchasing the longer (10 ft. and 12 ft.) sheets, be sure you can maneuver them into your house. They’re unwieldy, heavier and can be tough to get around corners and up or down stairs. Finally, avoid sheets with broken edges or corners and water stains. Moisture rapidly deteriorates drywall. Wet drywall is worthless.
Look for the 3/8-in. and 1/4-in. thick drywall, as well as the specialty materials shown, at drywall suppliers. Even if you don’t need specialty items. it’s fun to drop in at one of these places and check out the variety of tools and materials available. If the salespeople aren’t too busy, go ahead and ask for tips on materials. techniques, or special problems.
Hanging Drywall
Successfully hanging drywall requires a curious combination of geometric precision and brute strength. Everything’s in rectangles and perpendiculars as you measure, mark, cut and then hoist each successive heavy piece into place.
List of tools for hanging drywall:
- Drywall hammer
- Nail apron
- Cordless drill/driver
- Utility knife
- Saw
- Chalk line
- Square
- Tape
- Rasp
Wall Preparation for Hanging Drywall
- Just before closing up the walls, make sure everything is just right.
- Add extra studs (photo 1) or blocks (photo 2) to support the drywall edges as necessary:

- Cover wire runs with a 1/16" metal plate when wires come within 1-1/4" of the stud face.
- Mark pipe locations to make sure you won't nail them.
- And finally, adjust the electrical box depth to fit the drywall thickness.

Hanging drywall with nails or screws?
But before you make that first cut, decide which fastening system to use — nails or screws.
Pros use screws, driving them with electric screw guns, which are actually heavy duty drills with special tips which sink the screws to the proper depth. Those tips are also magnetized so the screw sticks right to the screw gun and therefore can be driven with one hand, a great advantage in difficult situations. Screws hold better than nails, so fewer are needed.
Usually, you can place screws a minimum of 12 in. on center (o.c.), whereas nails must be 7 in. o.c. Weighing the advantages, it’s probably easier to use screws if you own the screw gun or can get one. But nails work just fine, especially for small projects and repairs. Keep some nails handy anyway for small pieces and comer beads.
Proper nailing and screwing technique is critical. The trick is to set the fastener just below the surface of the drywall so it can be hidden with joint compound. When you drive a nail or screw too deep so that the paper breaks or the drywall crushes, you compromise the fastener’s holding power. Building inspectors tend to notice this error and may require more frequent fastening to compensate. While the special drywall hammer isn‘t necessary. Its convex head helps set the nails just right. If you use an ordinary hammer, avoid breaking the drywall paper on that last blow. Use 1-1/4 in. drywall screws and 1-1/4 in ring shank nails for both 1/2 in and 5/8 in. drywall.
Hang the ceiling panels before the walls and be prepared for some heavy lifting. Ask a friend to help out. A “dead-man” really helps, too. To make one cut a 2x4 2 in. shorter than the ceiling joist height and nail a 3 ft. piece of 2x4 flat on one end. Then simply draw it up under the drywall once you hoist the sheet up into place. Be sure to mark the joists along the walls so you can find them with your fasteners on the first try. Incidentally, to save wear and tear on your head when balancing a drywall sheet on it, try slipping a sponge under your hat.
You won’t have to completely fasten each piece at this stage. A dozen screws will hold it adequately. Concentrate on getting the entire ceiling hung initially, then return and fasten the whole thing off at once. Here‘s a tip: You can skip the fastener on the drywall edge next to the wall. That edge will be adequately supported from beneath by the wall panels and finish taping.
Drywall Cutting Technique
- Lay out the desired drywall size with your measuring tape.
- Mark both edges of the front and snap a chalk line for a guide.

- Score the paper with a sharp utility knife. You can use a straightedge to guide the cut as well.
- Tap the backside at the scored line with your knee to break.
- Slice the paper on the backside with a utility knife.

Drywall hanging procedures
- Keep in mind this illustration of drywall fastening techniques, as I will refer to it later.

- Measure first ceiling panel length to center of joist. Hang panels perpendicular to framing.
- Shove cut end against wall and hoist into place. Notice 2x4 dead-man helps support heavy panels.

- Fasten drywall to frame with 1-1/4" drywall screws 12" o.c. (on center) or ring shank nails 7" o.c.
- Butt factory machined edges for maximum tightness. Drive screws at least 3/8" from edge.

- Hang next row of panels tight to first row, but stagger joints to maximize strength.
- Lift first wall panel tightly against ceiling and screw to studs. Plan panel size to allow fewest joints.

- Saw out foor opening. Avoid making joints at corners of doors and windows to lessen potential cracks.
- Measure and mark electrical box cutouts with tape measure and square. Cut out with drywall saw.

- Pry lower panel up tightly against upper with a prybar and block. Then secure. Fit electrical box closely.
- Overlap outside corners. Use scraps here and in low visibility areas like closets.

- Shave protruding corners with rasp. It's also handy to shave slightly oversized panels.
- Snip metal corner bead with metal cutting shears and nail to outside corners at 9" o.c. on both edges.

- Mark the studs with any handy straight edge to avoid issues when adding remaining fasteners.

Tips for hanging
Don’t worry about gaps up to even 1/2 in. As long as you fasten the drywall securely, these gaps can be filled later and will not create a problem. If the gaps get larger, however, recut the piece, saving any miscuts for slightly smaller sections. And use some of those smaller pieces in closets and other less visible areas.
If all the walls and ceilings are flat and square, everything should go along trouble free.
Unfortunately, as most remodelers know, over the years houses tend to shift: ceilings may sag, foundations settle, and walls go askew. Sometimes studs or joists are simply uneven. When you discover that those factory-cut rectangles of drywall don’t fit or begin to look wavy, stop and assess the problem.
Here it’s nice to be able to unscrew a panel or two if necessary. It’s virtually impossible to pull those ring shank nails without ruining the drywall. A solution for uneven walls is to plane down protruding studs and fur out the receded ones.
To fur out is simply to add spacer pieces. Inexpensive plywood paneling about 3/16 in thick cut into 1-1/2 in. strips works well for this. Apply several layers to the framing if necessary. To flatten a sagging ceiling, fur the joists which are high Above all, try to keep the factory cut edges of the drywall aligned. If one piece becomes crooked, each subsequent piece will be off.
Finishing Drywall
The secret of drywall finishing is (1) patience and (2) a “mud” spattered radio tuned to an oldies station. (“Mud” is the slang term for joint compound.) While taping the joints and smoothing surfaces is repetitious and tedious, here’s where you get to cover up any of those drywall hanging mistakes. In short, a careful job here makes your whole effort look good.
Materials needed for finishing drywall:
- Quick-set compound
- Mud pan
- 6" taping knife
- Sanding block or a random orbit sander
- 100-grit sandpaper
- 12" taping knife
- Paper tape
- Joint compound
Basic drywall taping principle

How to finish drywall yourself
- Gather all materials needed.
- Fill joint gaps with quick-set compound using 6" knife. Avoid excess as material dries very hard.
- Load 6" knife with joint compound and fill tapered joint with as few strokes as possible.

- Press paper tape into mud bed with knife and cover with a smooth, thin layer of compound. Allow to dry.
- Lay paper tape in 1/16" bed of mud for non-tapered joints and cover with thin layer of compound.
Embed the tape in the first coat and fill and smooth with the next two coats. Taping a tapered joint is quite easy. You’re simply filling and smoothing the factory-made depressed edge. The non-tapered joints require more care, since the thickness of the first coat and tape form a bump which needs to be hidden Gradually draw the second and third coats out widely to obscure that rise.

- Apply at least 1/16" of compound to both sides of inside corner with 6" knife.
- Crease paper tape in center and press into corner, covering each side with thin layer of mud.
Of course, the thinner that first coat can be made, the easier you can hide the taped joint. But, problems may arise if you leave the mud bed too thin. The tape won’t stick well. It’ll “bubble” in places. Bubbled tape should be immediately pulled off and retaped. If the tape is already partially dry and the bubbling limited to a few spots, cut them out with a utility knife and retape those sections.

- Press tape into 1/16" mud bed to cover large gaps around electrical boxes. Also mud fastener dimples.
- Apply a second coat of mud to joints with 12" knife after the first coat dries. Feather (taper) edges.

- Feather non-tapered joints 10-12" with second coat to reduce visible hump in the flat wallboard surface.
- Spread second coat of mud on one side of inside corner, allow to dry, then apply second coat to other side.

- Apply successive mud coats to outside corners to cover metal. Bead provides good knife guide.
- Smooth a very light third coat over all mudded areas. Thin the compound slightly with water.

Another common problem is smoothing the third coat. Frequently hard bits of dried mud or grit get on your knife and leave ridges and grooves in the finish surface. Remove the embedded lumps with your finger and resmooth. Prevent the problem by cleaning your mud pan before refilling it, and throw away extra mud rather than returning it to the pail.
Apply three coats of mud to screw and nail dimples as well at to the metal corner bead. The comer head not only withstands the inevitable bumps every corner receives. It also provides a smooth guide for the mudding knife to make the corners flawless and crisp. If a corner bead looks as if it requires a lot of mud, use the quick-set compound for the first coat to avoid shrinkage.
Tips for finishing
To hide the joints and fasteners you’ll need to apply a special paper tape and three coats of joint compound. Why three coats? The mud shrinks as it dries, so it takes three layers to fill up the depressions to make the surface flat. In addition, each coat can be made increasingly smoother.
When you buy the mud, try using one of the new lightweight joint compounds (Gold Bond Lite or US. Gypsum Plus 3, for example.) They shrink less. so in areas not highly visible you may need only two coats. Purchase it pre-mixed in those 5 gallon plastic pails. Use paper tape for the joints.
Fiberglass tape may also be used, but it requires a special hardening joint compound for adequate bonding. Since it does not come pre-mixed and it sets (hardens) rather quickly, you can only mix a little at a time. So using it may not be worth the trouble except, perhaps, for smaller projects.
Use a quick-set compound for filling deep cracks, since it bonds well, doesn’t shrink, and hardens quickly enough to recoat within several hours. Unfortunately, it sets very hard. So try not to leave any protruding above the drywall surface or you’ll need a belt sander to remove the excess material.
Drywall sanding
- Sand lightly to ease any remaining edges, lumps, etc. Wear a dust mask. Wear goggles for overhead work.

The final step, sanding, is notoriously messy.
Drywall dust seems to infiltrate everything, so seal up doorways with plastic and masking tape, wear a dust mask, and put a fan in a window to draw the dust outside. It’s an incentive to apply mud sparingly and to make that third coat as smooth as possible.
Actually, when mudded carefully the sanding will only be cursory, just to knock off a few lumps and feather some edges. Be careful not to rough up the paper. If you plan to texture, skip the third coat and sanding, since the texture will hide any irregularities.
Then put your work to the test. Prime with a good primer and examine the wall for imperfections. If you find some, mud them, sand lightly, and reprime.
