
Working With Plastic Pipe
Working with the old cast iron and threaded galvanized pipe in a home can certainly mark a low point in a DIYer career. Pipes are tough to get apart and even worse to reconnect because you never have the exact lengths you need. Copper pipe makes the job easier, although you have to learn the required soldering skills.
Then plastic pipe arrived – what an ideal DIY material! You can cut and assemble it without special tools and you can master the joining process in the time it takes to read this article. What’s more, plastic pipe is inexpensive, won’t rust, lasts almost indefinitely, and its smooth interior surface allows water and waste to flow better than in metal pipes. It’s a choice DIY material.
Ah, but there are still some tricks you need to know. In this article, you’ll see how to cut, join and support plastic pipe so you can install long-lasting, trouble-free plumbing lines.
Following Code, Planning, And Execution
Keep in mind that while installing a plastic drain or water line is relatively easy, planning one is not. To plan one you have to figure out pipe sizes, slopes, vent locations, and other important factors. These details won’t be covered here.
Also, be aware that local plumbing codes sometimes prohibit the use of some types of plastic pipe in some situations. Always confirm your plans with the local plumbing inspector before you start a project.
Types Of Plastic Pipe And Their Uses
You’ll commonly find any of four types of plastic pipe used in homes (see the chart below). Few people can remember their tongue-twisting chemical names, so they use their more familiar initials — ABS, PVC, CPVC and PB.

- ABS. Rigid, black pipe used for drains and vents; available in sizes between 1-1/2 in. and 4 in.; solvent-welded joints.
- PVC. Rigid, white pipe used for drains and vents and also cold water lines, but not hot; available in sizes between 1/2 in. and 4 in.; requires primer (purple) for solvent-welded joints.
- CPVC. Rigid, cream-colored pipe used for hot and cold water supply lines; normally used in sizes 1 in. and smaller; requires primer (purple) for solvent-welded joints.
- PB (polybutylene). Flexible, usually gray pipe used for hot and cold water lines; normally used in sizes 1 in. and smaller; joined with special compression fittings. Since PB is less common than CPVC, and since you join it differently than the other three, I'll only talk about PB briefly.
You’ll probably find several other types of plastic pipe in your local home center as well. Polyethylene, a flexible black pipe, is commonly used for lawn and plant irrigation. PVC “pressure” pipe is the same PVC pipe as above, but its fittings are heavier duty for such uses as connecting swimming pool pumps. We won’t deal with either of these two types here.
If you have trouble identifying any type of plastic pipe or fitting by color, look for its initials printed or stamped somewhere on the plastic.
Cutting And Fitting Plastic Pipe
Plastic pipe is ready-made for the DIYer. The fittings all have precisely molded “hubs,” enlarged ends into which you slide the pipe (Photo 8). Simply remember to include the hub depth when you measure the length of each section of pipe (Photo 1).
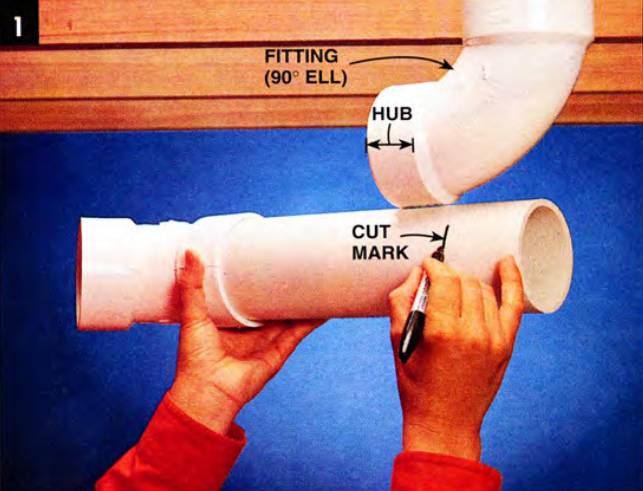
Measure the correct pipe length with a tape or hold a section in place and mark it. In either case, be sure to include the depth of the hub.
You can easily cut plastic pipe with a fine-tooth (about 14 teeth per inch) handsaw. However, don’t attempt to cut it with a narrow-blade hacksaw; your cut will wander out of square.
Make your cuts at exact right angles so that when two lengths are joined, you don’t leave interior gaps that can slow water flow or collect debris. Use a miter box to help make that square cut (Photo 2).
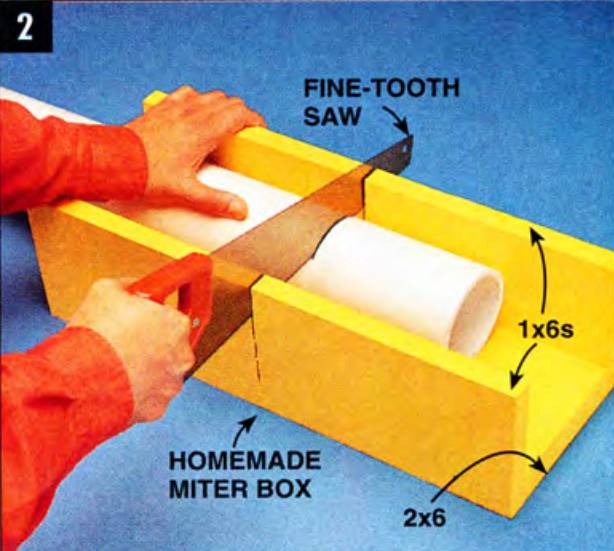
Cut the pipe off perfectly square using a miter box and a fine-tooth handsaw (about 14 teeth per inch works well).
A miter saw is ideal. Plumbers usually make their square cuts freehand (no miter box) and do it accurately enough because they’ve had lots of practice.
Tip: Cut completely through the pipe to avoid chipping off the last 1/16 in. Use a half-round file or sandpaper to bevel the edges slightly, allowing the pipe to nest into the hub more precisely (Photos 3 and 8)
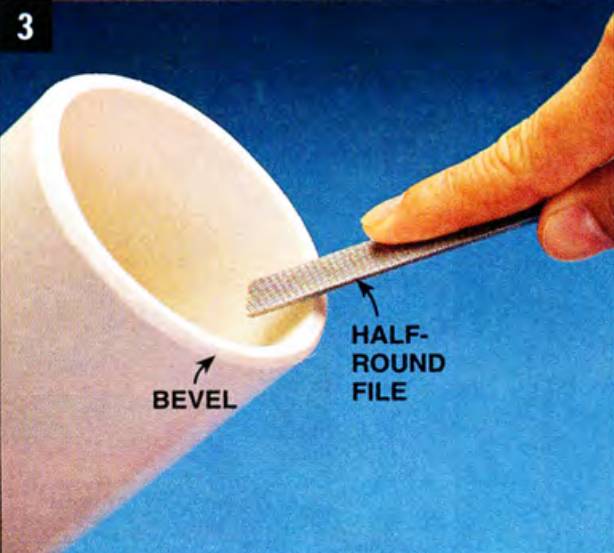
Remove the burr left by the saw with a file or sandpaper. Bevel the edges slightly for a smoother fit. Assemble the fittings and pipe without glue (“dry fit”). Mark the proper positioning with a felt-tip pen. If joints stick together when you disassemble the run, tap them with a hammer and wood block.
Cut and “dry fit” (put together without glue) the pipe and fittings until you complete an entire run. Then mark the pipes and fittings to make sure they line up again when you glue them together (Photo 4).
Watch out: Sometimes while dry-fitting, pipes and hubs fit so precisely that you can’t completely seat the pipe in the hub. This can throw off your measurements farther down the pipe run. If your joints don’t completely seat, cut, fit and glue three or four fittings at a time, rather than trying to dry-fit the entire run at one time.
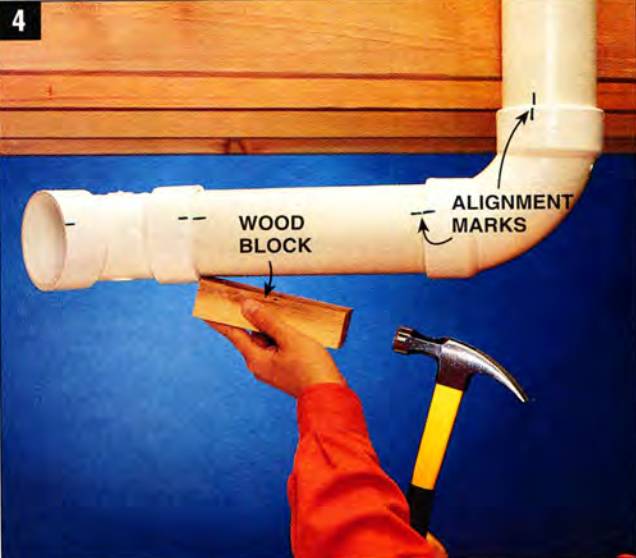
Tip: Dry-fit pipes and fittings can stick together so tightly that you might have a devil of a time pulling them apart. If so, whack the fittings with a wooden block and hammer (Photo 4).
Gluing Plastic Pipe
The gluing process is properly called “solvent welding.” The solvent melts the plastic, so when you push the pipe and hub together, the two pieces fuse as the solvent evaporates.
Tip: Each type of plastic has its own solvent. While some solvents work on several types of plastic, it’s best to buy the type meant solely for the plastic you’re working with.
For the solvent to work, the surfaces to be joined must be clean—free of dirt, grease, and moisture. Wipe the inside of the hub and the ends of the pipe with a clean cloth. Then apply a special, purple cleaner/primer to PVC and CPVC (Photo 5). ABS does not require a primer.
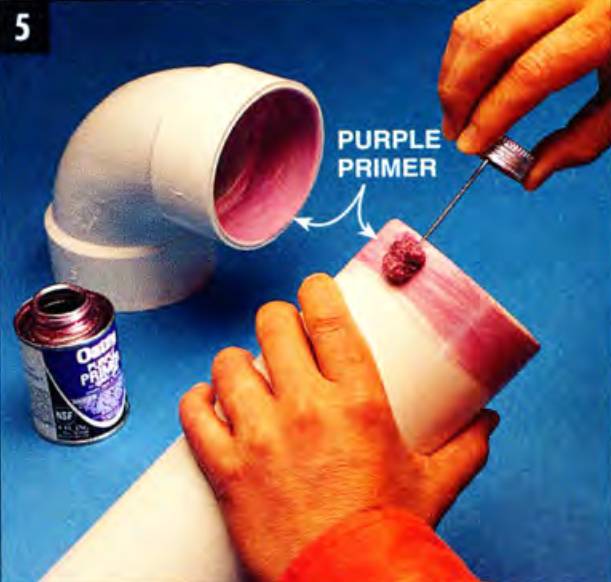
Spread special purple primer on the hubs and pipe ends of PVC and CPVC. This isn’t necessary with ABS pipe.
Next coat the surfaces to be joined liberally with the proper solvent (Photo 6).
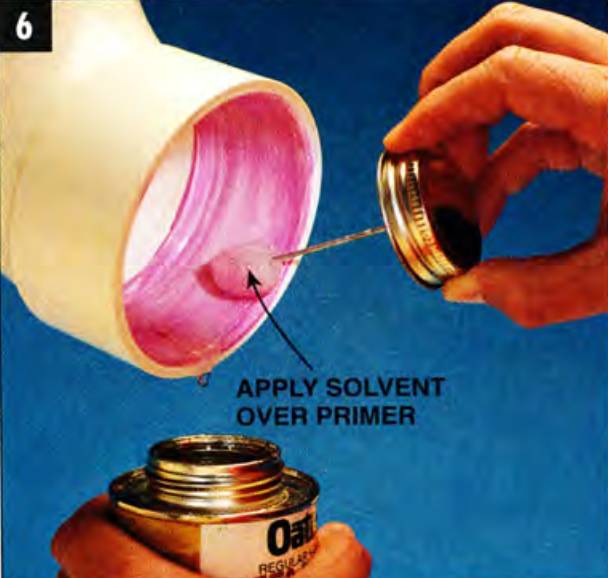
Spread the proper solvent liberally on the inside of the hub and the outer pipe surface.
Ventilate well or wear an organic fume respirator, because this stuff gives off powerful fumes. Quickly push the pipe into the fitting, giving the pipe a quarter of a revolution twist to make sure the pipe seats full depth in the hub (Photo 8).
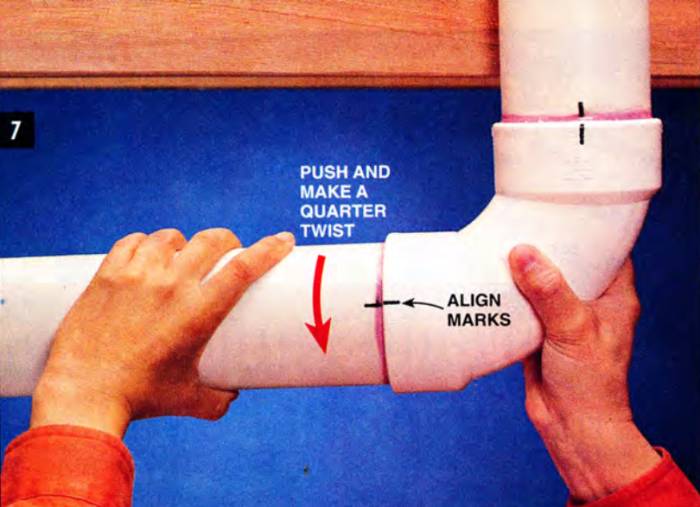
Push the hub and pipe together quickly, making a quarter turn in one to seat the pipe fully in the hub. Align the positioning marks and hold tightly for 15 seconds.
Align your marks as you twist the joint together because the joint will harden in seconds. The joint will want to spring apart, so hold it for about 15 seconds to make sure it stays tight.
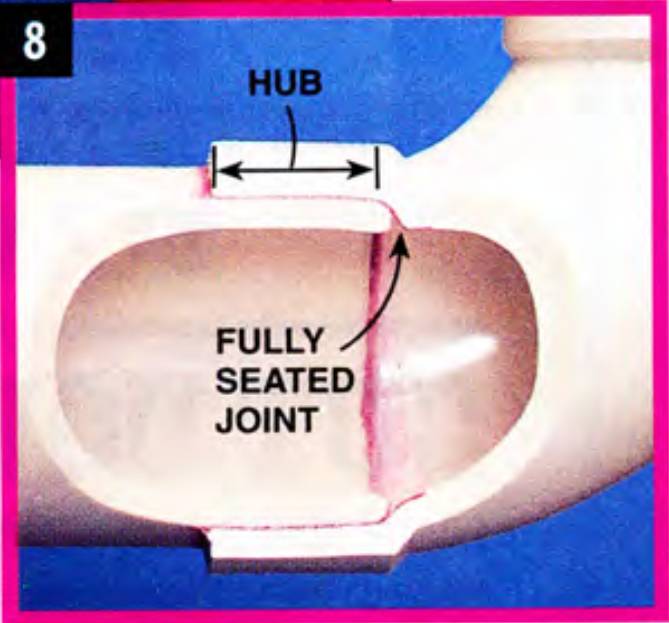
Finished joint should be completely seated so water flows smoothly, without obstruction.
Don’t worry if you make a mistake. Plastic fittings and pipe are inexpensive and you can easily saw out the bad joint. However, you might have to extend a pipe with an extra fitting if positioning is critical.
You can buy solvents, cleaners, primers, and all the other supplies at home centers and full-service hardware stores, but I like to use a plumbing supply store for the best selection of materials and good advice.
PVC also makes a great alternative for building your own dust collection system for your small homeshop.
Joining PB
Unlike the three types of plastics above, PB (polybutylene) joints are made with special compression fittings (Photo 9).
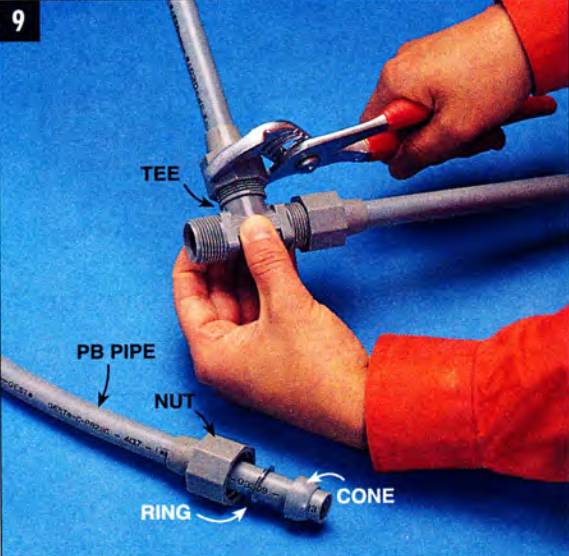
Tighten special PB fittings with slip-joint pliers or a wrench to make leak-proof joints. Joints must be readily accessible.
These fittings cost more than CPVC fittings, but since you can bend PB pipe much like a garden hose, you can make longer runs with fewer fittings.
However, plumbing codes require that all compression fittings be readily accessible in case they leak. This can be an inconvenience because you have to leave access panels in walls and ceilings to get to them.
Other Guidelines And Tips For Working With Plastic Pipe
Support
All pipe must be supported, and plastic requires more support than metal. Support ABS, PVC and PB every 32 in. when it runs horizontally and every 4 ft. when it runs vertically (Photo 10).
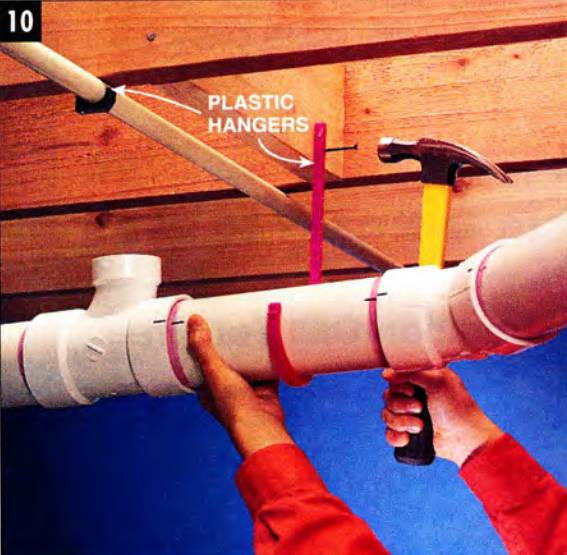
Support plastic pipe with plastic hangers sized to fit the pipe. Or use flexible plastic or steel banding.
Support CPVC every 3 ft. Confirm these distances with your local plumbing inspector, because codes vary. Studs and other framing count as support when the pipe runs through them.
Protection
Whenever a pipe passes through wood and comes within 1-1/4 in. of its edge, cover that area with a 1/16-in. thick steel plate (Photo 11).
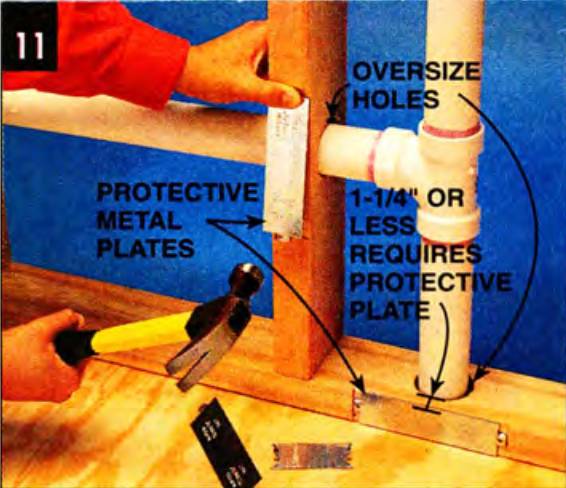
Add a 1/16-in. protective steel plate whenever the pipe passes within 1-1/4 in. of the surface of wood framing. Drill oversized holes in the framing so the pipes won’t squeak when they expand and contract.
This protects the pipe from misguided nails and screws.
Pipe Movement
Cut slightly oversize holes through wood members so plastic pipes can expand and contract easily when hot and cold water run through them. This avoids squeaking or “ticking” when the pipe moves.
Transitions
To make a transition from galvanized pipe or copper water lines to plastic, use special plastic transition fittings that have one threaded side (Photo 12). Make sure you buy the right size!
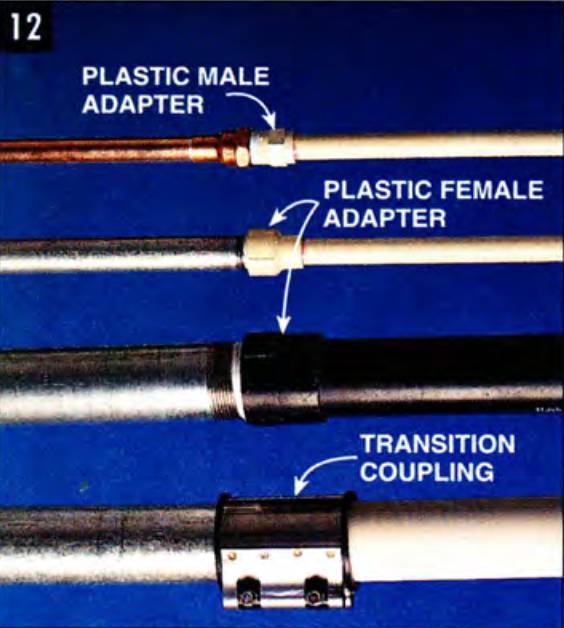
Buy special threaded fittings to make the transition from plastic to copper and threaded galvanized pipe. Use rubber transitions for larger galvanized and cast iron pipe.
For transitions to larger galvanized drains or vents, use rubber transition couplings with a steel sleeve (Photo 12). For hubless cast iron, use rubber and steel transition couplings as well.
Noise
Plastic doesn’t muffle the sound of draining water nearly as well as cast iron or steel pipe. Lessen this annoyance by tucking insulation around plastic drain pipes before you close up the wall or ceiling.
Working with the old cast iron and threaded galvanized pipe in a home can certainly mark a low point in a DIYer career. Pipes are tough to get apart and even worse to reconnect because you never have the exact lengths you need. Copper pipe makes the job easier, although you have to learn the required soldering skills.
Then plastic pipe arrived – what an ideal DIY material! You can cut and assemble it without special tools and you can master the joining process in the time it takes to read this article. What’s more, plastic pipe is inexpensive, won’t rust, lasts almost indefinitely, and its smooth interior surface allows water and waste to flow better than in metal pipes. It’s a choice DIY material.
Ah, but there are still some tricks you need to know. In this article, you’ll see how to cut, join and support plastic pipe so you can install long-lasting, trouble-free plumbing lines.
Following Code, Planning, And Execution
Keep in mind that while installing a plastic drain or water line is relatively easy, planning one is not. To plan one you have to figure out pipe sizes, slopes, vent locations, and other important factors. These details won’t be covered here.
Also, be aware that local plumbing codes sometimes prohibit the use of some types of plastic pipe in some situations. Always confirm your plans with the local plumbing inspector before you start a project.
Types Of Plastic Pipe And Their Uses
You’ll commonly find any of four types of plastic pipe used in homes (see the chart below). Few people can remember their tongue-twisting chemical names, so they use their more familiar initials — ABS, PVC, CPVC and PB.
- ABS. Rigid, black pipe used for drains and vents; available in sizes between 1-1/2 in. and 4 in.; solvent-welded joints.
- PVC. Rigid, white pipe used for drains and vents and also cold water lines, but not hot; available in sizes between 1/2 in. and 4 in.; requires primer (purple) for solvent-welded joints.
- CPVC. Rigid, cream-colored pipe used for hot and cold water supply lines; normally used in sizes 1 in. and smaller; requires primer (purple) for solvent-welded joints.
- PB (polybutylene). Flexible, usually gray pipe used for hot and cold water lines; normally used in sizes 1 in. and smaller; joined with special compression fittings. Since PB is less common than CPVC, and since you join it differently than the other three, I'll only talk about PB briefly.
You’ll probably find several other types of plastic pipe in your local home center as well. Polyethylene, a flexible black pipe, is commonly used for lawn and plant irrigation. PVC “pressure” pipe is the same PVC pipe as above, but its fittings are heavier duty for such uses as connecting swimming pool pumps. We won’t deal with either of these two types here.
If you have trouble identifying any type of plastic pipe or fitting by color, look for its initials printed or stamped somewhere on the plastic.
Cutting And Fitting Plastic Pipe
Plastic pipe is ready-made for the DIYer. The fittings all have precisely molded “hubs,” enlarged ends into which you slide the pipe (Photo 8). Simply remember to include the hub depth when you measure the length of each section of pipe (Photo 1).
Measure the correct pipe length with a tape or hold a section in place and mark it. In either case, be sure to include the depth of the hub.
You can easily cut plastic pipe with a fine-tooth (about 14 teeth per inch) handsaw. However, don’t attempt to cut it with a narrow-blade hacksaw; your cut will wander out of square.
Make your cuts at exact right angles so that when two lengths are joined, you don’t leave interior gaps that can slow water flow or collect debris. Use a miter box to help make that square cut (Photo 2).
Cut the pipe off perfectly square using a miter box and a fine-tooth handsaw (about 14 teeth per inch works well).
A miter saw is ideal. Plumbers usually make their square cuts freehand (no miter box) and do it accurately enough because they’ve had lots of practice.
Tip: Cut completely through the pipe to avoid chipping off the last 1/16 in. Use a half-round file or sandpaper to bevel the edges slightly, allowing the pipe to nest into the hub more precisely (Photos 3 and 8)
Remove the burr left by the saw with a file or sandpaper. Bevel the edges slightly for a smoother fit. Assemble the fittings and pipe without glue (“dry fit”). Mark the proper positioning with a felt-tip pen. If joints stick together when you disassemble the run, tap them with a hammer and wood block.
Cut and “dry fit” (put together without glue) the pipe and fittings until you complete an entire run. Then mark the pipes and fittings to make sure they line up again when you glue them together (Photo 4).
Watch out: Sometimes while dry-fitting, pipes and hubs fit so precisely that you can’t completely seat the pipe in the hub. This can throw off your measurements farther down the pipe run. If your joints don’t completely seat, cut, fit and glue three or four fittings at a time, rather than trying to dry-fit the entire run at one time.
Tip: Dry-fit pipes and fittings can stick together so tightly that you might have a devil of a time pulling them apart. If so, whack the fittings with a wooden block and hammer (Photo 4).
Gluing Plastic Pipe
The gluing process is properly called “solvent welding.” The solvent melts the plastic, so when you push the pipe and hub together, the two pieces fuse as the solvent evaporates.
Tip: Each type of plastic has its own solvent. While some solvents work on several types of plastic, it’s best to buy the type meant solely for the plastic you’re working with.
For the solvent to work, the surfaces to be joined must be clean—free of dirt, grease, and moisture. Wipe the inside of the hub and the ends of the pipe with a clean cloth. Then apply a special, purple cleaner/primer to PVC and CPVC (Photo 5). ABS does not require a primer.
Spread special purple primer on the hubs and pipe ends of PVC and CPVC. This isn’t necessary with ABS pipe.
Next coat the surfaces to be joined liberally with the proper solvent (Photo 6).
Spread the proper solvent liberally on the inside of the hub and the outer pipe surface.
Ventilate well or wear an organic fume respirator, because this stuff gives off powerful fumes. Quickly push the pipe into the fitting, giving the pipe a quarter of a revolution twist to make sure the pipe seats full depth in the hub (Photo 8).
Push the hub and pipe together quickly, making a quarter turn in one to seat the pipe fully in the hub. Align the positioning marks and hold tightly for 15 seconds.
Align your marks as you twist the joint together because the joint will harden in seconds. The joint will want to spring apart, so hold it for about 15 seconds to make sure it stays tight.
Finished joint should be completely seated so water flows smoothly, without obstruction.
Don’t worry if you make a mistake. Plastic fittings and pipe are inexpensive and you can easily saw out the bad joint. However, you might have to extend a pipe with an extra fitting if positioning is critical.
You can buy solvents, cleaners, primers, and all the other supplies at home centers and full-service hardware stores, but I like to use a plumbing supply store for the best selection of materials and good advice.
PVC also makes a great alternative for building your own dust collection system for your small homeshop.
Joining PB
Unlike the three types of plastics above, PB (polybutylene) joints are made with special compression fittings (Photo 9).
Tighten special PB fittings with slip-joint pliers or a wrench to make leak-proof joints. Joints must be readily accessible.
These fittings cost more than CPVC fittings, but since you can bend PB pipe much like a garden hose, you can make longer runs with fewer fittings.
However, plumbing codes require that all compression fittings be readily accessible in case they leak. This can be an inconvenience because you have to leave access panels in walls and ceilings to get to them.
Other Guidelines And Tips For Working With Plastic Pipe
Support
All pipe must be supported, and plastic requires more support than metal. Support ABS, PVC and PB every 32 in. when it runs horizontally and every 4 ft. when it runs vertically (Photo 10).
Support plastic pipe with plastic hangers sized to fit the pipe. Or use flexible plastic or steel banding.
Support CPVC every 3 ft. Confirm these distances with your local plumbing inspector, because codes vary. Studs and other framing count as support when the pipe runs through them.
Protection
Whenever a pipe passes through wood and comes within 1-1/4 in. of its edge, cover that area with a 1/16-in. thick steel plate (Photo 11).
Add a 1/16-in. protective steel plate whenever the pipe passes within 1-1/4 in. of the surface of wood framing. Drill oversized holes in the framing so the pipes won’t squeak when they expand and contract.
This protects the pipe from misguided nails and screws.
Pipe Movement
Cut slightly oversize holes through wood members so plastic pipes can expand and contract easily when hot and cold water run through them. This avoids squeaking or “ticking” when the pipe moves.
Transitions
To make a transition from galvanized pipe or copper water lines to plastic, use special plastic transition fittings that have one threaded side (Photo 12). Make sure you buy the right size!
Buy special threaded fittings to make the transition from plastic to copper and threaded galvanized pipe. Use rubber transitions for larger galvanized and cast iron pipe.
For transitions to larger galvanized drains or vents, use rubber transition couplings with a steel sleeve (Photo 12). For hubless cast iron, use rubber and steel transition couplings as well.
Noise
Plastic doesn’t muffle the sound of draining water nearly as well as cast iron or steel pipe. Lessen this annoyance by tucking insulation around plastic drain pipes before you close up the wall or ceiling.