
Pro Tips on How To Choose & Use Your First Miter Saw
Ever wonder how a trim carpenter makes window and door trim and baseboards fit so perfectly? OK, so they probably have years of experience. But they also used the right tool — a miter saw. Since its introduction in 1967, the miter saw (also called chop saw) has become a must-have tool for trim carpenters and thousands of do-it-yourselfers.
What does a miter saw do best?
Here are the main advantages of a power miter saw:
1. Precise Angles
Once you set any type of miter or angled cuts, they will be accurate and remain so for as many cuts as you wish. 45-degree miter cuts are even better because of the positive stops built in most saws.

Miter joints will be perfect because the saw has built-in stops at 45 degrees for both left- and right-hand cuts.
2. Square End Cuts
When you use a miter saw and properly support your workpiece on both sides of the cut, you ensure perfect 90-degree cuts in both directions.
3. Exact Length
Cutting exactly on the cutting line is fast and easy because you can nibble off thin slices of material until you’re on the line (Photo 2).
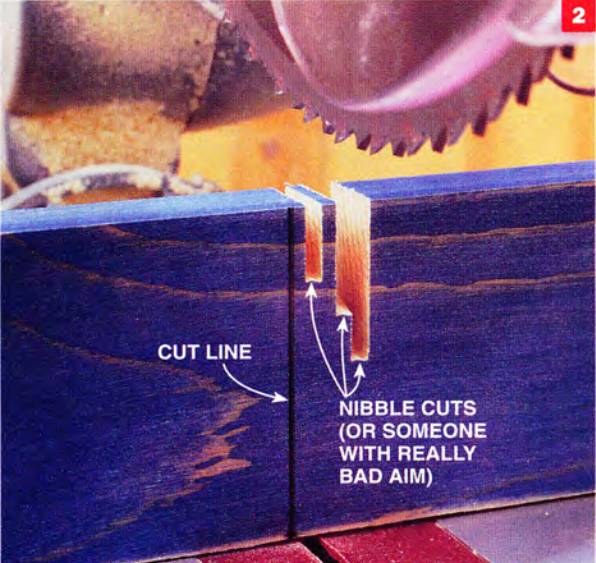
Nibble cut up to the cutting line. Don’t try to cut right on the line the first time. You can remove less than the kerf (thickness) of the saw blade by moving the material.
4. Cutting Thick Lumber
A power miter saw can cut completely through a 4x4 post in one pass. A 7-1/4 in. circular saw (the most popular size) can’t do that.
5. Cutting Other Materials
With a carbide blade, you can also cut aluminum shower door tracks, suspended ceiling gridwork, and other aluminum materials. Plastic plumbing pipe too. What a versatile tool!
Miter Saw Limitations
The biggest drawback of a miter saw is that the smaller (and cheaper) sizes can’t cut completely through wide material, such as 2x10 or 2x12 boards, in one pass.

Well, a sliding miter saw can make these cuts, but you’ll spend twice as much for one.
Miter Saw Shopping Tips
Here are the main aspects to watch out for when choosing a saw:
- Ten-inch models give you the most saw for your money. They can cut 4x4s and 2x6s at 90 degrees and 2x4s at 45 degrees.
- Compound miter saws will make those tricky two-angles-at-once (vertical and horizontal) cuts for crown molding. Compound miter saws cost 25 to 30% more than regular miter saws.
- Lift the saw. This is a portable power tool and you'll want it near your work site. Make sure you can lift it without too much strain.
- Be sure it comes with a dust bag, since you'll be using it indoors.
- See that the blade guard works easily and doesn't obstruct your view when you're cutting. Some guards work better than others. If you don't like the way it works, check out a different saw.
- Buy a carbide blade. Most saws come with a steel blade that's OK for cutting framing lumber, but not trim. A 50- to 80-tooth carbide blade will make smooth trim cuts.
- If you want extra cutting capacity, consider a sliding miter saw. They come in sizes from 8-1/4 to 12 in.

Increase the width capacity of your saw by placing a scrap piece of 3/4-in. mated-al under the wood. This technique enabled our 10-in. saw to cut completely through a 2x8.
How to Use a Miter Saw Safely
Here are a few tips to help you get the most out of your power miter saw:
- SAFETY FIRST! Never remove or alter the blade guard.
- Support long pieces. If the material sags, your cut won't be square. Build T-block supports from scrap lumber (Photo 4).
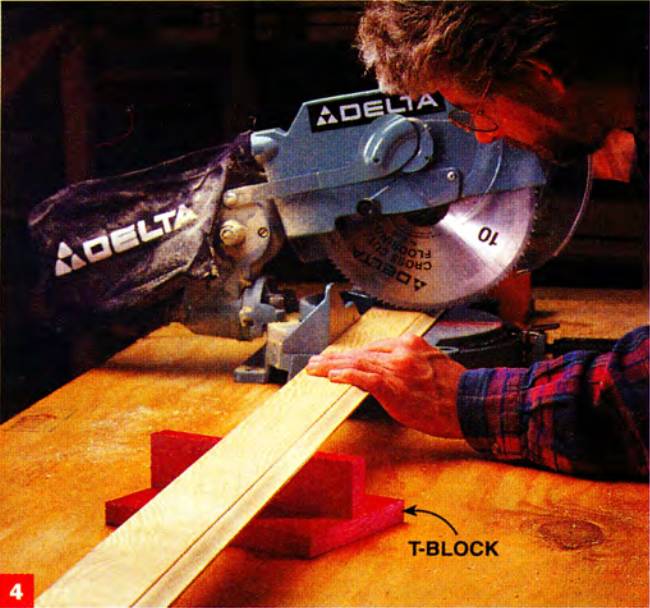
Support long pieces of material. T-blocks, built from scrap wood, work great. The blocks must be the same height as the saw’s table. Remember, if the wood isn’t lying flat, the cut won’t be square.
- Getting clean cuts. Wait for the blade to go through the wood and keep the blade down until it stops. Lifting the saw while the blade is spinning will tear up the grain near the cut. Most saws have a blade brake that stops the blade within a few seconds.
- If you're making repetitive cuts and using a stop-block jig (Photo 5), the saw must be clamped or bolted down. If it's not, the saw will move, making the jig worthless.
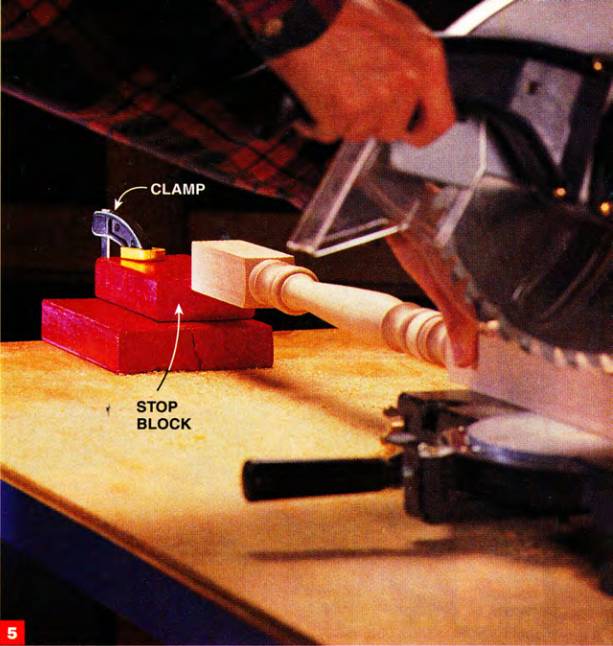
Repetitive cuts are easy and accurate when you use a stop-block jig. Secure the jig to the work surface with clamps or screws. This jig is set up for cutting stair rail spindles all the same length.
- Crown molding miters are cut with the material held upside down and backwards when you use a standard, non-com-pound miter saw. Think of the table of the miter box as the room's ceiling and the fence as the room's wall. With a compound saw, you can lay the molding flat on the saw's cutting table.
- You can't rip boards (cut them lengthwise) with a power miter saw. Use a circular saw with a guide, either a portable or a hybrid table saw or a radial arm saw.
Other Miter Saw Tips
Chop Saw Support Blocks
Miter saw or chop saw, whatever you call it, it’s the one power tool you don’t want to be without. Suppose you only have a few cuts to make and need a temporary support for your work.
Keep a couple of outrigger supports handy. Build them the same height as your miter saw table, and you’ll no longer have to ask your spouse to act as a chop saw support table.

Screw an 18-in. block to an 18-in. long by 6-in. wide scrap of plywood. The total thickness of the plywood and block should add up to the height of your chop saw table.
Portable Chop Saw Table
In just 10 minutes, you can make a portable saw table that supports long stock and makes quick work of multiple identical cuts.
Use the predrilled holes in your chop saw’s feet to fasten it to the table so you can pick up the whole rig and throw it in the back of the pickup or station wagon for road trips.
Most cuts are made on the right side of the work, so I prefer to go without right side supports. But you may decide to center the saw in the middle of the table and put supports on each side.
Table length is also up to you. I usually make mine just under 8 ft. so it’ll fit in the truck.
If you want to really go wild, modify this design slightly and make a permanent lightweight table out of 3/8-in. plywood. Build cubbyholes for your doohickeys and use mounting bolts with Wing-Nuts for easy removal of the chop saw.
(PHOTO BELOW) Screw blocks to a 2x12 with 3-in. screws, and screw a 2x6 on top of the blocks. Rip the blocks so that the top of the 2x6 exactly matches the height of the chop saw table.

(DETAIL ABOVE) Screw a stop block to the table for cutting multiple pieces of the same length. Cut a 45-degree chamfer on the bottom edge of the block so sawdust won’t pile up against it and prevent your work-piece from reaching the stop.
Miter Saw Quick (and Important) Safety Tip
Whenever you use a miter saw, hold the work firmly against the fence (the vertical back). If you don’t, the saw blade can seize in the wood, toss it and cause a serious injury.
Miter saw tuneup
If your miter saw isn’t cutting square, the problem is easy to fix.
Unplug the saw, loosen the fence bolts, and hold a framing square against the fence and blade. Be sure the square touches only the saw’s plate and not the carbide teeth so you can make an accurate adjustment.

With the blade down as deep as it will go in the throat plate, slide the .002-in. thick blade of an automotive feeler gauge (super cheap at auto parts stores) between the blade and the square. Adjust the fence until you feel uniform resistance all along the frame and blade, then retighten the bolts.
Check a few test cuts for square, and you’re done.
Quick and Accurate Miter Saw Cuts
If your miter saw has a removable throat plate, you can customize your saw with a “zero-clearance” throat plate that makes it easy to line up the cut.
With this tip, you’ll be able to line up crosscuts faster and cut boards with less tear-out.
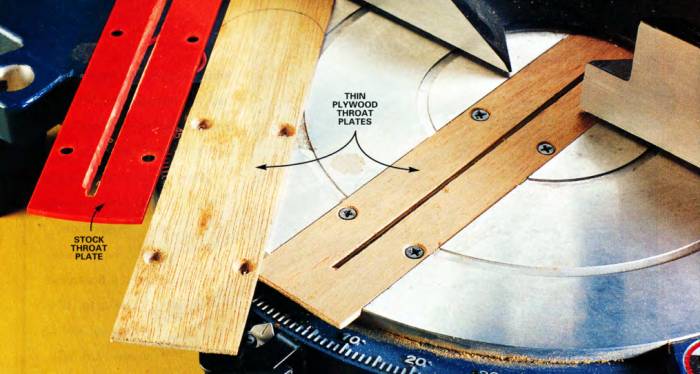
Here’s how: Remove the original throat plate, and cut a plywood piece to the thickness and width of the saw’s original throat plate. They’re easy to make, so cut a few extras.
Mark, drill and countersink any screw holes and install the wood throat plate. Now cut into the new wood throat plate with your miter saw blade to create a zero-clearance opening.
To use, mark the cuts along the board edge, line ‘em up with one edge of the zero-clearance opening, and make perfect cuts every time.
A long (and portable) miter-saw table
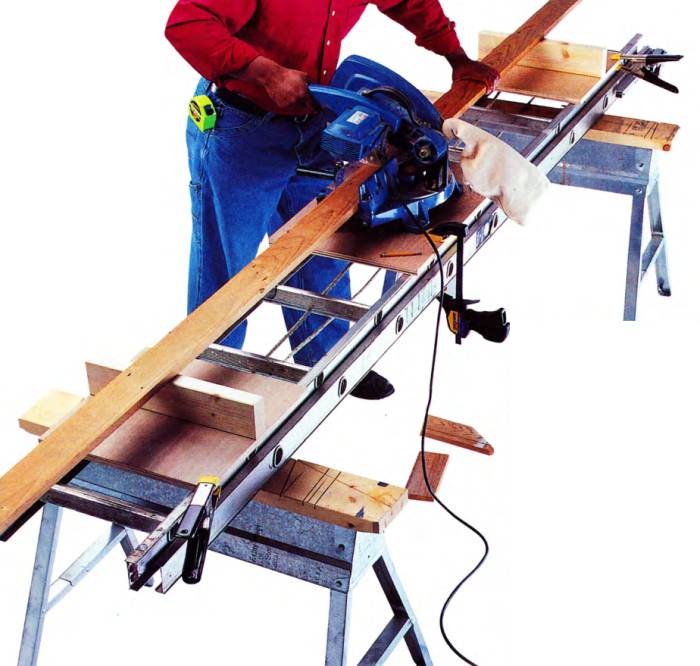
An extension ladder on a pair of sawhorses makes the perfect stable and fiat miter saw table, especially for cutting long stuff. Mount the saw on a plywood base, clamp it to the ladder, add a couple of outfeed supports and you’re ready to cut away!
Ever wonder how a trim carpenter makes window and door trim and baseboards fit so perfectly? OK, so they probably have years of experience. But they also used the right tool — a miter saw. Since its introduction in 1967, the miter saw (also called chop saw) has become a must-have tool for trim carpenters and thousands of do-it-yourselfers.
What does a miter saw do best?
Here are the main advantages of a power miter saw:
1. Precise Angles
Once you set any type of miter or angled cuts, they will be accurate and remain so for as many cuts as you wish. 45-degree miter cuts are even better because of the positive stops built in most saws.
Miter joints will be perfect because the saw has built-in stops at 45 degrees for both left- and right-hand cuts.
2. Square End Cuts
When you use a miter saw and properly support your workpiece on both sides of the cut, you ensure perfect 90-degree cuts in both directions.
3. Exact Length
Cutting exactly on the cutting line is fast and easy because you can nibble off thin slices of material until you’re on the line (Photo 2).
Nibble cut up to the cutting line. Don’t try to cut right on the line the first time. You can remove less than the kerf (thickness) of the saw blade by moving the material.
4. Cutting Thick Lumber
A power miter saw can cut completely through a 4x4 post in one pass. A 7-1/4 in. circular saw (the most popular size) can’t do that.
5. Cutting Other Materials
With a carbide blade, you can also cut aluminum shower door tracks, suspended ceiling gridwork, and other aluminum materials. Plastic plumbing pipe too. What a versatile tool!
Miter Saw Limitations
The biggest drawback of a miter saw is that the smaller (and cheaper) sizes can’t cut completely through wide material, such as 2x10 or 2x12 boards, in one pass.
Well, a sliding miter saw can make these cuts, but you’ll spend twice as much for one.
Miter Saw Shopping Tips
Here are the main aspects to watch out for when choosing a saw:
- Ten-inch models give you the most saw for your money. They can cut 4x4s and 2x6s at 90 degrees and 2x4s at 45 degrees.
- Compound miter saws will make those tricky two-angles-at-once (vertical and horizontal) cuts for crown molding. Compound miter saws cost 25 to 30% more than regular miter saws.
- Lift the saw. This is a portable power tool and you'll want it near your work site. Make sure you can lift it without too much strain.
- Be sure it comes with a dust bag, since you'll be using it indoors.
- See that the blade guard works easily and doesn't obstruct your view when you're cutting. Some guards work better than others. If you don't like the way it works, check out a different saw.
- Buy a carbide blade. Most saws come with a steel blade that's OK for cutting framing lumber, but not trim. A 50- to 80-tooth carbide blade will make smooth trim cuts.
- If you want extra cutting capacity, consider a sliding miter saw. They come in sizes from 8-1/4 to 12 in.
Increase the width capacity of your saw by placing a scrap piece of 3/4-in. mated-al under the wood. This technique enabled our 10-in. saw to cut completely through a 2x8.
How to Use a Miter Saw Safely
Here are a few tips to help you get the most out of your power miter saw:
- SAFETY FIRST! Never remove or alter the blade guard.
- Support long pieces. If the material sags, your cut won't be square. Build T-block supports from scrap lumber (Photo 4).
Support long pieces of material. T-blocks, built from scrap wood, work great. The blocks must be the same height as the saw’s table. Remember, if the wood isn’t lying flat, the cut won’t be square.
- Getting clean cuts. Wait for the blade to go through the wood and keep the blade down until it stops. Lifting the saw while the blade is spinning will tear up the grain near the cut. Most saws have a blade brake that stops the blade within a few seconds.
- If you're making repetitive cuts and using a stop-block jig (Photo 5), the saw must be clamped or bolted down. If it's not, the saw will move, making the jig worthless.
Repetitive cuts are easy and accurate when you use a stop-block jig. Secure the jig to the work surface with clamps or screws. This jig is set up for cutting stair rail spindles all the same length.
- Crown molding miters are cut with the material held upside down and backwards when you use a standard, non-com-pound miter saw. Think of the table of the miter box as the room's ceiling and the fence as the room's wall. With a compound saw, you can lay the molding flat on the saw's cutting table.
- You can't rip boards (cut them lengthwise) with a power miter saw. Use a circular saw with a guide, either a portable or a hybrid table saw or a radial arm saw.
Other Miter Saw Tips
Chop Saw Support Blocks
Miter saw or chop saw, whatever you call it, it’s the one power tool you don’t want to be without. Suppose you only have a few cuts to make and need a temporary support for your work.
Keep a couple of outrigger supports handy. Build them the same height as your miter saw table, and you’ll no longer have to ask your spouse to act as a chop saw support table.
Screw an 18-in. block to an 18-in. long by 6-in. wide scrap of plywood. The total thickness of the plywood and block should add up to the height of your chop saw table.
Portable Chop Saw Table
In just 10 minutes, you can make a portable saw table that supports long stock and makes quick work of multiple identical cuts.
Use the predrilled holes in your chop saw’s feet to fasten it to the table so you can pick up the whole rig and throw it in the back of the pickup or station wagon for road trips.
Most cuts are made on the right side of the work, so I prefer to go without right side supports. But you may decide to center the saw in the middle of the table and put supports on each side.
Table length is also up to you. I usually make mine just under 8 ft. so it’ll fit in the truck.
If you want to really go wild, modify this design slightly and make a permanent lightweight table out of 3/8-in. plywood. Build cubbyholes for your doohickeys and use mounting bolts with Wing-Nuts for easy removal of the chop saw.
(PHOTO BELOW) Screw blocks to a 2x12 with 3-in. screws, and screw a 2x6 on top of the blocks. Rip the blocks so that the top of the 2x6 exactly matches the height of the chop saw table.
(DETAIL ABOVE) Screw a stop block to the table for cutting multiple pieces of the same length. Cut a 45-degree chamfer on the bottom edge of the block so sawdust won’t pile up against it and prevent your work-piece from reaching the stop.
Miter Saw Quick (and Important) Safety Tip
Whenever you use a miter saw, hold the work firmly against the fence (the vertical back). If you don’t, the saw blade can seize in the wood, toss it and cause a serious injury.
Miter saw tuneup
If your miter saw isn’t cutting square, the problem is easy to fix.
Unplug the saw, loosen the fence bolts, and hold a framing square against the fence and blade. Be sure the square touches only the saw’s plate and not the carbide teeth so you can make an accurate adjustment.
With the blade down as deep as it will go in the throat plate, slide the .002-in. thick blade of an automotive feeler gauge (super cheap at auto parts stores) between the blade and the square. Adjust the fence until you feel uniform resistance all along the frame and blade, then retighten the bolts.
Check a few test cuts for square, and you’re done.
Quick and Accurate Miter Saw Cuts
If your miter saw has a removable throat plate, you can customize your saw with a “zero-clearance” throat plate that makes it easy to line up the cut.
With this tip, you’ll be able to line up crosscuts faster and cut boards with less tear-out.
Here’s how: Remove the original throat plate, and cut a plywood piece to the thickness and width of the saw’s original throat plate. They’re easy to make, so cut a few extras.
Mark, drill and countersink any screw holes and install the wood throat plate. Now cut into the new wood throat plate with your miter saw blade to create a zero-clearance opening.
To use, mark the cuts along the board edge, line ‘em up with one edge of the zero-clearance opening, and make perfect cuts every time.
A long (and portable) miter-saw table
An extension ladder on a pair of sawhorses makes the perfect stable and fiat miter saw table, especially for cutting long stuff. Mount the saw on a plywood base, clamp it to the ladder, add a couple of outfeed supports and you’re ready to cut away!