7 Basic Plumbing Fixes
Plumbing can be mysterious and complicated stuff — much of it, anyway. But happily, many of the plumbing problems that haunt every house are no big deal to fix, even if wrenches make you nervous.
The simple fixes shown here will help you solve seven small but nagging plumbing problems. Some take only five or ten minutes and require no tool more complicated than a pair of pliers or your own hand. One or two might take you an hour. None of them will get you in over your head.
How to fix a Slow-Flowing Faucet
When your kitchen or bathroom faucet just doesn’t deliver water like it used to, the problem may be right at the end of your faucet spout.
Most faucets have a small device called an aerator (Photo 1) that screws onto the end of the spout. Its job is to mix air with the water, providing an even. smooth. splash-free flow.
If the water delivery is just plain slow. or if the flow is erratic, remove the aerator and clean out any debris.
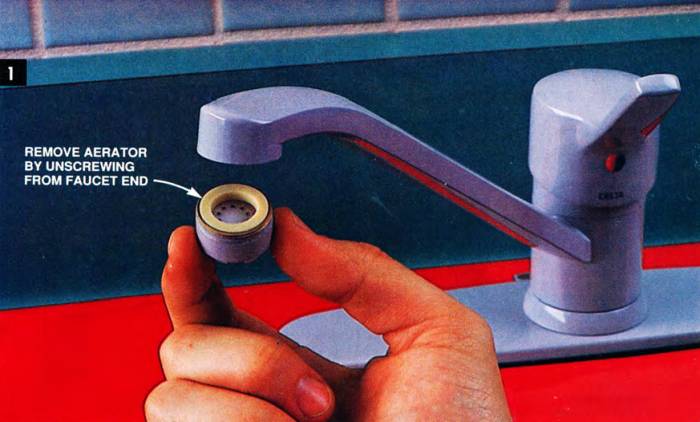
Remove the aerator from the faucet end by turning it clockwise. Flush away sediment and debris, using a sewing needle to clean crevices and small holes.
Most aerators can be removed by hand with a strong clockwise twist. A rubber glove can give you a better grip. But you may need the help of a pair of pliers. If you do use pliers. don’t squeeze so hard that you dent the aerator. Also, use a strip of folded-up cloth or paper towel to avoid scratching it.
Some aerators, especially older ones, have lots of parts in them — perforated discs, washers, sometimes several round screens. Unscrew the aerator carefully so the parts don’t all fall out and get jumbled. If they get mixed up, figuring out how they go back together could keep you scratching your head for a while.
First try flushing out any debris inside (mostly small iron, lime, and calcium particles) without taking all the internal parts out of the aerator. Then tap it sharply upside down on the counter.
If this doesn’t do the job, you’ll need to disassemble the internal parts, laying them out in the order you remove them (Photo 2).
The holes and crevices in the screens and discs are small, so you may need to use a sewing needle to pick and poke the particles out.
Once you have all the parts cleaned, reassemble the aerator, but don’t put it back on just yet. First run both hot and cold water to flush out any residue that may have collected behind the aerator, then reinstall the aerator.
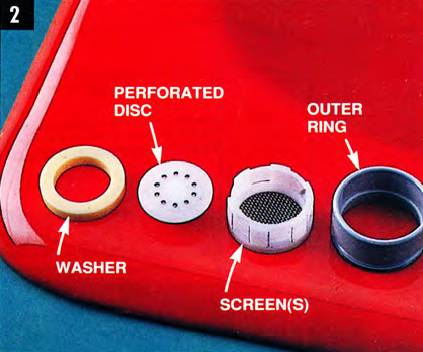
Disassemble the aerator parts if further cleaning is necessary. Lay out the parts in order so you’ll remember how they go back together.
It the water still doesn’t flow smoothly and splash-free, the aerator parts themselves may be the problem. They may be worn or distorted.
Take the old aerator to a home center or plumbing supply store. Plumbing supply stores often have a better assortment of plumbing materials than home centers. Buy a replacement aerator that’s the same size and has the same type of threads as your old one – it shouldn’t cost you more than $5.
But you haven’t settled with these particles forever, you know. They’ll be back! Iron, lime, and calcium are suspended in almost all water supplies. These minerals aren’t unhealthy, but they cause grief in your faucets, so think of cleaning aerators as sort of a lifetime hobby.
How to unplug a bad sink sprayer?
The sprayer on your kitchen sink can get plugged and uncooperative much the same way as a faucet aerator.
The sprayer head unscrews at its base. Pay attention to the washers; there’s a thick, hard one and a soft, thin one. When it’s time to reassemble the sprayer head to the base, make sure these washers are in proper sequence.
Use a needle to clean out any debris from around the nozzle and inside the connecting joint of the base, then reattach the head.
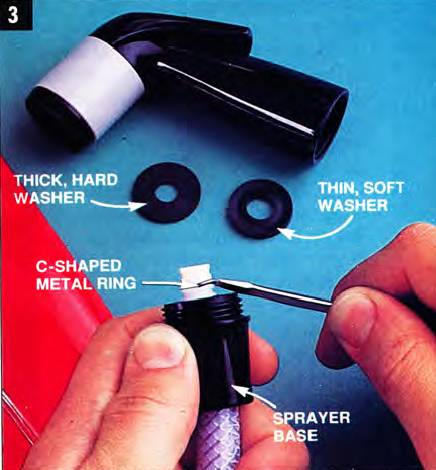
Unscrew the sprayer head and clean built-up deposits from the nozzle and hose connection. Keep washers in order. To remove the hose from the sprayer base, snap off the metal C-shaped ring with a small screwdriver.
If you can’t get the sprayer head cleaned out. or if it’s worn, broken, or just plain ugly, you can replace it.
The good news is that most brands of sprayer heads are interchangeable. Bring the old one along to a home center or plumbing supply store. The heads can often be purchased separately from the hose, and cost around $15.
If your sprayer head is good but the hose needs replacing, use a small screwdriver, as shown in Photo 3, to pry off the small, C-shaped metal ring that secures the bottom part of the sprayer head to the hose.
The other end of the hose connects to the underside of the faucet (Fig. A). Sometimes this hose connection piece is threaded on the outside, as shown, and sometimes on the inside.
Most hose replacement kits have adapters to accommodate either type of thread. but bring your old hose along anyway; it may save you a trip back to the store.

Replace a sprayer hole by first disconnecting the hose from the sprayer base. Then unscrew the threaded fitting from the underside of the faucet base. Use thread faint sealant or Teflon thread-sealing tape on the new faucet connection.
Before you connect the hose end to the underside of the faucet. use your finger to dab thread joint sealant into the threads. A small tube of sealant costs about $3.
Clear out all the stuff under the kitchen sink to give you room to work when it’s time to connect the hose to the faucet bottom. Get yourself plenty of light and a piece of carpet to cushion your back against the edge of the kitchen cabinet base.
Since you’re working in a small space, up high over your head, with very little leverage, pliers or an adjustable wrench about 6 in. long are the best tools to make this connection.
Fix a leaking basket strainer
A kitchen sink that won’t stay filled with wash or rinse water is enough to make you growl, but it’s a problem that’s easy to solve.
The basket strainer that lifts in and out of the drain has two jobs — to strain the water as it goes down, catching any large items, and to plug the sink compartment when you want to fill it with water.
The stopper at the bottom of these basket strainers can wear out. If you’ve got one that won‘t hold water, take the culprit to a home center or plumbing supply store. It’s important to get an exact match.
Fig. B shows the three most common basket strainers. The one on the top right has a dropdown rubber stopper; the one on the bottom right has a fixed stopper and a rigid, flat spindle on the bottom, and you turn the whole basket to seal the drain. The style shown at the lower left, usually the most expensive, has a threaded center piece that spins and locks the basket in place. A new basket will cost from $5 to $25.
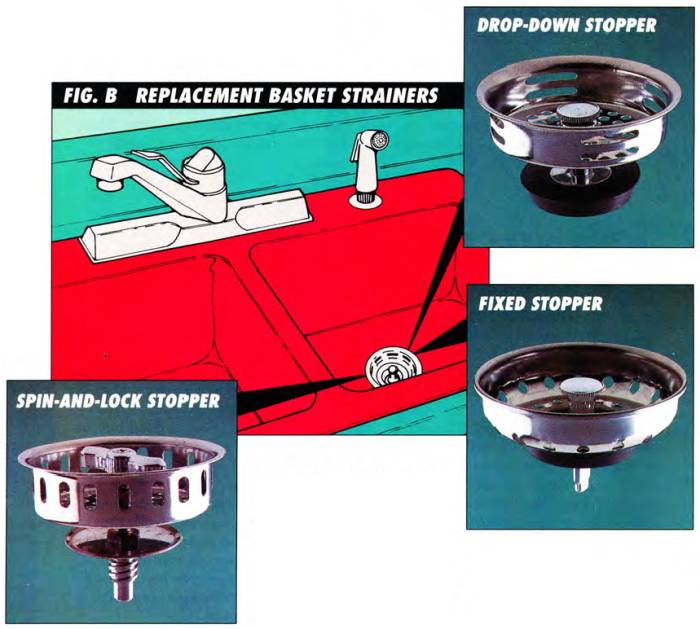
Replace a leaking basket strainer with a new one at the same type. The three main types are shown above. Each one seals the drain using a slightly different method.
How to fix a drippy shower head
A showerhead that squirts, drips or sprays you where you don’t want it to takes all the joy out of a good, hot shower. No need to put up with that.
A couple of good soaking sprays of ordinary supermarket delimer may clean out minor clogging, but if the shower head is worn or clogged beyond hope, replace it. A new shower head — even those muscle-relaxing ones with an adjustable or pulsating spray — is easy to install. They cost anywhere from $35 to $80.
The installation is super simple if you have external threads on the bottom end of the shower arm, as shown in Photo 4. Just remove the old head using long-handled adjustable pliers, then apply thread joint sealant or Teflon thread-sealing tape to the threads (wrap the tape on clockwise — the same direction the shower head screws on).
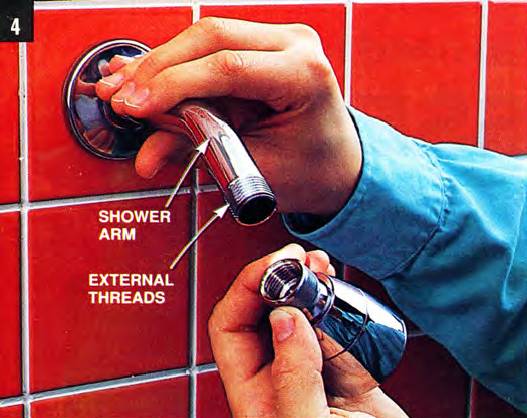
Remove the old shower head from the shower arm. If the arm has external threads, simply apply thread joint sealant or tape and screw the new head in place.
Screw the new head on by hand.
If the receiving collar (Photo 7) of the new head has sections of flat surface on it like a nut, tighten the collar with an adjustable wrench.
If the collar has either a smooth or serrated surface, carefully use a pair of pliers. Tighten the collar just enough so it doesn’t leak. Remove any excess thread sealant or Teflon tape that remains visible.
If you remove your old showerhead and discover a ball-shape at the end of the shower arm. as shown in Photo 5, the arm itself, as well as the shower head, will have to be replaced.
This is a bit more work. but it’s no big deal. The cutaway wall in Photos 6 and 7 shows what’s going on behind the wall.
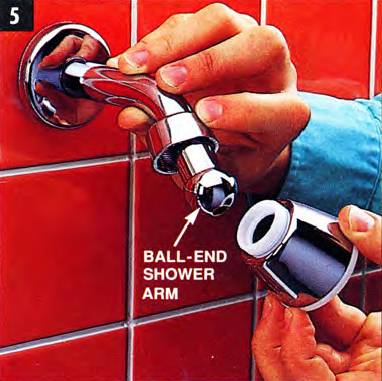
To install a new showerhead if your shower arm has a ball end, you’ll also need to replace the arm, as shown in the following cut-away photos.
Pull the cover plate away from the wall. With long-handled adjustable pliers, grasp the shower arm up close to the wall and turn it counterclockwise to remove it (Photo 6).
Take the old arm with you to a home center or plumbing supply store, and buy a new arm (it costs $10 or so) with external threads on both ends.
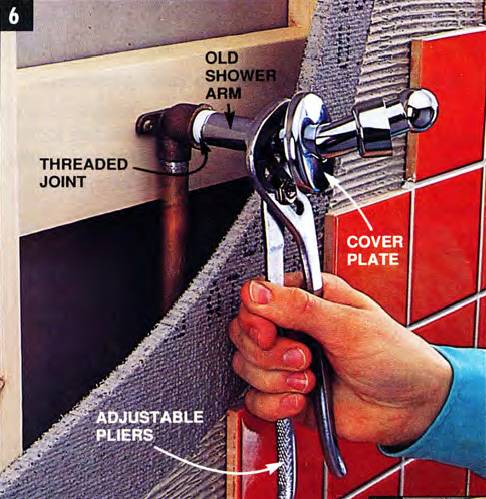
Unscrew the old shower arm by sliding hack the cover plate and using long-handled adjustable pliers. The wall cutaway shows how the arm unscrews from the shower supply pipe.
Carefully slide the cover plate onto the arm. put thread joint sealant or Teflon thread-sealing tape on the threads of one end and screw it in place (clockwise) as far as you can by hand.
Put your pliers on the arm up close to the wall and tighten to the desired position. The cover plate will conceal slight pliers marks.
Once the arm is in place. put thread sealant on the threads at the bottom end, and attach your new shower head as outlined above and shown in Photo 7.
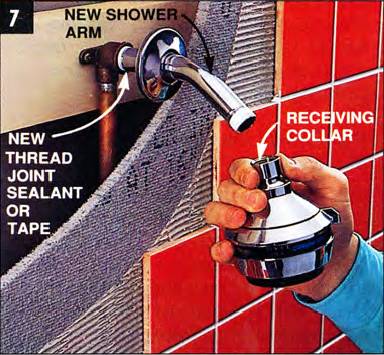
Screw the new shower arm into the supply pipe and tighten. Then mount the new shower head to the arm bottom. Use pipe thread sealant or Teflon thread-sealing tape at both joints.
How to fix a slow-filling washing machine
Does your washing machine seem to take forever to fill up with water? Particles of dirt and sediment may be plugging the hoses where they screw onto the threaded connections at the back of the washing machine. These connections are marked “hot” and “cold” on the machine.
To clean these hose connections, close the two shutoff valves that supply the hot and cold water through the hoses to the machine. Unscrew the hoses from the machine. If they won’t come off by hand. use a pair of pliers — but very carefully so you don’t squeeze the hose end out of shape.
Some washing machines have internal filter screens just inside these hot and cold threaded connections on the machine. Clean these screens with a cotton swab or small brush.
In other cases, as we show in Photo 8, each hose end holds a removable dome-shaped screen, usually brass, that’s attached to a hose washer.
Clean the dome-shaped screens, or replace them if they’re corroded — they cost about $2 each at a home center. Check the hose end connections at the shutoff valves as well. They may also have screens that need cleaning.
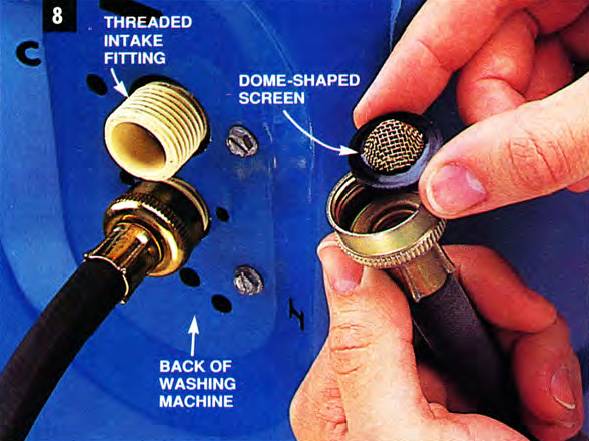
Disconnect the hoses from the threaded intake fittings at the back of your washing machine and clean the dome-shaped filter screens. Buy new ones if they are corroded or broken.
Before you walk away. make sure you’ve reconnected the hoses properly — the hot water to the hot water connection on the machine, and the cold to the cold.
Fixing a Washing Machine Water Hammer Noise
Your washing machine has an electric valve that shuts off the water when it reaches the desired level in the tub. This valve shuts off so quickly and forcefully that it sometimes creates loud banging noises, known as “water hammer.”
Get rid of this annoyance by installing shock absorbers on the offending water lines (Photo 9). These shock absorbers have the necessary fittings built right into them to connect to the shutoff valves and hoses.
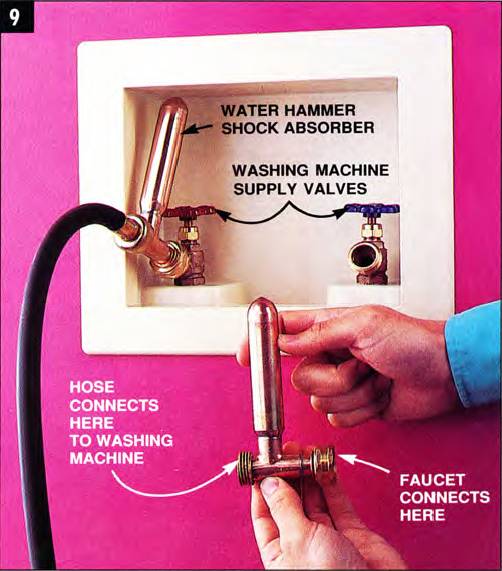
Install noise-suppressing shock absorbers on your washing machine’s water intake hoses to eliminate the annoying “water hammer” noise. These units screw in place between the hose and shutoff valve.
Simply shut off the valves where the hoses connect. Unscrew your hoses (carefully use pliers if necessary), then screw on the shock absorbers and reattach the hoses. Make sure the washers that come with the hoses and shock absorbers are in place.
The shock absorbers have an expansion area to counteract the quick opening and closing of the machine’s valve. You can buy them at most home centers or plumbing supply stores for $20 each.
How to Drain a Water Heater
If you’ve ever really read the instructions that come with your water heater (who even knows where they are?), you’ll discover the manufacturer recommends that you drain some water from the bottom of the tank periodically.
Those same rascals that clog aerators and washing machine lines — iron, lime, and calcium particles — can settle to the bottom of your water heater tank.
In some cases, the particle buildup can actually reduce the storage capacity of the tank and make it much less efficient. A gas water heater, with the burner at the bottom, has to heat through all of this buildup.
These particles can also adhere to the inside walls of the tank, creating an internal shelf, causing noisy rumbling sounds as the water sloshes around the shelf.
Particles lying on the bottom of the tank can also rub back and forth, wearing away the glass lining, exposing the steel to water, and causing rust-through.
All water heaters have a drain valve located near the bottom of the tank, about 5 or 6 in. from the floor. These valves have external threads on them, so you can connect an ordinary garden hose to drain the water into a floor drain, but you can drain the water directly into a small bucket or shallow pan as well.
Be careful: The water will be hot!
Don’t try draining the tank using the pressure relief valve (Fig. C). Since it is at or near the top of the tank, it won’t remove any sediment.
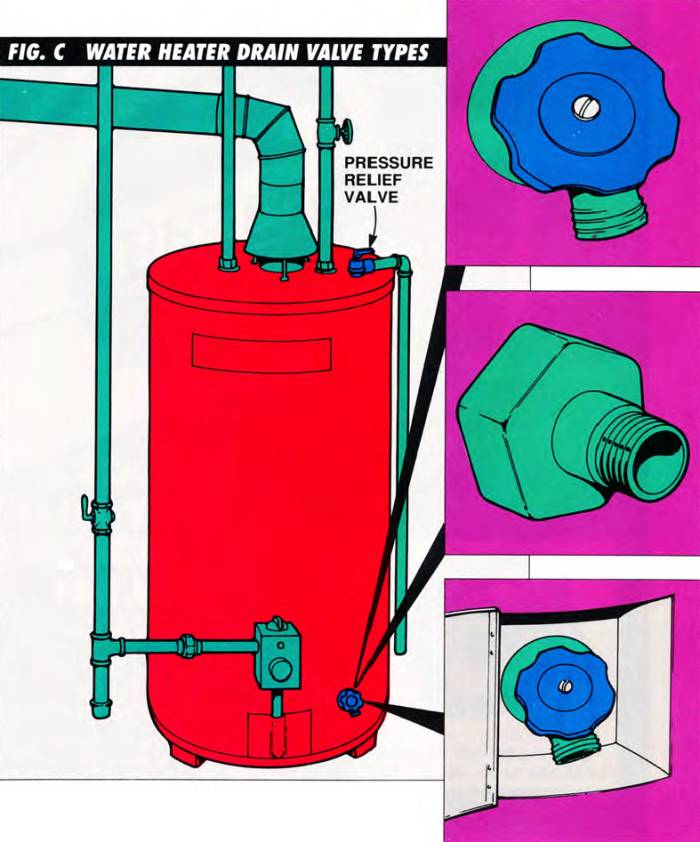
Flush mineral sediment from the bottom of your water heater tank periodically. Shown are the three most common drain valve types.
Water heater drain valves come in different shapes and styles, and you may not even recognize them as valves.
The standard-looking drain valve, shown in the top inset of Fig. C, is the most common variety. It has a round handle that you turn counterclockwise to open the valve. (Some have a straight lever instead of a round handle. Turn the lever 90 degrees to open the valve fully.)
The style shown in the center inset of Fig C doesn’t look like a valve at all, but you can identify it by the external threads on the end of its central spout.
The valve is usually white plastic and round or hexagonal—about 3 in. in diameter. To open, turn the circular or hexagonal outside ring by hand, counterclockwise. The ring and spout will turn together as a unit. Don’t force it once it reaches its limit; it’s possible to unscrew it too far, removing it from its moorings. and all the water will pour out. Talk about a mess!
A third drain valve style you may have, shown at the bottom, isn’t always easy to spot, because it’s located in a recess behind a small metal door on the water heater tank.
It’s not necessary to turn off the cold water into the tank or the fuel source to the water heater while you’re doing this draining process. Flush the tank for two to four minutes, with the water flowing as forcefully as the valve will allow so that it will siphon out the sediment.
To determine how regularly you should do this procedure, check your water heater’s instructions (lots of luck, by the way!). In most cases, once or twice a year is often enough. Although some water heater manufacturers recommend this operation as often as monthly if your water has a high mineral content and you don’t have a water softener.
Plumbing can be mysterious and complicated stuff — much of it, anyway. But happily, many of the plumbing problems that haunt every house are no big deal to fix, even if wrenches make you nervous.
The simple fixes shown here will help you solve seven small but nagging plumbing problems. Some take only five or ten minutes and require no tool more complicated than a pair of pliers or your own hand. One or two might take you an hour. None of them will get you in over your head.
How to fix a Slow-Flowing Faucet
When your kitchen or bathroom faucet just doesn’t deliver water like it used to, the problem may be right at the end of your faucet spout.
Most faucets have a small device called an aerator (Photo 1) that screws onto the end of the spout. Its job is to mix air with the water, providing an even. smooth. splash-free flow.
If the water delivery is just plain slow. or if the flow is erratic, remove the aerator and clean out any debris.

Remove the aerator from the faucet end by turning it clockwise. Flush away sediment and debris, using a sewing needle to clean crevices and small holes.
Most aerators can be removed by hand with a strong clockwise twist. A rubber glove can give you a better grip. But you may need the help of a pair of pliers. If you do use pliers. don’t squeeze so hard that you dent the aerator. Also, use a strip of folded-up cloth or paper towel to avoid scratching it.
Some aerators, especially older ones, have lots of parts in them — perforated discs, washers, sometimes several round screens. Unscrew the aerator carefully so the parts don’t all fall out and get jumbled. If they get mixed up, figuring out how they go back together could keep you scratching your head for a while.
First try flushing out any debris inside (mostly small iron, lime, and calcium particles) without taking all the internal parts out of the aerator. Then tap it sharply upside down on the counter.
If this doesn’t do the job, you’ll need to disassemble the internal parts, laying them out in the order you remove them (Photo 2).
The holes and crevices in the screens and discs are small, so you may need to use a sewing needle to pick and poke the particles out.
Once you have all the parts cleaned, reassemble the aerator, but don’t put it back on just yet. First run both hot and cold water to flush out any residue that may have collected behind the aerator, then reinstall the aerator.

Disassemble the aerator parts if further cleaning is necessary. Lay out the parts in order so you’ll remember how they go back together.
It the water still doesn’t flow smoothly and splash-free, the aerator parts themselves may be the problem. They may be worn or distorted.
Take the old aerator to a home center or plumbing supply store. Plumbing supply stores often have a better assortment of plumbing materials than home centers. Buy a replacement aerator that’s the same size and has the same type of threads as your old one – it shouldn’t cost you more than $5.
But you haven’t settled with these particles forever, you know. They’ll be back! Iron, lime, and calcium are suspended in almost all water supplies. These minerals aren’t unhealthy, but they cause grief in your faucets, so think of cleaning aerators as sort of a lifetime hobby.
How to unplug a bad sink sprayer?
The sprayer on your kitchen sink can get plugged and uncooperative much the same way as a faucet aerator.
The sprayer head unscrews at its base. Pay attention to the washers; there’s a thick, hard one and a soft, thin one. When it’s time to reassemble the sprayer head to the base, make sure these washers are in proper sequence.
Use a needle to clean out any debris from around the nozzle and inside the connecting joint of the base, then reattach the head.

Unscrew the sprayer head and clean built-up deposits from the nozzle and hose connection. Keep washers in order. To remove the hose from the sprayer base, snap off the metal C-shaped ring with a small screwdriver.
If you can’t get the sprayer head cleaned out. or if it’s worn, broken, or just plain ugly, you can replace it.
The good news is that most brands of sprayer heads are interchangeable. Bring the old one along to a home center or plumbing supply store. The heads can often be purchased separately from the hose, and cost around $15.
If your sprayer head is good but the hose needs replacing, use a small screwdriver, as shown in Photo 3, to pry off the small, C-shaped metal ring that secures the bottom part of the sprayer head to the hose.
The other end of the hose connects to the underside of the faucet (Fig. A). Sometimes this hose connection piece is threaded on the outside, as shown, and sometimes on the inside.
Most hose replacement kits have adapters to accommodate either type of thread. but bring your old hose along anyway; it may save you a trip back to the store.

Replace a sprayer hole by first disconnecting the hose from the sprayer base. Then unscrew the threaded fitting from the underside of the faucet base. Use thread faint sealant or Teflon thread-sealing tape on the new faucet connection.
Before you connect the hose end to the underside of the faucet. use your finger to dab thread joint sealant into the threads. A small tube of sealant costs about $3.
Clear out all the stuff under the kitchen sink to give you room to work when it’s time to connect the hose to the faucet bottom. Get yourself plenty of light and a piece of carpet to cushion your back against the edge of the kitchen cabinet base.
Since you’re working in a small space, up high over your head, with very little leverage, pliers or an adjustable wrench about 6 in. long are the best tools to make this connection.
Fix a leaking basket strainer
A kitchen sink that won’t stay filled with wash or rinse water is enough to make you growl, but it’s a problem that’s easy to solve.
The basket strainer that lifts in and out of the drain has two jobs — to strain the water as it goes down, catching any large items, and to plug the sink compartment when you want to fill it with water.
The stopper at the bottom of these basket strainers can wear out. If you’ve got one that won‘t hold water, take the culprit to a home center or plumbing supply store. It’s important to get an exact match.
Fig. B shows the three most common basket strainers. The one on the top right has a dropdown rubber stopper; the one on the bottom right has a fixed stopper and a rigid, flat spindle on the bottom, and you turn the whole basket to seal the drain. The style shown at the lower left, usually the most expensive, has a threaded center piece that spins and locks the basket in place. A new basket will cost from $5 to $25.

Replace a leaking basket strainer with a new one at the same type. The three main types are shown above. Each one seals the drain using a slightly different method.
How to fix a drippy shower head
A showerhead that squirts, drips or sprays you where you don’t want it to takes all the joy out of a good, hot shower. No need to put up with that.
A couple of good soaking sprays of ordinary supermarket delimer may clean out minor clogging, but if the shower head is worn or clogged beyond hope, replace it. A new shower head — even those muscle-relaxing ones with an adjustable or pulsating spray — is easy to install. They cost anywhere from $35 to $80.
The installation is super simple if you have external threads on the bottom end of the shower arm, as shown in Photo 4. Just remove the old head using long-handled adjustable pliers, then apply thread joint sealant or Teflon thread-sealing tape to the threads (wrap the tape on clockwise — the same direction the shower head screws on).

Remove the old shower head from the shower arm. If the arm has external threads, simply apply thread joint sealant or tape and screw the new head in place.
Screw the new head on by hand.
If the receiving collar (Photo 7) of the new head has sections of flat surface on it like a nut, tighten the collar with an adjustable wrench.
If the collar has either a smooth or serrated surface, carefully use a pair of pliers. Tighten the collar just enough so it doesn’t leak. Remove any excess thread sealant or Teflon tape that remains visible.
If you remove your old showerhead and discover a ball-shape at the end of the shower arm. as shown in Photo 5, the arm itself, as well as the shower head, will have to be replaced.
This is a bit more work. but it’s no big deal. The cutaway wall in Photos 6 and 7 shows what’s going on behind the wall.

To install a new showerhead if your shower arm has a ball end, you’ll also need to replace the arm, as shown in the following cut-away photos.
Pull the cover plate away from the wall. With long-handled adjustable pliers, grasp the shower arm up close to the wall and turn it counterclockwise to remove it (Photo 6).
Take the old arm with you to a home center or plumbing supply store, and buy a new arm (it costs $10 or so) with external threads on both ends.

Unscrew the old shower arm by sliding hack the cover plate and using long-handled adjustable pliers. The wall cutaway shows how the arm unscrews from the shower supply pipe.
Carefully slide the cover plate onto the arm. put thread joint sealant or Teflon thread-sealing tape on the threads of one end and screw it in place (clockwise) as far as you can by hand.
Put your pliers on the arm up close to the wall and tighten to the desired position. The cover plate will conceal slight pliers marks.
Once the arm is in place. put thread sealant on the threads at the bottom end, and attach your new shower head as outlined above and shown in Photo 7.

Screw the new shower arm into the supply pipe and tighten. Then mount the new shower head to the arm bottom. Use pipe thread sealant or Teflon thread-sealing tape at both joints.
How to fix a slow-filling washing machine
Does your washing machine seem to take forever to fill up with water? Particles of dirt and sediment may be plugging the hoses where they screw onto the threaded connections at the back of the washing machine. These connections are marked “hot” and “cold” on the machine.
To clean these hose connections, close the two shutoff valves that supply the hot and cold water through the hoses to the machine. Unscrew the hoses from the machine. If they won’t come off by hand. use a pair of pliers — but very carefully so you don’t squeeze the hose end out of shape.
Some washing machines have internal filter screens just inside these hot and cold threaded connections on the machine. Clean these screens with a cotton swab or small brush.
In other cases, as we show in Photo 8, each hose end holds a removable dome-shaped screen, usually brass, that’s attached to a hose washer.
Clean the dome-shaped screens, or replace them if they’re corroded — they cost about $2 each at a home center. Check the hose end connections at the shutoff valves as well. They may also have screens that need cleaning.

Disconnect the hoses from the threaded intake fittings at the back of your washing machine and clean the dome-shaped filter screens. Buy new ones if they are corroded or broken.
Before you walk away. make sure you’ve reconnected the hoses properly — the hot water to the hot water connection on the machine, and the cold to the cold.
Fixing a Washing Machine Water Hammer Noise
Your washing machine has an electric valve that shuts off the water when it reaches the desired level in the tub. This valve shuts off so quickly and forcefully that it sometimes creates loud banging noises, known as “water hammer.”
Get rid of this annoyance by installing shock absorbers on the offending water lines (Photo 9). These shock absorbers have the necessary fittings built right into them to connect to the shutoff valves and hoses.

Install noise-suppressing shock absorbers on your washing machine’s water intake hoses to eliminate the annoying “water hammer” noise. These units screw in place between the hose and shutoff valve.
Simply shut off the valves where the hoses connect. Unscrew your hoses (carefully use pliers if necessary), then screw on the shock absorbers and reattach the hoses. Make sure the washers that come with the hoses and shock absorbers are in place.
The shock absorbers have an expansion area to counteract the quick opening and closing of the machine’s valve. You can buy them at most home centers or plumbing supply stores for $20 each.
How to Drain a Water Heater
If you’ve ever really read the instructions that come with your water heater (who even knows where they are?), you’ll discover the manufacturer recommends that you drain some water from the bottom of the tank periodically.
Those same rascals that clog aerators and washing machine lines — iron, lime, and calcium particles — can settle to the bottom of your water heater tank.
In some cases, the particle buildup can actually reduce the storage capacity of the tank and make it much less efficient. A gas water heater, with the burner at the bottom, has to heat through all of this buildup.
These particles can also adhere to the inside walls of the tank, creating an internal shelf, causing noisy rumbling sounds as the water sloshes around the shelf.
Particles lying on the bottom of the tank can also rub back and forth, wearing away the glass lining, exposing the steel to water, and causing rust-through.
All water heaters have a drain valve located near the bottom of the tank, about 5 or 6 in. from the floor. These valves have external threads on them, so you can connect an ordinary garden hose to drain the water into a floor drain, but you can drain the water directly into a small bucket or shallow pan as well.
Be careful: The water will be hot!
Don’t try draining the tank using the pressure relief valve (Fig. C). Since it is at or near the top of the tank, it won’t remove any sediment.

Flush mineral sediment from the bottom of your water heater tank periodically. Shown are the three most common drain valve types.
Water heater drain valves come in different shapes and styles, and you may not even recognize them as valves.
The standard-looking drain valve, shown in the top inset of Fig. C, is the most common variety. It has a round handle that you turn counterclockwise to open the valve. (Some have a straight lever instead of a round handle. Turn the lever 90 degrees to open the valve fully.)
The style shown in the center inset of Fig C doesn’t look like a valve at all, but you can identify it by the external threads on the end of its central spout.
The valve is usually white plastic and round or hexagonal—about 3 in. in diameter. To open, turn the circular or hexagonal outside ring by hand, counterclockwise. The ring and spout will turn together as a unit. Don’t force it once it reaches its limit; it’s possible to unscrew it too far, removing it from its moorings. and all the water will pour out. Talk about a mess!
A third drain valve style you may have, shown at the bottom, isn’t always easy to spot, because it’s located in a recess behind a small metal door on the water heater tank.
It’s not necessary to turn off the cold water into the tank or the fuel source to the water heater while you’re doing this draining process. Flush the tank for two to four minutes, with the water flowing as forcefully as the valve will allow so that it will siphon out the sediment.
To determine how regularly you should do this procedure, check your water heater’s instructions (lots of luck, by the way!). In most cases, once or twice a year is often enough. Although some water heater manufacturers recommend this operation as often as monthly if your water has a high mineral content and you don’t have a water softener.
