
How Do I Build A New Wood Fence From Scratch?
Sometimes a job’s too big to do yourself. Sometimes it’s too complicated. Sometimes it’s too dirty, too scary, too time-consuming, too heavy, too smelly, or has too many wires sticking out of it (for me, that’s three). So you hire a pro to do it.
Building a fence, though, is different — it’s one job you should save for yourself. Even if you’ve never tackled anything larger than a doghouse, building a fence is a great project for the do-it-yourselfer.
Look at the advantages: You don’t need fancy tools; it won’t disrupt your family’s life the way some big projects do; fences look great but don’t require the skill of a master carpenter; and finally, if you screw up (heaven forbid!) you won’t be damaging your house.
Best of all, though, will be your fence itself. Look at it as you drive up — it’s handsome and impressive. Walk up close and give that post a wiggle — it’s solid and strong. Put your cheek to the wood and sight down the length — it’s perfect. And you made it. It also does those practical things you wanted a fence to do in the first place, like keeping your dogs in or the nosy neighbors out.
This story will show you how to build a typical wood fence, easily and successfully. There are plenty of other types of fences you could build, from the simplest prefab panel fence to an elaborate historical design, but no matter which one you choose, these techniques will help make your fence a “most-likely-to-succeed” project.
What it takes to build
The tools you need to build this fence are simple: hand tools and a circular saw. The skill level of this project is intermediate, but it varies a lot depending on how flat your terrain is (flat is easier) and how long your fence is (long is harder). The tricky part of fence building is accurately laying out and setting the posts, not handling the tools.

Fence building is hard physical work, however. Fence posts are heavy, and digging holes is a chore that can wilt even XXL-size guys. If anybody owes you some labor, this is the project to rope them in on.
To give you a rough idea of material costs, a 6-ft. high fence generally costs between $11 and $19 a foot for the lumber if it’s made from cedar or redwood. The materials for this fence, which was made from clear cedar, cost $14 a foot. Made from a knotty grade, it would have cost $11 a foot.
A side-by-side board fence with a scalloped top
This design was chosen because it’s easy to build, but looks fancy. The fence boards are simply nailed up side by side, but they’re livened up by having a long curve cut across their tops after assembly (a “scalloped” top). The fence-lumber dealer also sold posts with decorative tops.
A scalloped-top fence is easy to build, economical of materials, and gives plenty of privacy. The disadvantages are that it blocks the breeze, the front looks better than the back, and the decorative post tops require you to be more careful in setting the posts. This fence was made from clear cedar and gave it a natural clear finish to show off the wood.
You may be surprised that I used a footing of tamped dirt and concrete (Fig. A). You don’t need to put a large rock at the bottom of the hole, or gravel to let the water drain. According to my professional fence installer friend, a concrete footing makes the strongest fence support, and tamped dirt lets the water drain away as well as it’s going to.

Enough said. Let’s build the fence.
The first step: planning
The first thing to do is to tell your neighbors you plan to build a fence. A surprise fence is the first volley in many a neighborhood war.
Alter alerting the neighbors, you need to find out two things:
- Where your property lines are, and
- Where any underground utility lines (gas, electric, phone, and cable) are buried.
You may be able to locate the stakes or “monuments” used to mark the corners of your lot (a metal detector helps), but if not, your city or county government can sometimes help. They’ll have plot maps or other documents that give a legal description of your property. You must have your entire fence, including the footings around the posts, inside your property lines. Hire a surveyor if necessary.
In most areas, utility companies will mark on the ground where their cables and pipes are if you ask them to. Stay at least 18 in. away from the marks. Or, better yet, call before you dig.
Check with your local building officials to see if the building code regulates fences. Often the code will require that the better side of the fence face out, toward the street or neighbors (that’s a surprise, isn’t it?). There may also be restrictions on fence height or how close you can be to property lines (called “setback”).
Map out your fence
Once you know the legal requirements, put up stakes and strings to mark the location of your fence posts. The strings should be at least 6 in. inside your property lines. Make a map of your fence on graph paper, showing the length of each section.
Now calculate how far apart the posts will be for each section of fence. The posts should be 8ft. apart or less, from the center of one post to the center of the next. Here’s how to figure it:
- Take the total length of the section in inches and divide it by 96.
- Take that number and round it up to the next highest whole number.
- Divide the total length of the fence section by that number.
- The result is the center-to-center distance.
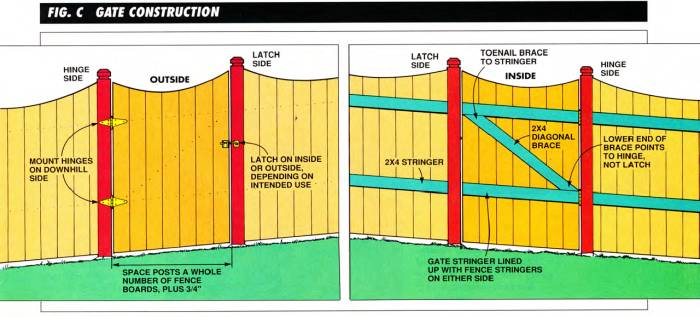
If you want a gate, decide on its location. It should be on as level a spot as possible, with the hinge on the downhill side. The opening for the gate should be a whole multiple of the fence board width, plus 3/4 in. (Fig. C).
Mark the post and gate locations and the distance between post centers on your fence map.
Ordering materials
Using your fence map as a guide, order your lumber, concrete, and fasteners. A fence dealer will have the best selection of lumber.
All the lumber for this fence is rough cut, rather than planed smooth. Surprisingly, “dog-eared” fence boards (the kind with the corners cut off; see Photo 13) are so popular that they’re cheaper than plain boards, so I bought them and cut the ends off when I cut the scalloped tops (Photo 13). For common grade fence material. allow 10 percent extra for waste. For clear grades, 5 percent.
If you’re mixing the concrete yourself. figure about two 80-lb. bags per post. Otherwise. figure roughly 1 yard of concrete for 40 posts.
Choose aluminum. stainless steel or hot-dipped (not electroplated) galvanized nails to minimize rust staining. You can recognize hot-dipped nails by their rough texture.
Setting the corner posts
The first step in building your fence is to set the posts on the ends and corners of the fence. It’s important that the posts be deep enough: 32 in. deep is the minimum for a 6-ft.-tall fence.
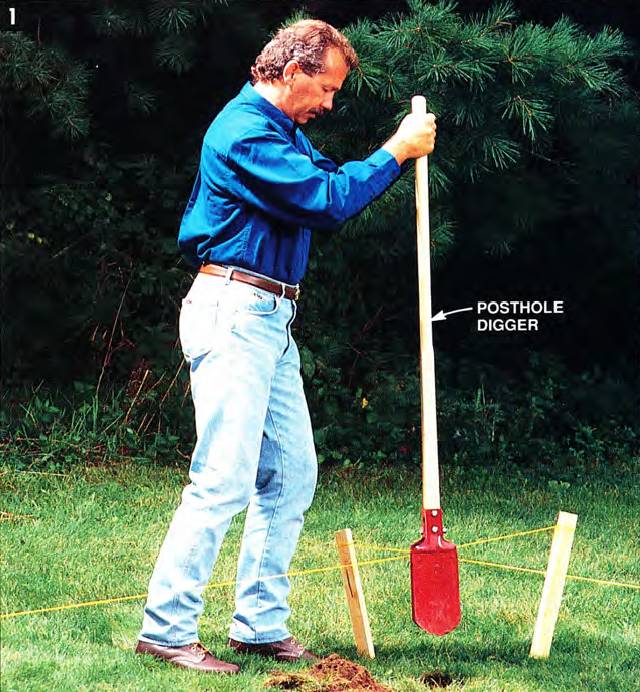
Dig the holes with a clamshell-type posthole digger (Photo 1), making sure that the holes are flat and solid on the bottom.
Begin by digging holes for the pre-cut corner and end posts. Strings and stakes mark the fence location, just inside your property lines.
Adjust the posts so they’re the right height above the ground. by either tamping extra dirt at the bottom of the hole or by deepening the hole. Remember that a fence like this one, with pre-cut decorative post tops, must have the posts set to the right height. On other fences. for example. those with posts that have nailed-on caps or finials. You can set posts extra high and trim them off after the stringers are nailed on (Photo 19).
When a post is the right height, tamp 6 to 8 in of dirt around the base to keep the post plumb (straight up and down) in both directions (Photo 2).
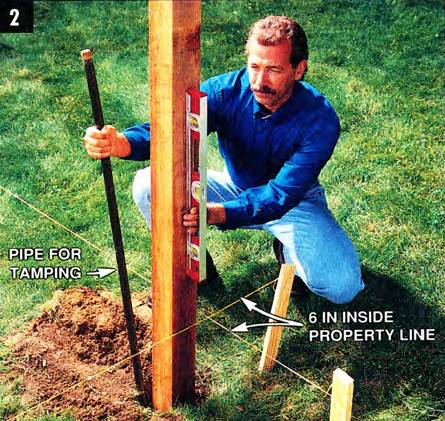
Tamp 6-8 in. of dirt around the corner post: to hold them, doing an inch or two at a time. Make sure the post is straight up and down and the right height above the ground.
Tamping dirt is a simple activity, but it takes a little practice to get it right. Do an inch or two of dirt at a time, tamping evenly around the post and using your level to test for plumb. Start gently and then tamp harder as you go around. If you try to tamp hard right away, it’ll push the post to the side. A length of 3/4-in. pipe makes a great tamping tool.
Tie a mason’s string line between your corner posts and end posts, at the height of the bottom of the lower stringer (Photo 3). This string will be used to locate all the other posts, so pull it tight and check its position twice.

Set a string line between the corner and end posts at the height of the lower 2x4 stringer. Mark the other post locations on the string with a felt-tip marker.
Measure from your string to the ground to see how the slope changes. See the “Dealing with Slopes” section below to determine how you’ll need to adjust the string line, and perhaps your corner and end posts, to get your fence to follow the contours of your lawn.
Using a felt-tip marker, mark the string to locate where the remaining posts and gate posts will go.
Setting intermediate posts
You can dig the rest of the postholes by hand or use a power auger (Photo 4) if your soil isn’t too rocky. Either way, locate each hole so 2/3 of it is inside the line, and 1/3 is outside (Photo 4, inset).
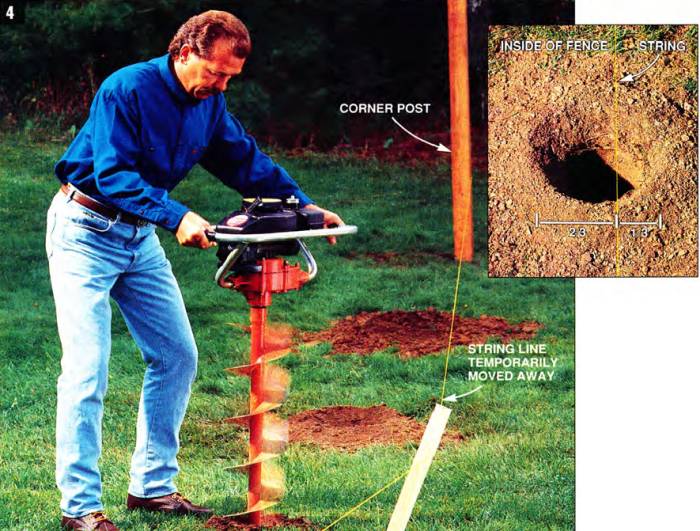
Dig the remaining postholes and set the posts in tamped dirt. You can use a power auger, with the hole 2/3 of the way inside the string line.
The little, one person power auger (Photo 4) is pretty gruesome work. If I were doing it again. I’d get a larger, two-person machine and get my brother-in-law (who sure owes me!) to come over and pitch in. You can rent one and it’ll save you tons of time and sweat.
After your holes are dug, mark on your remaining posts where the bottom of the lower stringer will be. Set the posts in their holes, lining up that mark with the string liner. Add well-tamped dirt to raise the post, or dig the hole a little deeper, as needed.
Tamp 6 to 8 in. of dirt around each post to hold it in place. Make sure that each post is:
- plumb in both directions,
- at the right height in relation to the string line,
- square to the string line, and
- just barely touching it.
Don’t let the posts push the string line outward. If any of your posts are bowed. arrange the bow so it’s parallel to the fence.
A common problem is rocks.
- Try prying with a pick and pry bar. If that doesn’t work, you have several options.
- If the rock is a foot or more deep, just cut off the end of the post (intermediate posts only).
- You can also move the post to one side — in the direction of the fence only — without it being very noticeable.
- As a last resort, you can shift the bottom of the post in or out an inch or two in the direction perpendicular to the fence. If you keep the tops of the post in line, the fence will still look straight, even if the bottom edge sticks out in one spot.
Tree roots are less of a problem. Cut the smaller ones and move the post around the larger ones.
Stand back now and look at the posts.
Do they look straight up and down? Stand on a ladder and look down the tops. Are they in a line (Photo 5)? Are they the right height? When you look from the side, do the tops of the posts make a straight line or a pleasantly smooth curve? Since the posts are just tamped in place, you can adjust them as much as you want, so get fussy. Get your posts just right and the rest of the fence will follow.

Check the posts to be sure they’re plumb, they line up straight, and the tops form an even line. Because the posts are set in dirt, you can adjust them if necessary.
After the posts get your final approval, and if it’s a calm day, fill the holes with concrete (Photo 6).

Fill the holes with concrete, after making a final check that the posts are plumb, square to the line, and in a smooth line.
Mound the concrete up and trowel the top of it smooth, so it sheds water well (Photo 7). Let the concrete cure overnight.

Trowel the tops of the concrete footings to shed water. After a year, you can caulk the gap between the wood and concrete.
Dealing with slopes
There is no cut-and-dried, carefully measured, mathematically precise way to get a fence to look right on irregular terrain (and that’s what most of us have). It’s a matter of trusting your eye and making adjustments.
You have two basic choices:
Straight fence
For a straight fence (Fig. B below), you set the corner posts, string your line, and set the height of the remaining posts a fixed distance above that line.
- Advantage: the fence looks good.
- Disadvantage: you may have large gaps and humps under it.
Fence following the ground
To have a fence follow the ground, each post is set to a fixed height above the ground.
- Advantage: there is a constant. even gap at the bottom of the fence.
- Disadvantage: following minor humps and hollows can make your fence look jagged, which you may not like.
The best solution: compromise
A good-looking fence is usually a compromise between being straight and following the terrain. It follows a smooth curve or has just a few changes in slope.
You can accomplish this by adjusting the height of intermediate posts where there is a change in slope (Fig. B).
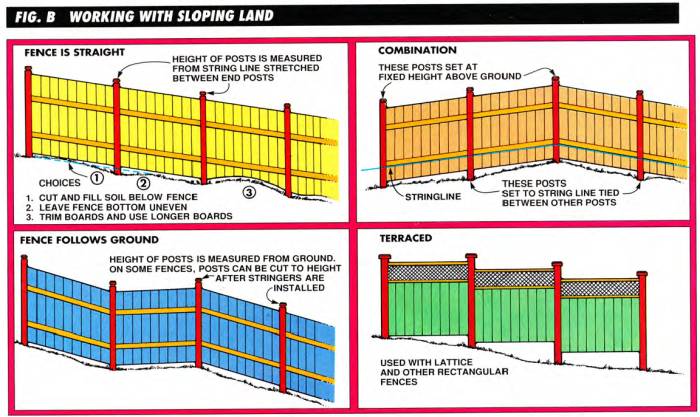
Put a nail in these posts at the lower stringer height, and wrap your string line around it, so your string line can still be used as a reference. You can soften an abrupt change in slope by adjusting the heights of a couple of posts on either side of the break in slope. Remember, as long as the posts are just set in tamped dirt, you can adjust them to get the line of the fence just right.
For small humps and hollows, you can cut or fill the soil, cut some of the fence boards to fit, or use a few longer fence boards.
If you have complicated slopes, it will be easier to install a fence style that allows you to trim off the tops of the posts after they’re set (see the “Other popular fences” section below).
Nail on the stringers
You’ll save a lot of walking if you start by laying out the stringers by pairs all along your fence (This project used a wheelbarrow to carry the boards.)
You put up a stringer like this:
- Hold it up to the posts at the right height and mark each end for cutting.
- Trim off the ends, then toenail (nail diagonally) the stringer to the posts at each end, keeping the ends at just the right height.
The trick to doing this quickly, easily and accurately is to use a couple of 2x4 blocks and a pair of 38in. spacer boards made of 1x6. Tack these onto the posts to locate the stringers and hold them for nailing (Photos 8 and 9).
The 2x4 blocks hold the lower stringer, first for marking, and then for toenailing. The 1x6 spacers locate the upper stringer a precise distance above the lower stringer, then hold it for toenailing.
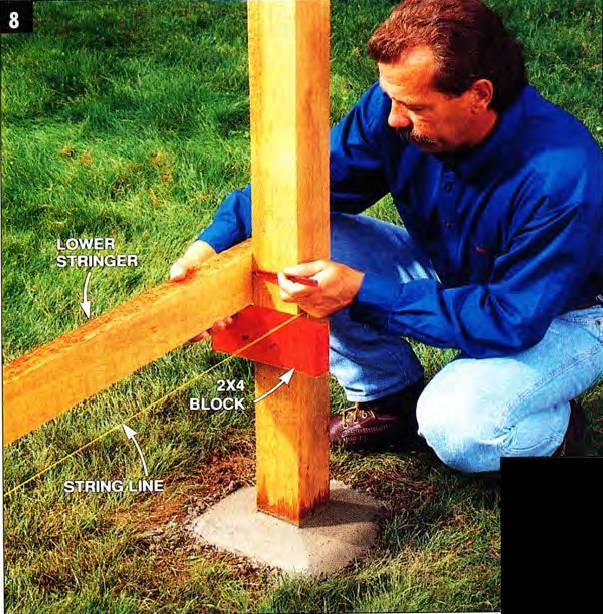
2X4 blocks, tacked on temporarily, hold the lower stringer while you mark it for cutting the ends. They also hold the stringer in position so you can nail it on without a helper.
If you’ve ever done it, you know that the bugaboo of toenailing is that the board shifts as you nail it. The blocks and spacer boards will keep your stringers in the right spot.
Toenail the stringers with three 10d galvanized nails at each end, centering the stringer on the post. The lower stringer should have two nails on the side and one on the top edge. The upper stringer should get two nails on the edges and one on the side. When you nail on the side, do it on the side where the fence boards will be attached, in order to hide the nails. If you have warped stringers, use them on the bottom, not the top.
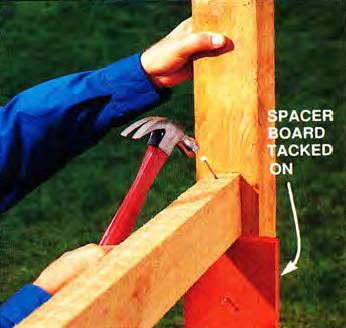
Toenail the stringers into the posts with galvanized nails. The spacer boards and 2x4 blocks keep the stringers from shifting as you nail them.
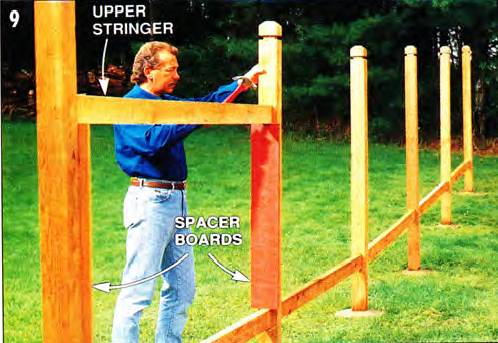
Spacer boards hold the upper stringer for both marking the end cuts and nailing. They also ensure that the upper and lower stringers are parallel.
Nail on the fence boards
Now for the fun part! Spread your fence boards out along the fence as you did the stringers, and start nailing them up. Once again, a jig (Photo 10) will make this part of the project go quickly and accurately, guaranteeing that the tops of all the fence boards are the right height above the upper stringer.
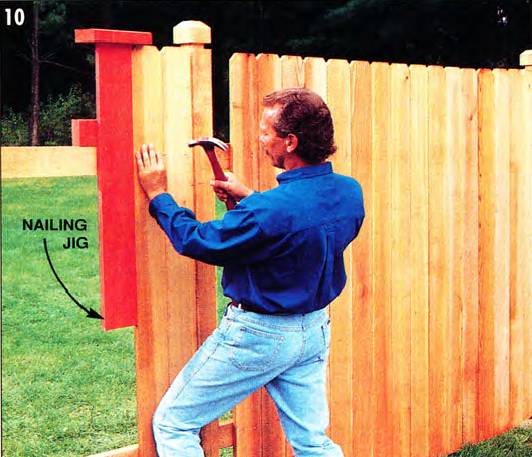
Nail on the fence boards using a jig to make sure the tops of the boards on parallel to the upper stringer. Keep the boards plumb as you nail them.
Start at one post and nail the boards to the upper stringer only with two 7d galvanized box nails. The jig ensures that each board will be at the right height. Do all the boards between two posts this way. If the gap left at the second post is uniform, top to bottom, go back and nail the boards to the bottom stringer.
If the gap at the end is 3 in. wide or more, just rip the last board to fit (Photo 11).
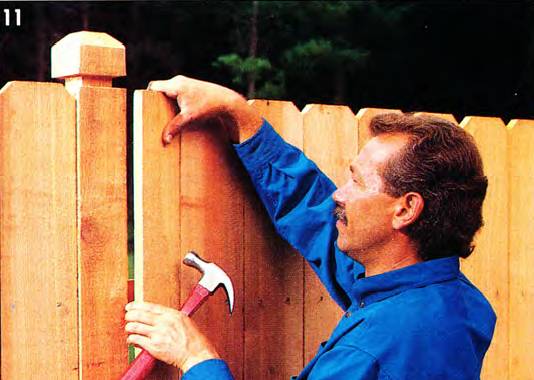
Fill the gap left at the end of a section of fence boards by cutting the last one.
If the gap is 1 to 3 in. wide, rip the last two boards. If the gap is less than an inch, remove a few boards and leave slight gaps between them when you nail them back on.
After all the boards are nailed on, mark the curved cuts that give the fence its scalloped look. For each post-to-post section, tack on three nails, two on the posts just at the tops of the boards, and the other in the middle of the fence section, 6 in. down from the other nails (Fig. A).
A strip of 1/4—in. hardboard or plywood, bent between these nails, will form a smooth curve from which you can trace the cutting line (Photo 12).
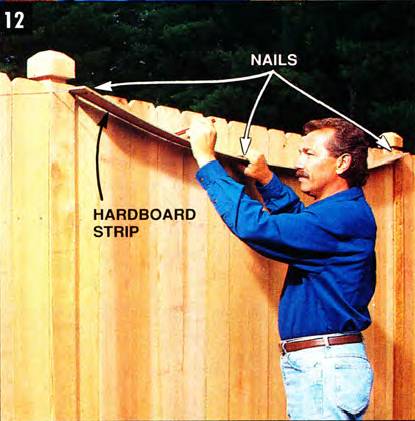
Trace the curves for the top of the fence boards using a thin strip of 1/4-in. hardboard bent between three nails.
Cut out the curve with a jigsaw, finishing the end of the cut with a coping saw if necessary, and smooth the cut edge of the boards with a rasp (Photo 13).
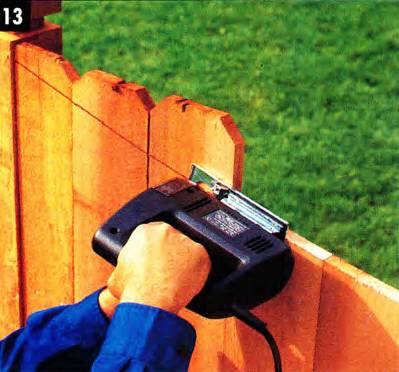
Cut the curves with a jigsaw, finishing the ends with a coping saw if necessary. Smooth the cut ends of the boards with a rasp.
Building the gate
The trick to building a gate is to tack it together on the ground, using only two nails for each board (Photo 14).
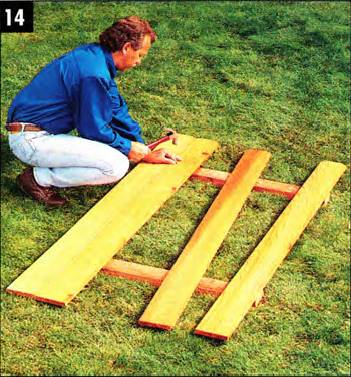
Assemble the gate on the ground, using only one nail on each end of the board, so the gate stays somewhat flexible.
You can then fit it into the opening, twist it so the stringers line up on either side, then finish nailing. Then lay a 2x4 across the stringers for a diagonal brace, trace the ends, and cut it to fit (Fig. C above and Photo 15 below).
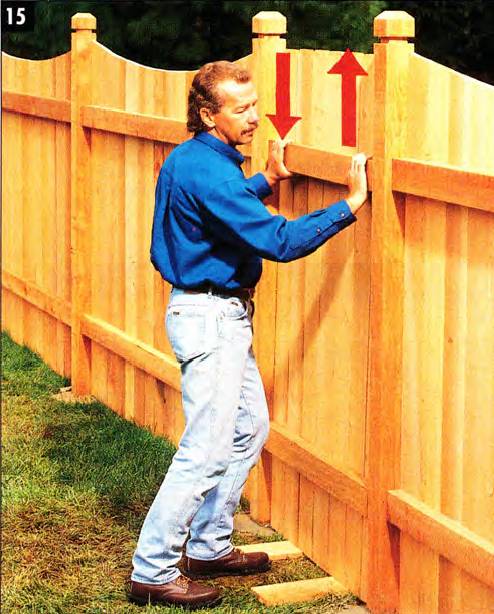
Twist the gate so the stringers line up with those on either side. Then finish nailing on the boards and add a diagonal 2x4 brace.
Toenail the diagonal brace in place, being sure that it points from the latch side down to the hinge side. rather than the reverse. (This is the cause of many a sagging gate.) Cut the scalloped top on the gate, then mount the hardware as shown in Fig. C above.
Final touches
Left to weather naturally, cedar will turn gray. Although this is acceptable to many people and doesn’t affect the longevity of the wood much, this project treated the fence with a clear water-repellent sealer to keep it golden brown (Photo 16).

A clear finish brings out the warm cedar colors but must be reapplied every few years. Without it, cedar weathers to a light silver.
Any sealer that’s designed for cedar decks will work. However, be warned: you’ll have to reapply the finish every few years to keep it looking fresh. It cost $2 a ft. to finish this fence.
After your fence has been up for a year, it’s recommended that you caulk between the concrete footing and the post to keep water out.
Other popular fences
There are a million styles of fences, and half the fun of building one yourself is choosing and designing it. You’ll probably see a wide variety of fences right in your own neighborhood.
The building method shown for the scallop-top fence is typical for most fences. If you want to build another style, here’s a brief description of three of the most popular ones:
Alternate Board Fence
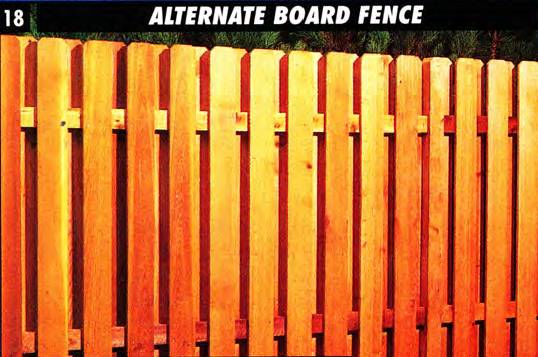
This fence looks equally good from both sides, is very easy to build, allows good ventilation, and follows ground contours well.
This fence is an example of one where you can set the posts without worrying about height, and trim the posts after the top stringer is nailed on (Photo 19).

Cut tops of posts on an alternate board fence to length after upper stringer is nailed on. This is a dangerous cut because the saw can kick back out of your control. You can use a handsaw for more safety.
This makes setting posts go much faster. The 1x6 fence boards should be spaced about 3-1/2 in. apart on each side (use a jig), although the last few can be varied to fit.
Picket Fence
This is one of the easiest fences to build. It provides more of a visual boundary than it does privacy or protection. Fence dealers carry a wide variety of decorative out pickets and matching posts.
Posts should be buried a minimum of 24 in. deep, and typically they are 7 ft. long. You can use just tamped dirt for the till on intermediate posts, but concrete is better and should definitely be used on corner, end, and gate posts. Space standard 1x4 pickets about 2-1/2 in. apart, with the stringers 27 in. apart for a 4ft. fence. Use four nails per picket.
Overlapped Board Fence with Lattice
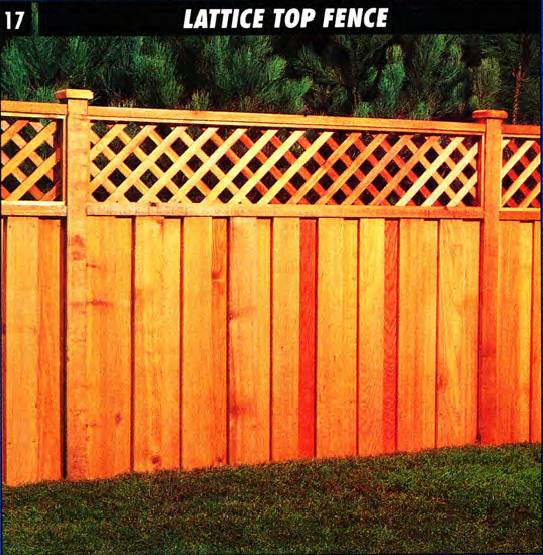
This is one of the more complicated fences to build, though it’s also one where doing it yourself will save the most money.
It gives good privacy, is very strong (because of the overlapping boards), it’s hard to climb and has a classy look. For slopes. It must go down in steps (Fig. B). A table saw is almost a necessity to rip the thin nailing strips for this fence.
In this example, the posts run long and are topped with a beveled cap that was cut on a table saw. You can adapt this design to make a fence that’s entirely lattice, or one that’s entirely overlapping board. The details of the construction are shown in Fig. D.
Sometimes a job’s too big to do yourself. Sometimes it’s too complicated. Sometimes it’s too dirty, too scary, too time-consuming, too heavy, too smelly, or has too many wires sticking out of it (for me, that’s three). So you hire a pro to do it.
Building a fence, though, is different — it’s one job you should save for yourself. Even if you’ve never tackled anything larger than a doghouse, building a fence is a great project for the do-it-yourselfer.
Look at the advantages: You don’t need fancy tools; it won’t disrupt your family’s life the way some big projects do; fences look great but don’t require the skill of a master carpenter; and finally, if you screw up (heaven forbid!) you won’t be damaging your house.
Best of all, though, will be your fence itself. Look at it as you drive up — it’s handsome and impressive. Walk up close and give that post a wiggle — it’s solid and strong. Put your cheek to the wood and sight down the length — it’s perfect. And you made it. It also does those practical things you wanted a fence to do in the first place, like keeping your dogs in or the nosy neighbors out.
This story will show you how to build a typical wood fence, easily and successfully. There are plenty of other types of fences you could build, from the simplest prefab panel fence to an elaborate historical design, but no matter which one you choose, these techniques will help make your fence a “most-likely-to-succeed” project.
What it takes to build
The tools you need to build this fence are simple: hand tools and a circular saw. The skill level of this project is intermediate, but it varies a lot depending on how flat your terrain is (flat is easier) and how long your fence is (long is harder). The tricky part of fence building is accurately laying out and setting the posts, not handling the tools.
Fence building is hard physical work, however. Fence posts are heavy, and digging holes is a chore that can wilt even XXL-size guys. If anybody owes you some labor, this is the project to rope them in on.
To give you a rough idea of material costs, a 6-ft. high fence generally costs between $11 and $19 a foot for the lumber if it’s made from cedar or redwood. The materials for this fence, which was made from clear cedar, cost $14 a foot. Made from a knotty grade, it would have cost $11 a foot.
A side-by-side board fence with a scalloped top
This design was chosen because it’s easy to build, but looks fancy. The fence boards are simply nailed up side by side, but they’re livened up by having a long curve cut across their tops after assembly (a “scalloped” top). The fence-lumber dealer also sold posts with decorative tops.
A scalloped-top fence is easy to build, economical of materials, and gives plenty of privacy. The disadvantages are that it blocks the breeze, the front looks better than the back, and the decorative post tops require you to be more careful in setting the posts. This fence was made from clear cedar and gave it a natural clear finish to show off the wood.
You may be surprised that I used a footing of tamped dirt and concrete (Fig. A). You don’t need to put a large rock at the bottom of the hole, or gravel to let the water drain. According to my professional fence installer friend, a concrete footing makes the strongest fence support, and tamped dirt lets the water drain away as well as it’s going to.
Enough said. Let’s build the fence.
The first step: planning
The first thing to do is to tell your neighbors you plan to build a fence. A surprise fence is the first volley in many a neighborhood war.
Alter alerting the neighbors, you need to find out two things:
- Where your property lines are, and
- Where any underground utility lines (gas, electric, phone, and cable) are buried.
You may be able to locate the stakes or “monuments” used to mark the corners of your lot (a metal detector helps), but if not, your city or county government can sometimes help. They’ll have plot maps or other documents that give a legal description of your property. You must have your entire fence, including the footings around the posts, inside your property lines. Hire a surveyor if necessary.
In most areas, utility companies will mark on the ground where their cables and pipes are if you ask them to. Stay at least 18 in. away from the marks. Or, better yet, call before you dig.
Check with your local building officials to see if the building code regulates fences. Often the code will require that the better side of the fence face out, toward the street or neighbors (that’s a surprise, isn’t it?). There may also be restrictions on fence height or how close you can be to property lines (called “setback”).
Map out your fence
Once you know the legal requirements, put up stakes and strings to mark the location of your fence posts. The strings should be at least 6 in. inside your property lines. Make a map of your fence on graph paper, showing the length of each section.
Now calculate how far apart the posts will be for each section of fence. The posts should be 8ft. apart or less, from the center of one post to the center of the next. Here’s how to figure it:
- Take the total length of the section in inches and divide it by 96.
- Take that number and round it up to the next highest whole number.
- Divide the total length of the fence section by that number.
- The result is the center-to-center distance.
If you want a gate, decide on its location. It should be on as level a spot as possible, with the hinge on the downhill side. The opening for the gate should be a whole multiple of the fence board width, plus 3/4 in. (Fig. C).
Mark the post and gate locations and the distance between post centers on your fence map.
Ordering materials
Using your fence map as a guide, order your lumber, concrete, and fasteners. A fence dealer will have the best selection of lumber.
All the lumber for this fence is rough cut, rather than planed smooth. Surprisingly, “dog-eared” fence boards (the kind with the corners cut off; see Photo 13) are so popular that they’re cheaper than plain boards, so I bought them and cut the ends off when I cut the scalloped tops (Photo 13). For common grade fence material. allow 10 percent extra for waste. For clear grades, 5 percent.
If you’re mixing the concrete yourself. figure about two 80-lb. bags per post. Otherwise. figure roughly 1 yard of concrete for 40 posts.
Choose aluminum. stainless steel or hot-dipped (not electroplated) galvanized nails to minimize rust staining. You can recognize hot-dipped nails by their rough texture.
Setting the corner posts
The first step in building your fence is to set the posts on the ends and corners of the fence. It’s important that the posts be deep enough: 32 in. deep is the minimum for a 6-ft.-tall fence.
Dig the holes with a clamshell-type posthole digger (Photo 1), making sure that the holes are flat and solid on the bottom.
Begin by digging holes for the pre-cut corner and end posts. Strings and stakes mark the fence location, just inside your property lines.
Adjust the posts so they’re the right height above the ground. by either tamping extra dirt at the bottom of the hole or by deepening the hole. Remember that a fence like this one, with pre-cut decorative post tops, must have the posts set to the right height. On other fences. for example. those with posts that have nailed-on caps or finials. You can set posts extra high and trim them off after the stringers are nailed on (Photo 19).
When a post is the right height, tamp 6 to 8 in of dirt around the base to keep the post plumb (straight up and down) in both directions (Photo 2).
Tamp 6-8 in. of dirt around the corner post: to hold them, doing an inch or two at a time. Make sure the post is straight up and down and the right height above the ground.
Tamping dirt is a simple activity, but it takes a little practice to get it right. Do an inch or two of dirt at a time, tamping evenly around the post and using your level to test for plumb. Start gently and then tamp harder as you go around. If you try to tamp hard right away, it’ll push the post to the side. A length of 3/4-in. pipe makes a great tamping tool.
Tie a mason’s string line between your corner posts and end posts, at the height of the bottom of the lower stringer (Photo 3). This string will be used to locate all the other posts, so pull it tight and check its position twice.
Set a string line between the corner and end posts at the height of the lower 2x4 stringer. Mark the other post locations on the string with a felt-tip marker.
Measure from your string to the ground to see how the slope changes. See the “Dealing with Slopes” section below to determine how you’ll need to adjust the string line, and perhaps your corner and end posts, to get your fence to follow the contours of your lawn.
Using a felt-tip marker, mark the string to locate where the remaining posts and gate posts will go.
Setting intermediate posts
You can dig the rest of the postholes by hand or use a power auger (Photo 4) if your soil isn’t too rocky. Either way, locate each hole so 2/3 of it is inside the line, and 1/3 is outside (Photo 4, inset).
Dig the remaining postholes and set the posts in tamped dirt. You can use a power auger, with the hole 2/3 of the way inside the string line.
The little, one person power auger (Photo 4) is pretty gruesome work. If I were doing it again. I’d get a larger, two-person machine and get my brother-in-law (who sure owes me!) to come over and pitch in. You can rent one and it’ll save you tons of time and sweat.
After your holes are dug, mark on your remaining posts where the bottom of the lower stringer will be. Set the posts in their holes, lining up that mark with the string liner. Add well-tamped dirt to raise the post, or dig the hole a little deeper, as needed.
Tamp 6 to 8 in. of dirt around each post to hold it in place. Make sure that each post is:
- plumb in both directions,
- at the right height in relation to the string line,
- square to the string line, and
- just barely touching it.
Don’t let the posts push the string line outward. If any of your posts are bowed. arrange the bow so it’s parallel to the fence.
A common problem is rocks.
- Try prying with a pick and pry bar. If that doesn’t work, you have several options.
- If the rock is a foot or more deep, just cut off the end of the post (intermediate posts only).
- You can also move the post to one side — in the direction of the fence only — without it being very noticeable.
- As a last resort, you can shift the bottom of the post in or out an inch or two in the direction perpendicular to the fence. If you keep the tops of the post in line, the fence will still look straight, even if the bottom edge sticks out in one spot.
Tree roots are less of a problem. Cut the smaller ones and move the post around the larger ones.
Stand back now and look at the posts.
Do they look straight up and down? Stand on a ladder and look down the tops. Are they in a line (Photo 5)? Are they the right height? When you look from the side, do the tops of the posts make a straight line or a pleasantly smooth curve? Since the posts are just tamped in place, you can adjust them as much as you want, so get fussy. Get your posts just right and the rest of the fence will follow.
Check the posts to be sure they’re plumb, they line up straight, and the tops form an even line. Because the posts are set in dirt, you can adjust them if necessary.
After the posts get your final approval, and if it’s a calm day, fill the holes with concrete (Photo 6).
Fill the holes with concrete, after making a final check that the posts are plumb, square to the line, and in a smooth line.
Mound the concrete up and trowel the top of it smooth, so it sheds water well (Photo 7). Let the concrete cure overnight.
Trowel the tops of the concrete footings to shed water. After a year, you can caulk the gap between the wood and concrete.
Dealing with slopes
There is no cut-and-dried, carefully measured, mathematically precise way to get a fence to look right on irregular terrain (and that’s what most of us have). It’s a matter of trusting your eye and making adjustments.
You have two basic choices:
Straight fence
For a straight fence (Fig. B below), you set the corner posts, string your line, and set the height of the remaining posts a fixed distance above that line.
- Advantage: the fence looks good.
- Disadvantage: you may have large gaps and humps under it.
Fence following the ground
To have a fence follow the ground, each post is set to a fixed height above the ground.
- Advantage: there is a constant. even gap at the bottom of the fence.
- Disadvantage: following minor humps and hollows can make your fence look jagged, which you may not like.
The best solution: compromise
A good-looking fence is usually a compromise between being straight and following the terrain. It follows a smooth curve or has just a few changes in slope.
You can accomplish this by adjusting the height of intermediate posts where there is a change in slope (Fig. B).
Put a nail in these posts at the lower stringer height, and wrap your string line around it, so your string line can still be used as a reference. You can soften an abrupt change in slope by adjusting the heights of a couple of posts on either side of the break in slope. Remember, as long as the posts are just set in tamped dirt, you can adjust them to get the line of the fence just right.
For small humps and hollows, you can cut or fill the soil, cut some of the fence boards to fit, or use a few longer fence boards.
If you have complicated slopes, it will be easier to install a fence style that allows you to trim off the tops of the posts after they’re set (see the “Other popular fences” section below).
Nail on the stringers
You’ll save a lot of walking if you start by laying out the stringers by pairs all along your fence (This project used a wheelbarrow to carry the boards.)
You put up a stringer like this:
- Hold it up to the posts at the right height and mark each end for cutting.
- Trim off the ends, then toenail (nail diagonally) the stringer to the posts at each end, keeping the ends at just the right height.
The trick to doing this quickly, easily and accurately is to use a couple of 2x4 blocks and a pair of 38in. spacer boards made of 1x6. Tack these onto the posts to locate the stringers and hold them for nailing (Photos 8 and 9).
The 2x4 blocks hold the lower stringer, first for marking, and then for toenailing. The 1x6 spacers locate the upper stringer a precise distance above the lower stringer, then hold it for toenailing.
2X4 blocks, tacked on temporarily, hold the lower stringer while you mark it for cutting the ends. They also hold the stringer in position so you can nail it on without a helper.
If you’ve ever done it, you know that the bugaboo of toenailing is that the board shifts as you nail it. The blocks and spacer boards will keep your stringers in the right spot.
Toenail the stringers with three 10d galvanized nails at each end, centering the stringer on the post. The lower stringer should have two nails on the side and one on the top edge. The upper stringer should get two nails on the edges and one on the side. When you nail on the side, do it on the side where the fence boards will be attached, in order to hide the nails. If you have warped stringers, use them on the bottom, not the top.
Toenail the stringers into the posts with galvanized nails. The spacer boards and 2x4 blocks keep the stringers from shifting as you nail them.
Spacer boards hold the upper stringer for both marking the end cuts and nailing. They also ensure that the upper and lower stringers are parallel.
Nail on the fence boards
Now for the fun part! Spread your fence boards out along the fence as you did the stringers, and start nailing them up. Once again, a jig (Photo 10) will make this part of the project go quickly and accurately, guaranteeing that the tops of all the fence boards are the right height above the upper stringer.
Nail on the fence boards using a jig to make sure the tops of the boards on parallel to the upper stringer. Keep the boards plumb as you nail them.
Start at one post and nail the boards to the upper stringer only with two 7d galvanized box nails. The jig ensures that each board will be at the right height. Do all the boards between two posts this way. If the gap left at the second post is uniform, top to bottom, go back and nail the boards to the bottom stringer.
If the gap at the end is 3 in. wide or more, just rip the last board to fit (Photo 11).
Fill the gap left at the end of a section of fence boards by cutting the last one.
If the gap is 1 to 3 in. wide, rip the last two boards. If the gap is less than an inch, remove a few boards and leave slight gaps between them when you nail them back on.
After all the boards are nailed on, mark the curved cuts that give the fence its scalloped look. For each post-to-post section, tack on three nails, two on the posts just at the tops of the boards, and the other in the middle of the fence section, 6 in. down from the other nails (Fig. A).
A strip of 1/4—in. hardboard or plywood, bent between these nails, will form a smooth curve from which you can trace the cutting line (Photo 12).
Trace the curves for the top of the fence boards using a thin strip of 1/4-in. hardboard bent between three nails.
Cut out the curve with a jigsaw, finishing the end of the cut with a coping saw if necessary, and smooth the cut edge of the boards with a rasp (Photo 13).
Cut the curves with a jigsaw, finishing the ends with a coping saw if necessary. Smooth the cut ends of the boards with a rasp.
Building the gate
The trick to building a gate is to tack it together on the ground, using only two nails for each board (Photo 14).
Assemble the gate on the ground, using only one nail on each end of the board, so the gate stays somewhat flexible.
You can then fit it into the opening, twist it so the stringers line up on either side, then finish nailing. Then lay a 2x4 across the stringers for a diagonal brace, trace the ends, and cut it to fit (Fig. C above and Photo 15 below).
Twist the gate so the stringers line up with those on either side. Then finish nailing on the boards and add a diagonal 2x4 brace.
Toenail the diagonal brace in place, being sure that it points from the latch side down to the hinge side. rather than the reverse. (This is the cause of many a sagging gate.) Cut the scalloped top on the gate, then mount the hardware as shown in Fig. C above.
Final touches
Left to weather naturally, cedar will turn gray. Although this is acceptable to many people and doesn’t affect the longevity of the wood much, this project treated the fence with a clear water-repellent sealer to keep it golden brown (Photo 16).
A clear finish brings out the warm cedar colors but must be reapplied every few years. Without it, cedar weathers to a light silver.
Any sealer that’s designed for cedar decks will work. However, be warned: you’ll have to reapply the finish every few years to keep it looking fresh. It cost $2 a ft. to finish this fence.
After your fence has been up for a year, it’s recommended that you caulk between the concrete footing and the post to keep water out.
Other popular fences
There are a million styles of fences, and half the fun of building one yourself is choosing and designing it. You’ll probably see a wide variety of fences right in your own neighborhood.
The building method shown for the scallop-top fence is typical for most fences. If you want to build another style, here’s a brief description of three of the most popular ones:
Alternate Board Fence
This fence looks equally good from both sides, is very easy to build, allows good ventilation, and follows ground contours well.
This fence is an example of one where you can set the posts without worrying about height, and trim the posts after the top stringer is nailed on (Photo 19).
Cut tops of posts on an alternate board fence to length after upper stringer is nailed on. This is a dangerous cut because the saw can kick back out of your control. You can use a handsaw for more safety.
This makes setting posts go much faster. The 1x6 fence boards should be spaced about 3-1/2 in. apart on each side (use a jig), although the last few can be varied to fit.
Picket Fence
This is one of the easiest fences to build. It provides more of a visual boundary than it does privacy or protection. Fence dealers carry a wide variety of decorative out pickets and matching posts.
Posts should be buried a minimum of 24 in. deep, and typically they are 7 ft. long. You can use just tamped dirt for the till on intermediate posts, but concrete is better and should definitely be used on corner, end, and gate posts. Space standard 1x4 pickets about 2-1/2 in. apart, with the stringers 27 in. apart for a 4ft. fence. Use four nails per picket.
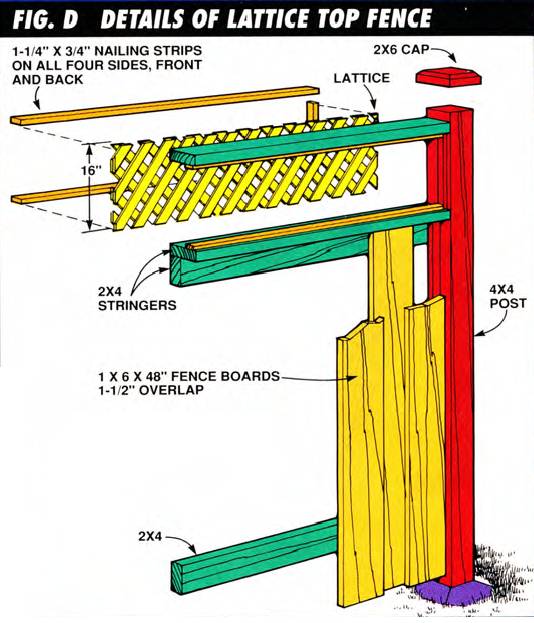
Overlapped Board Fence with Lattice
This is one of the more complicated fences to build, though it’s also one where doing it yourself will save the most money.
It gives good privacy, is very strong (because of the overlapping boards), it’s hard to climb and has a classy look. For slopes. It must go down in steps (Fig. B). A table saw is almost a necessity to rip the thin nailing strips for this fence.
In this example, the posts run long and are topped with a beveled cap that was cut on a table saw. You can adapt this design to make a fence that’s entirely lattice, or one that’s entirely overlapping board. The details of the construction are shown in Fig. D.