Build your own Yard Shed (with pictures, plans, and a detailed step-by-step)
It’s buried in there somewhere, deep in the trackless wilderness of your garage.
You vault the lawn mower, fight off the garden hose, narrowly escape being impaled by a fishing pole, to emerge triumphantly — fugitive rake in hand.
Wouldn’t it be terrific to avoid all that? To have a separate place to store the mowers, blowers, trimmers, tillers, ladders, sporting gear and other trappings of our busy do-it-ourselves lives? A yard shed is a perfect solution.
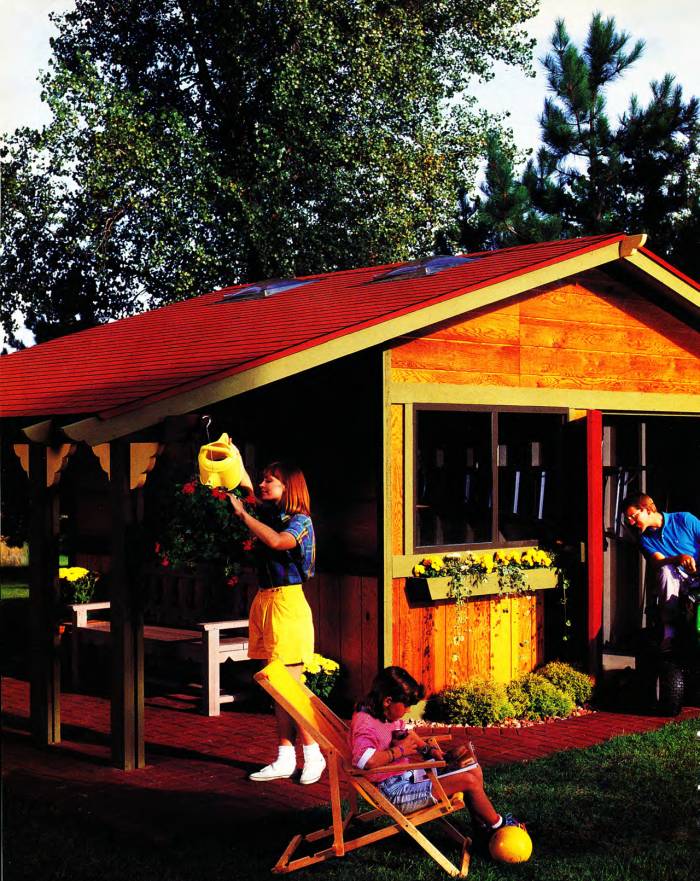
Building a shed is cheaper than expanding the garage, a lot more convenient than hauling stuff out of the basement, and safer than leaving your tools and treasures outside. Best of all, though, a yard shed puts everything right where you need it — in the yard. Heck, you could probably clear out enough space to actually fit a car in your garage again.
Step-by-step construction
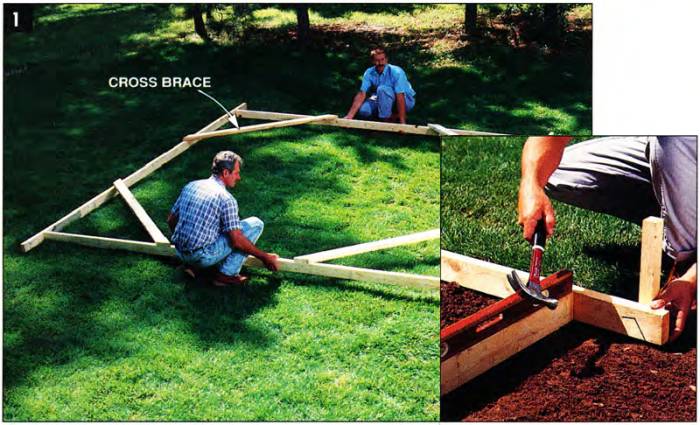
- Position the concrete form, then level and nail it to stakes driven firmly into the ground. Cross braces keep the form square and straight.
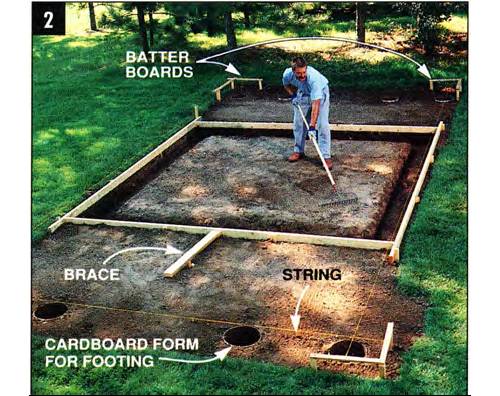
- Dig out and level the area for the concrete slab and dig holes for the eave post footings. Strings and batter boards locate the footings.
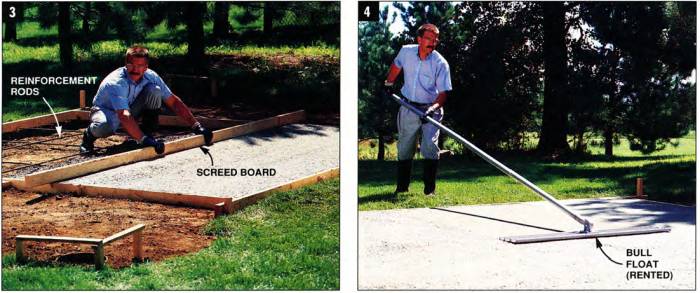
- Level the concrete as you pour it into the form. Criss-crossed reinforcement rods in the slab and footing strengthen the concrete.
- Float the concrete to even out high and low spots and further smooth the surface. Small ridges that remain are removed by hand traweling.
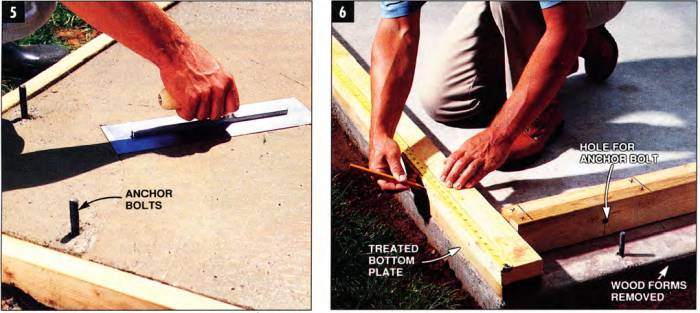
- Trowel the concrete as it sets up and hardens. Anchor bolts, installed while the concrete is still wet, will secure walls to the slab.
- Mark the nailing plates in pairs to indicate the location of studs, doors, and windows. The bottom plate must be made of treated lumber.
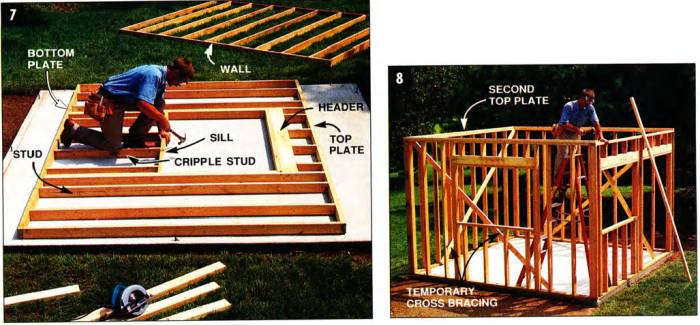
- Nail walls together with 16d nails. Make certain the rough openings for windows and doors are the right size for the windows and doors you plan to use.
- Nail on top plates to tie the corners together. Cross braces (reused from the concrete form) hold walls plumb and straight until you apply the siding.
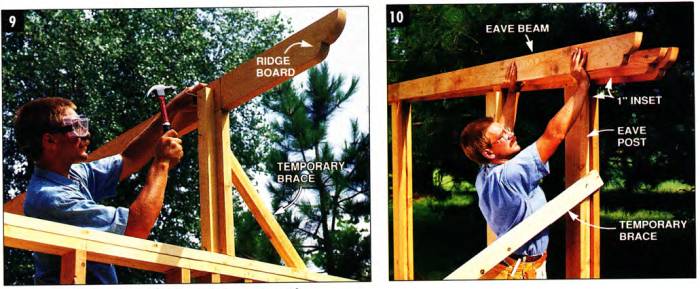
- Install the ridge board on top of the support post. Decorative end cuts are quick and easy to make with a jigsaw.
- Install eave beams and posts, then plumb and brace them. The narrower center member provides extra strength without looking boxy.
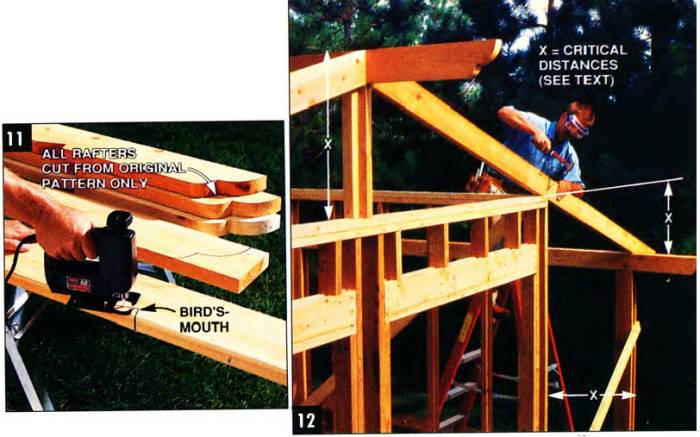
- Cut rafters. One angled peak cut, two birds-mouth cuts, and one decorative tail cut are required per rafter. Use one rafter as a pattern for the rest.
- Nail rafters in place, installing the gable-end ones first. Rafters are spaced every 2 ft. and toenailed to beam and wall with 16d nails.
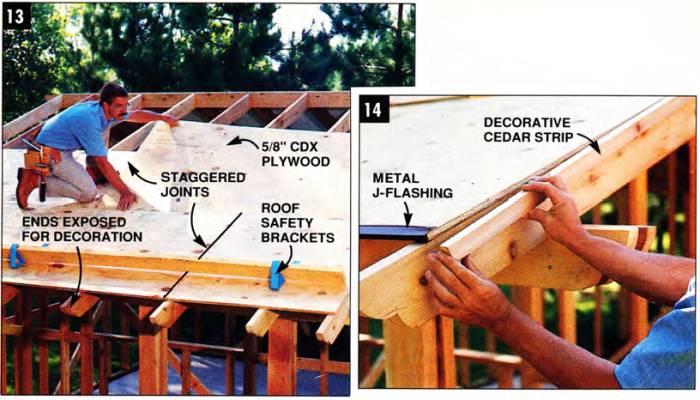
- Install plywood roof sheathing, trimming excess plywood after nailing. Stagger end joints and nail securely with 8d nails.
- Protect sheets of plywood from moisture and humidity with 1x2 cedar on the gable ends and metal J-flashing at eaves.
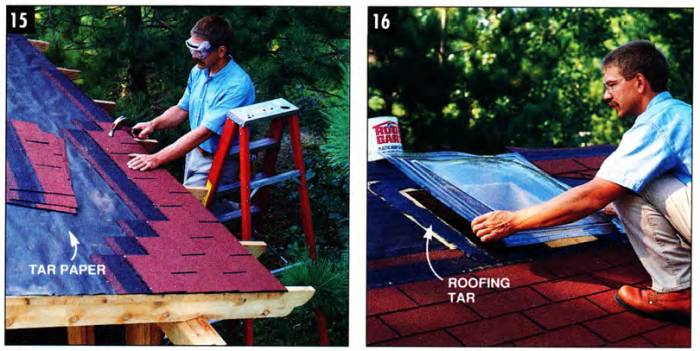
- Nail shingles over tar paper. Stagger the shingles and fasten them according to manufacturer's directions on the wrapper.
- Install skylights, embedding them in roofing tar. Skylights located near the peak of the roof let in the most light.
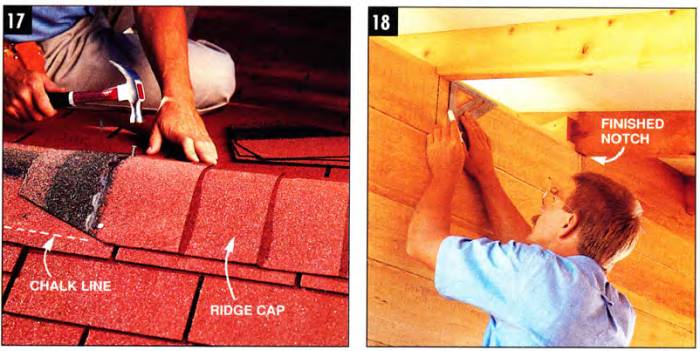
- Install ridge cap. Individual shingle tabs with cut-off corners overlap one another to waterproof the ridge and give a finished appearance.
- Mark siding to fit around rafter tails while sheets are temporarily tacked in position. Use a jigsaw to carefully cut out the notches.
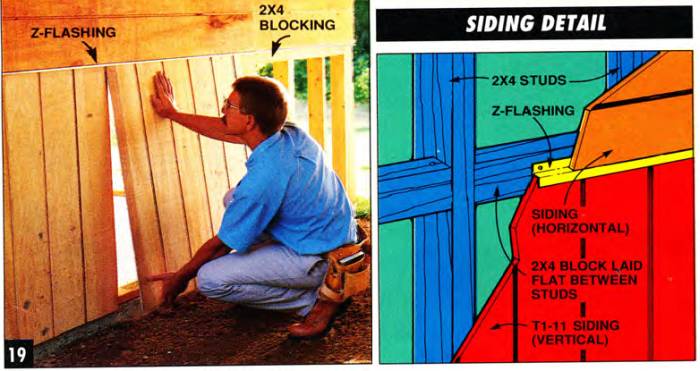
- Install lower siding. Use Z-shaped flashing for weather-tightness where siding changes directions. Blocking at seams adds extra support.
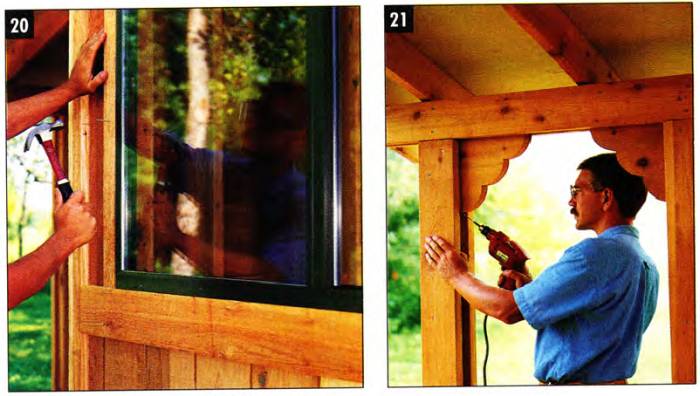
- Install the windows and the cedar window trim. Horizontal 1x6 boards cover the siding seam and Z-flashing.
- Fasten brackets in place to stabilize posts and beams. Paint, stain or seal all exterior surfaces, and your shed is done.
Is this the shed for you?
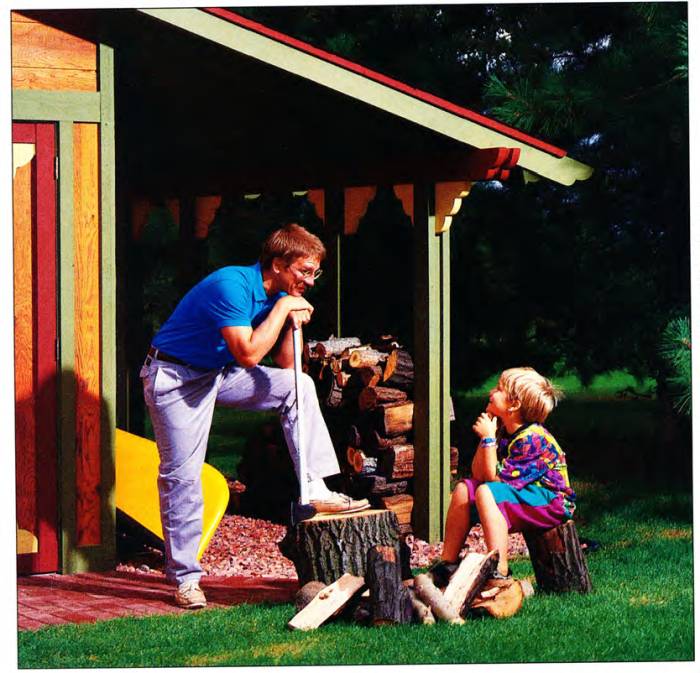
The great feature of this shed is its spacious open eaves.
They double the useful space, with only a small increase in construction cost and labor. The eaves provide a protected space for storing those oddball items — firewood, canoe, utility trailer, lawn furniture or rabbit pen. They also provide space for those oddball activities — refinishing furniture, washing the dog, or just resting your weary bones.
However, if you don’t need or don’t have room for the eaves, you can easily eliminate one or both of them. Simply end the roof rafters a foot or two past the shed walls, and eliminate the support posts, beam, and footings.
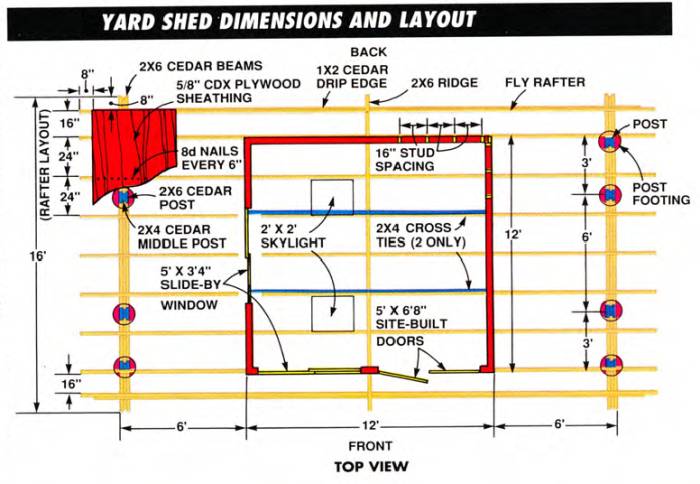
With both eaves, this shed requires a space at least 16 x 27 ft; with one eave, 16 x 21 ft.; and with no eaves, 16 x 15 ft. The enclosed space is 12 x 12 ft.
This shed is a lot fancier than the barn-shaped or prefab metal units available through home centers and other dealers. We endured plenty of quips about the “gingerbread shack” we were building, but, heck, just pulling a lawnmower out of a shed that looks this lighthearted seems to make the job go easier. The frills are really just a little extra paint and a little extra cutting with the jigsaw — not much time or money — and underneath, it’s a hard-working, long-lasting shed.
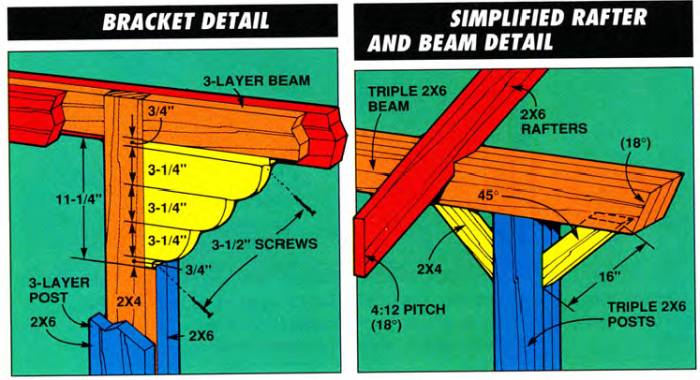
If you prefer a simpler look, you can modify the design by simplifying the rafter and beam.
How much does it cost to build a yard shed?
The materials for our yard shed, including concrete, framing materials, siding and trim, roofing, windows, skylights, and fasteners, cost $5,200. Additional costs included $200 for the building permit and $350 for paint. If you decide to have the concrete slab professionally poured, plan to spend an extra $750 - $900. We went all the way with our shed and put pavers and rock under the open eaves, which cost another $1,500. Although far from essential, these materials keep the mud and dirt at bay.
You could save money by substituting treated pine for the cedar, eliminating windows, and leaving off an eave or two, but be prepared to spend at least $4,600 for a shed of this size and quality.
How much time do I need to build a shed alone?
You should be prepared to spend a good chunk of your summer spare time wearing a tool belt.
Even an ambitious, well-seasoned DIYer will spend a solid weekend laying out and excavating the site; another weekend pouring the slab; and at least 100 hours building the framework, installing siding and shingles, building the doors and adding the trim.
What skills do I need to build a shed by myself?
This is an intermediate to advanced-level project that will test all your DIY knowledge and perseverance.
You’re basically building a small house — starting with the concrete floor, working your way up through the wall and roof framing, and capping it off with shingles.
Some tasks, such as lifting the walls into place, installing the roof rafters and hefting plywood onto the roof, require a helper — don’t try to be a hero by doing it alone. You’ll be working at heights, too, so use roof brackets (Photo 13) and good ladder sense.
Tools and Materials
You’ll need a circular saw, cordless drill, jigsaw and a hefty 12-gauge extension cord if you’re running power more than 50 ft. A hammer, chalk line, 4-ft. level, and square are mandatory hand tools. You’ll want to invest $20 in a pair of roof brackets (Photo 13). and have an 8-ft. stepladder and short extension ladder available For me, safety glasses and hearing protectors are as important as any other tool listed here — buy them and wear them.
All of the lumber in this project remains exposed, so pick nice straight boards. Use treated or cedar lumber wherever recommended, and paint or seal the non-treated materials to protect them from the elements. Use galvanized nails and screws, too.
| Item | Use | Quantity |
|---|---|---|
| Concrete | slab and footings | 3-1/4 yards |
| 2 x 4 x 12' treated | bottom plate | 4 |
| 2 x 4 x 12' hem/fir | top plates, cross ties | 10 |
| 2 x 6 x 12' hem/fir | headers | 3 |
| 2 x 4 x 8' studs | wall studs | 55 |
| 2 x 6 x 16' cedar | rafters, ridge, beams | 25 |
| 2 x 6 x 8' cedar | eave support posts | 16 |
| 2 x 6 x 8' cedar | eave support posts | 8 |
| 2 x 12 x 16' cedar | post brackets | 1 |
| 1 x 2 x 10' cedar | corner trim | 4 |
| 1 x 3 x 16' cedar | corner, window trim | 10 |
| 4 x 8 T1-11 | siding | 14 sheets |
| 5/8" x 4 x 8 CDX plywood | roof sheathing | 16 sheets |
| Tar paper | 2 rolls | |
| Fiberglass shingles | 5 squares | |
| Windows | ||
| Skylights | ||
| Door materials | ||
| Flashings | ||
| Fasteners | ||
| Anchor bolts | ||
| Concrete reinforcement rod |
Planning and permits
Check with your local building inspector to determine property line setback requirements (5 to 15 ft. are common). Get information on the maximum size and height of outbuildings and find out if there are any protective covenants (special neighborhood regulations) that might affect your project.
Earthquakes, termites, and frost depth are regional factors that may require you to modify this design. Consult your local building inspector for details. A building permit can take as long as a month to obtain — longer if you need to apply for a variance — so, get rolling early.
Site preparation and excavation
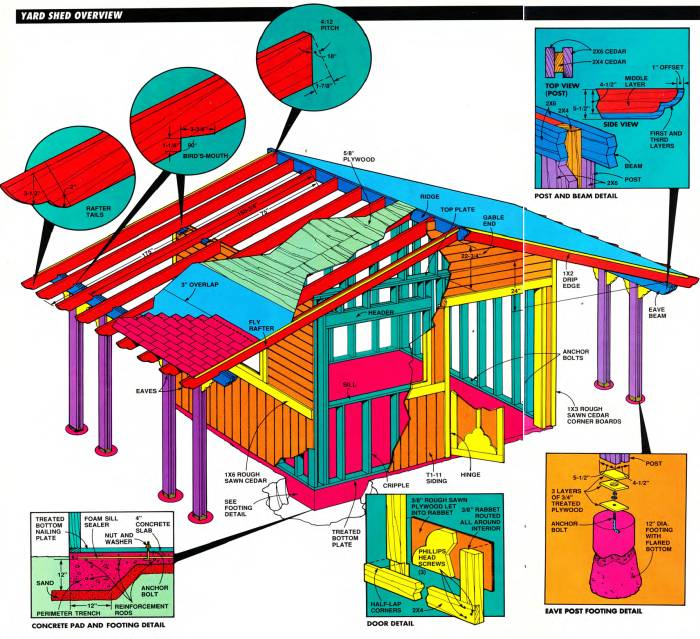
The best location for your shed is one that’s flat and out of the path of any water runoff. You can level a hilly site, but the excavation will be expensive, labor-intensive or both. Build a 12 x 12-ft. concrete form from 2x4 lumber, then square and brace it (Photo 1). Move the entire form around until you’re certain you have space for the eave areas, then level and stake the form securely (Photo 2). Dig the perimeter trench as shown in Fig. A, then level the rest of the area to a depth 4 in. below the top of the form.
Stretch strings between batter boards (Photo 2) to determine the location of the eave post footings. Dig these footings to the appropriate frost depth for your area using a posthole digger and shovel, then tamp the bottom of the hole firmly with the end of a 2x4.
Pouring the concrete slab
Pouring a concrete slab is hard, heavy work, and unlike carpentry, where you can pull a few nails to correct a mistake, goof-ups in concrete are, well, set in concrete.
Working with concrete is mostly a process of progressive leveling and smoothing. Concrete is poured into the form, then roughly leveled even with the top with a long, straight 2x4, called a “screed” (Photo 3). The concrete is further leveled and smoothed with a bull float (Photo 4), a hand float, and finally a finishing trowel (Photo 5).
As much as I champion the “roll up your sleeves and give it a whirl” attitude, I feel a project this large is not the place to begin your concrete career. Your shed will be only as useful and longlasting as the slab it rests on. Hire a reputable professional — one familiar with the soil and weather conditions that will affect your slab. Keep in mind the following:
- Take care of the “grunt work” yourself, so contractor bids are for the skilled work only. You can level and stake the forms, excavate and supply muscle power during the concrete pour. But let the pros order the concrete, place the rebar and anchor bolts, orchestrate the actual pour, and do the actual leveling and finishing of the concrete.
- If you have a perfect yard shed location but can’t get a concrete truck to it, use a wheelbarrow. That’s what we did. It’s a lot of hard work — three strong backs each made 12 trips over the course of an hour. And it will cost you more — concrete firms charge a fee for excessively long waits.
- Use reinforcement rods (Fig. A) to strengthen your slab. Then install three anchor bolts per wall while the concrete is wet — one a foot in from each corner, the other centered. Make sure you don’t put one in the door opening.
- A smooth concrete surface is the easiest to sweep and keep clean, but a broom finish or slightly textured surface is less slippery, especially when wet or oily.
- Concrete needs to cure and harden slowly. You’ll need to cover it with plastic, keep it moist, and wait at least two or three days before removing the forms or beginning carpentry work. Again, when in doubt, consult your concrete contractor.
Framing Walls
You’ve shoveled dirt, hauled concrete, used a lot of Bengay and now it’s time for the payoff — building the walls.
Cut four pairs of nailing plates (Photo 6) to length. Each pair consists of a bottom plate. which should be pressure-treated lumber, and a top plate, which is not. Position each bottom plate on the edges of the slab, and drill it to fit over the anchor bolts (Photo 6). Mark the location of the studs, windows, and doors on each pair of plates. Studs should be positioned every 16 in.
These window-opening measurements are for the particular sliding windows used, but you can use any make or style window you like. This project uses self-built doors (Fig. A), designed to accommodate the largest resident of this shed, a riding lawn mower. You could also install manufactured steel double doors, a single door, even an overhead garage door. If you increase the width of a door or window opening, though, make certain you increase the size of the support header above it. Consult your building inspector on the size.
The concrete slab provides a clean, flat surface for nailing your walls together (Photo 7) One by one, separate the pairs of nailing plates, lay studs between the layout marks and secure each stud to the plate with two 16d nails on each end, Install the headers, trimmers, sills, and cripple studs for the windows and doors as shown in Fig. A and Photo 7.
Build all four walls, then with the help of an assistant, erect the walls around the edge of the slab, position the holes in the bottom plates over the anchor bolts and secure them with washers and nuts. Sandwich a thin strip of foam sill sealer or butyl caulk between the bottom plate and concrete slab to provide a weathertight seal (Fig. A). A termite guard may be required in some areas.
Nail the comer studs together, making sure the edges are even. Use your level to plumb each wall, then brace them by nailing a 2x4 diagonally across the inside of each wall as shown in Photo 8. Since the siding, which gives the walls their rigidity, isn’t installed until after the roof is complete, make sure you brace all four walls. Add the second top plate to the walls, overlapping the wall comers to tie them firmly together. Install two permanent cross-ties, parallel to the rafters, to prevent the walls from bulging out (Fig. B).
Roof framing and sheathing
Install the ridge board (Photo 9) and the three-member eave posts and beams (Photo 10). The center members of the beams and posts are inset 1 in. to avoid a boxy look. There are three important measurements shown in Figs. A and B — ones you must follow for your rafters to fit:
- The distance between the framework of your 2x4 walls and the outside of your eave beam must be 6 ft.
- The top of your ridge board must be 28-1/4 in. above the top of your shed walls.
- The top of your eave beam must be 24in. below the top of your shed walls.
- (Tip: Run a straight board with a level attached from the top of the shed wall over to a temporary post resting on each concrete post pad. Then measure down 29-1/2 in, (the 24in. drop plus the 5-1/2 in. depth of the beam) to get the correct post height)
You can alter these dimensions to fit your design, but if you change one, you will have to change the others.
Plumb and brace the posts in both directions until the rafters are installed. Make layout marks for the rafters 2 ft. apart, center to center, along the ridge, walls, and beams. Fly rafters (Fig. B) are located 16 in. outside the walls.
Next, cut your rafters. Select the straightest 2x6 and cut it to the rafter dimension shown in Fig A. There are four cuts per rafter: the angled peak cut, the two triangular “birds-mouth” cuts (where the rafter rests on the wall and beam) and the curved tail out. Cut the birds-mouths by cutting to the line with a circular saw and finishing the cut with a jigsaw or handsaw (Photo 11).
After cutting the first rafter, set it in place on both sides of both gable ends to check for a snug fit. Use this first rafter as a pattern to cut the remaining ones. (Don’t cut the wall top birds-mouth in the four fly rafters.) Secure the two rafters at each gable end first, using 16d nails, then install the remaining rafters in opposing pairs (Photo 12).
To establish a straight line for laying the roof plywood, snap a chalk line near the eave end of the rafters. This project leaves 8 in of the rafter ends exposed, but you could also cover the rafters all the way to the ends.
Here are two tips:
- Use 5/ 8-in. plywood rather than the normal 1/2-in. if you want to avoid the tips of the 3/4-in. roofing nails from being visible from below.
- Paint the underside of the plywood before installation, so you don’t have to do it later.
Stagger the end joints of your plywood (Photo 13) as you install the sheets. and nail the plywood firmly to each rafter with 8d nails, spaced 6 in. apart (Fig. B.) Use a chalk line to mark any overhanging plywood and use a circular saw to trim it after it’s nailed down. Cover the exposed edges with flashing and cedar strips (Photo 14) before shingling.
Shingling
As always, use caution when working on a roof. Staple tar paper down over the entire roof right away. to protect your project from the rain. Horizontal tar paper seams should overlap by at least 3 in, and end-to-end seams by 6 in. Take care to lay the tar paper parallel to the ridge so it can be used as a guide for laying the shingles. The best shingling instructions I know of comes right on most shingle wrappers — follow them. Tread lightly on your installed shingles: In cold weather they’re brittle; in warm weather, they’re hot and gooey.
Skylights are optional but really brighten the interior. This project used inexpensive (around $75) plastic skylights available through most home centers. It took an extra hour to install each skylight and shingles around it. Skylights let in plenty of heat, too — you may want to install vents at gable ends for summer cooling.
Waterproof the ridge and give it a neat finished look by installing the ridge cap (Photo 17). Trim the upper comers of the individual tabs, then overlap the pieces as you nail them along the ridge. Snap a chalk line beforehand to keep your ridge cap straight.
Siding, Windows, and Doors
This project uses 4 by 8-ft. sheets of T1-11 (Photo 18) siding for a number of reasons. First, it doubles as both structural sheathing and siding, eliminating the need to use plywood underneath. T1-11 is relatively inexpensive and by simply changing the direction of the grooves, it makes an interesting design at a bargain rate. Finally, the large sheets made it easier to notch, then slide the siding around the rafters (Photo 18), so it wasn’t necessary to cut separate blocks to fit between the rafters.
Mark and cut the upper sheets of siding that fit around the rafter tails first. Next, tuck in the Z-flashing (Fig. E) and install the lower vertical siding (Photo 19). Before siding the gable ends, fill in the space between the rafters and Wall tops with short cripple studs (Fig A).
Install the windows, cedar corner boards, and horizontal 1x6s. The curved brackets installed in Photo 21 are cute, but also structural — they brace the eave posts and beams. You can change the bracket design (Fig. C), but make sure you leave some form of a solid triangle between post and beam.
Construct the doors as shown in Fig. A and install them. A standard door sweep will help seal the gap between the door bottom and the concrete slab from wind and water.
Painting and maintenance
Save a ton of time and energy by using a roller to paint the underside of your roof plywood and the back side of your siding before installing it. I cut and tacked my cedar trim in place to assure a tight fit, then removed it, painted it and nailed it up for good. Use caulk to seal any gaps. I coated the floor with a paint made specifically for concrete floors to help seal moisture out and make cleanups easier.
Hornets and other pests will love the open eaves of your shed almost as much as you do. An occasional spraying with a garden hose should help control the insect population.
Organizing and using your shed
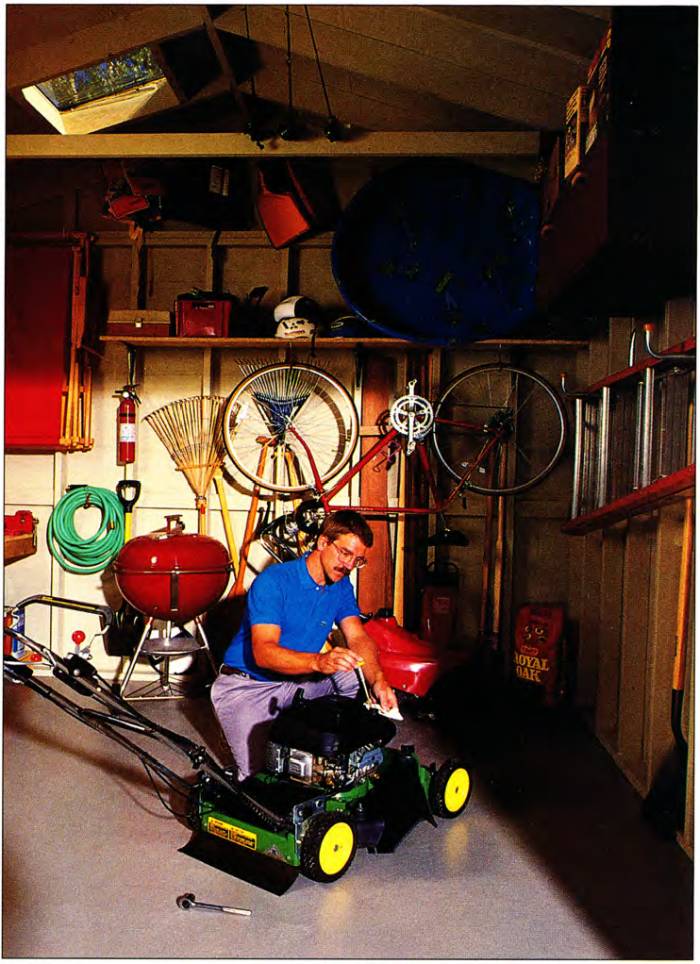
You built this shed to conquer clutter, so here are some additional tips to help you win the battle:
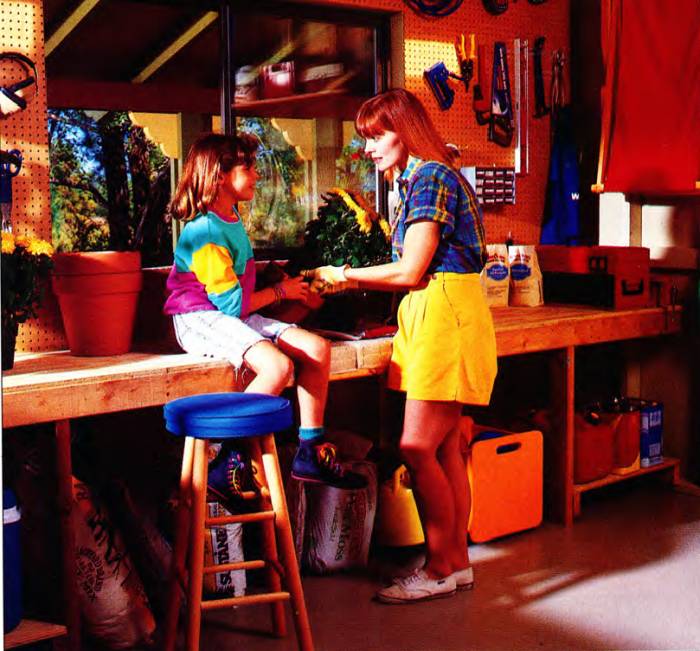
- Determine what activities and equipment your shed will contain before you start building. This will help you find the best placement of doors, windows, benches, etc.
- Make a sketch before you build, showing the position of large items like workbenches, riding and push mowers, snow blowers and cabinets, then plan and build storage cabinets and shelves to fit around them.
- Use every square inch of your shed. The rafter space can store light, infrequently used items; the cavities between the studs can hold lumber; even the backs of your double doors can provide a convenient place to hang shovels and brooms.
- Take advantage of the great, low-maintenance workshop and closet organizers on the market today. Roll-out baskets, stackable bins, shelving systems and hooks are easy to install and ready to go to work.
Proper planning will turn your yard shed into a real DIYer’s castle.
It’s buried in there somewhere, deep in the trackless wilderness of your garage.
You vault the lawn mower, fight off the garden hose, narrowly escape being impaled by a fishing pole, to emerge triumphantly — fugitive rake in hand.
Wouldn’t it be terrific to avoid all that? To have a separate place to store the mowers, blowers, trimmers, tillers, ladders, sporting gear and other trappings of our busy do-it-ourselves lives? A yard shed is a perfect solution.

Building a shed is cheaper than expanding the garage, a lot more convenient than hauling stuff out of the basement, and safer than leaving your tools and treasures outside. Best of all, though, a yard shed puts everything right where you need it — in the yard. Heck, you could probably clear out enough space to actually fit a car in your garage again.

Step-by-step construction
- Position the concrete form, then level and nail it to stakes driven firmly into the ground. Cross braces keep the form square and straight.

- Dig out and level the area for the concrete slab and dig holes for the eave post footings. Strings and batter boards locate the footings.

- Level the concrete as you pour it into the form. Criss-crossed reinforcement rods in the slab and footing strengthen the concrete.
- Float the concrete to even out high and low spots and further smooth the surface. Small ridges that remain are removed by hand traweling.

- Trowel the concrete as it sets up and hardens. Anchor bolts, installed while the concrete is still wet, will secure walls to the slab.
- Mark the nailing plates in pairs to indicate the location of studs, doors, and windows. The bottom plate must be made of treated lumber.

- Nail walls together with 16d nails. Make certain the rough openings for windows and doors are the right size for the windows and doors you plan to use.
- Nail on top plates to tie the corners together. Cross braces (reused from the concrete form) hold walls plumb and straight until you apply the siding.

- Install the ridge board on top of the support post. Decorative end cuts are quick and easy to make with a jigsaw.
- Install eave beams and posts, then plumb and brace them. The narrower center member provides extra strength without looking boxy.

- Cut rafters. One angled peak cut, two birds-mouth cuts, and one decorative tail cut are required per rafter. Use one rafter as a pattern for the rest.
- Nail rafters in place, installing the gable-end ones first. Rafters are spaced every 2 ft. and toenailed to beam and wall with 16d nails.

- Install plywood roof sheathing, trimming excess plywood after nailing. Stagger end joints and nail securely with 8d nails.
- Protect sheets of plywood from moisture and humidity with 1x2 cedar on the gable ends and metal J-flashing at eaves.

- Nail shingles over tar paper. Stagger the shingles and fasten them according to manufacturer's directions on the wrapper.
- Install skylights, embedding them in roofing tar. Skylights located near the peak of the roof let in the most light.

- Install ridge cap. Individual shingle tabs with cut-off corners overlap one another to waterproof the ridge and give a finished appearance.
- Mark siding to fit around rafter tails while sheets are temporarily tacked in position. Use a jigsaw to carefully cut out the notches.

- Install lower siding. Use Z-shaped flashing for weather-tightness where siding changes directions. Blocking at seams adds extra support.

- Install the windows and the cedar window trim. Horizontal 1x6 boards cover the siding seam and Z-flashing.
- Fasten brackets in place to stabilize posts and beams. Paint, stain or seal all exterior surfaces, and your shed is done.

Is this the shed for you?
The great feature of this shed is its spacious open eaves.
They double the useful space, with only a small increase in construction cost and labor. The eaves provide a protected space for storing those oddball items — firewood, canoe, utility trailer, lawn furniture or rabbit pen. They also provide space for those oddball activities — refinishing furniture, washing the dog, or just resting your weary bones.
However, if you don’t need or don’t have room for the eaves, you can easily eliminate one or both of them. Simply end the roof rafters a foot or two past the shed walls, and eliminate the support posts, beam, and footings.
With both eaves, this shed requires a space at least 16 x 27 ft; with one eave, 16 x 21 ft.; and with no eaves, 16 x 15 ft. The enclosed space is 12 x 12 ft.

This shed is a lot fancier than the barn-shaped or prefab metal units available through home centers and other dealers. We endured plenty of quips about the “gingerbread shack” we were building, but, heck, just pulling a lawnmower out of a shed that looks this lighthearted seems to make the job go easier. The frills are really just a little extra paint and a little extra cutting with the jigsaw — not much time or money — and underneath, it’s a hard-working, long-lasting shed.
If you prefer a simpler look, you can modify the design by simplifying the rafter and beam.

How much does it cost to build a yard shed?
The materials for our yard shed, including concrete, framing materials, siding and trim, roofing, windows, skylights, and fasteners, cost $5,200. Additional costs included $200 for the building permit and $350 for paint. If you decide to have the concrete slab professionally poured, plan to spend an extra $750 - $900. We went all the way with our shed and put pavers and rock under the open eaves, which cost another $1,500. Although far from essential, these materials keep the mud and dirt at bay.
You could save money by substituting treated pine for the cedar, eliminating windows, and leaving off an eave or two, but be prepared to spend at least $4,600 for a shed of this size and quality.
How much time do I need to build a shed alone?
You should be prepared to spend a good chunk of your summer spare time wearing a tool belt.
Even an ambitious, well-seasoned DIYer will spend a solid weekend laying out and excavating the site; another weekend pouring the slab; and at least 100 hours building the framework, installing siding and shingles, building the doors and adding the trim.
What skills do I need to build a shed by myself?
This is an intermediate to advanced-level project that will test all your DIY knowledge and perseverance.
You’re basically building a small house — starting with the concrete floor, working your way up through the wall and roof framing, and capping it off with shingles.
Some tasks, such as lifting the walls into place, installing the roof rafters and hefting plywood onto the roof, require a helper — don’t try to be a hero by doing it alone. You’ll be working at heights, too, so use roof brackets (Photo 13) and good ladder sense.

Tools and Materials
You’ll need a circular saw, cordless drill, jigsaw and a hefty 12-gauge extension cord if you’re running power more than 50 ft. A hammer, chalk line, 4-ft. level, and square are mandatory hand tools. You’ll want to invest $20 in a pair of roof brackets (Photo 13). and have an 8-ft. stepladder and short extension ladder available For me, safety glasses and hearing protectors are as important as any other tool listed here — buy them and wear them.
All of the lumber in this project remains exposed, so pick nice straight boards. Use treated or cedar lumber wherever recommended, and paint or seal the non-treated materials to protect them from the elements. Use galvanized nails and screws, too.
| Item | Use | Quantity |
|---|---|---|
| Concrete | slab and footings | 3-1/4 yards |
| 2 x 4 x 12' treated | bottom plate | 4 |
| 2 x 4 x 12' hem/fir | top plates, cross ties | 10 |
| 2 x 6 x 12' hem/fir | headers | 3 |
| 2 x 4 x 8' studs | wall studs | 55 |
| 2 x 6 x 16' cedar | rafters, ridge, beams | 25 |
| 2 x 6 x 8' cedar | eave support posts | 16 |
| 2 x 6 x 8' cedar | eave support posts | 8 |
| 2 x 12 x 16' cedar | post brackets | 1 |
| 1 x 2 x 10' cedar | corner trim | 4 |
| 1 x 3 x 16' cedar | corner, window trim | 10 |
| 4 x 8 T1-11 | siding | 14 sheets |
| 5/8" x 4 x 8 CDX plywood | roof sheathing | 16 sheets |
| Tar paper | 2 rolls | |
| Fiberglass shingles | 5 squares | |
| Windows | ||
| Skylights | ||
| Door materials | ||
| Flashings | ||
| Fasteners | ||
| Anchor bolts | ||
| Concrete reinforcement rod |
Planning and permits
Check with your local building inspector to determine property line setback requirements (5 to 15 ft. are common). Get information on the maximum size and height of outbuildings and find out if there are any protective covenants (special neighborhood regulations) that might affect your project.
Earthquakes, termites, and frost depth are regional factors that may require you to modify this design. Consult your local building inspector for details. A building permit can take as long as a month to obtain — longer if you need to apply for a variance — so, get rolling early.
Site preparation and excavation
The best location for your shed is one that’s flat and out of the path of any water runoff. You can level a hilly site, but the excavation will be expensive, labor-intensive or both. Build a 12 x 12-ft. concrete form from 2x4 lumber, then square and brace it (Photo 1). Move the entire form around until you’re certain you have space for the eave areas, then level and stake the form securely (Photo 2). Dig the perimeter trench as shown in Fig. A, then level the rest of the area to a depth 4 in. below the top of the form.
Stretch strings between batter boards (Photo 2) to determine the location of the eave post footings. Dig these footings to the appropriate frost depth for your area using a posthole digger and shovel, then tamp the bottom of the hole firmly with the end of a 2x4.
Pouring the concrete slab
Pouring a concrete slab is hard, heavy work, and unlike carpentry, where you can pull a few nails to correct a mistake, goof-ups in concrete are, well, set in concrete.
Working with concrete is mostly a process of progressive leveling and smoothing. Concrete is poured into the form, then roughly leveled even with the top with a long, straight 2x4, called a “screed” (Photo 3). The concrete is further leveled and smoothed with a bull float (Photo 4), a hand float, and finally a finishing trowel (Photo 5).
As much as I champion the “roll up your sleeves and give it a whirl” attitude, I feel a project this large is not the place to begin your concrete career. Your shed will be only as useful and longlasting as the slab it rests on. Hire a reputable professional — one familiar with the soil and weather conditions that will affect your slab. Keep in mind the following:
- Take care of the “grunt work” yourself, so contractor bids are for the skilled work only. You can level and stake the forms, excavate and supply muscle power during the concrete pour. But let the pros order the concrete, place the rebar and anchor bolts, orchestrate the actual pour, and do the actual leveling and finishing of the concrete.
- If you have a perfect yard shed location but can’t get a concrete truck to it, use a wheelbarrow. That’s what we did. It’s a lot of hard work — three strong backs each made 12 trips over the course of an hour. And it will cost you more — concrete firms charge a fee for excessively long waits.
- Use reinforcement rods (Fig. A) to strengthen your slab. Then install three anchor bolts per wall while the concrete is wet — one a foot in from each corner, the other centered. Make sure you don’t put one in the door opening.
- A smooth concrete surface is the easiest to sweep and keep clean, but a broom finish or slightly textured surface is less slippery, especially when wet or oily.
- Concrete needs to cure and harden slowly. You’ll need to cover it with plastic, keep it moist, and wait at least two or three days before removing the forms or beginning carpentry work. Again, when in doubt, consult your concrete contractor.
Framing Walls
You’ve shoveled dirt, hauled concrete, used a lot of Bengay and now it’s time for the payoff — building the walls.
Cut four pairs of nailing plates (Photo 6) to length. Each pair consists of a bottom plate. which should be pressure-treated lumber, and a top plate, which is not. Position each bottom plate on the edges of the slab, and drill it to fit over the anchor bolts (Photo 6). Mark the location of the studs, windows, and doors on each pair of plates. Studs should be positioned every 16 in.
These window-opening measurements are for the particular sliding windows used, but you can use any make or style window you like. This project uses self-built doors (Fig. A), designed to accommodate the largest resident of this shed, a riding lawn mower. You could also install manufactured steel double doors, a single door, even an overhead garage door. If you increase the width of a door or window opening, though, make certain you increase the size of the support header above it. Consult your building inspector on the size.
The concrete slab provides a clean, flat surface for nailing your walls together (Photo 7) One by one, separate the pairs of nailing plates, lay studs between the layout marks and secure each stud to the plate with two 16d nails on each end, Install the headers, trimmers, sills, and cripple studs for the windows and doors as shown in Fig. A and Photo 7.
Build all four walls, then with the help of an assistant, erect the walls around the edge of the slab, position the holes in the bottom plates over the anchor bolts and secure them with washers and nuts. Sandwich a thin strip of foam sill sealer or butyl caulk between the bottom plate and concrete slab to provide a weathertight seal (Fig. A). A termite guard may be required in some areas.
Nail the comer studs together, making sure the edges are even. Use your level to plumb each wall, then brace them by nailing a 2x4 diagonally across the inside of each wall as shown in Photo 8. Since the siding, which gives the walls their rigidity, isn’t installed until after the roof is complete, make sure you brace all four walls. Add the second top plate to the walls, overlapping the wall comers to tie them firmly together. Install two permanent cross-ties, parallel to the rafters, to prevent the walls from bulging out (Fig. B).
Roof framing and sheathing
Install the ridge board (Photo 9) and the three-member eave posts and beams (Photo 10). The center members of the beams and posts are inset 1 in. to avoid a boxy look. There are three important measurements shown in Figs. A and B — ones you must follow for your rafters to fit:
- The distance between the framework of your 2x4 walls and the outside of your eave beam must be 6 ft.
- The top of your ridge board must be 28-1/4 in. above the top of your shed walls.
- The top of your eave beam must be 24in. below the top of your shed walls.
- (Tip: Run a straight board with a level attached from the top of the shed wall over to a temporary post resting on each concrete post pad. Then measure down 29-1/2 in, (the 24in. drop plus the 5-1/2 in. depth of the beam) to get the correct post height)
You can alter these dimensions to fit your design, but if you change one, you will have to change the others.
Plumb and brace the posts in both directions until the rafters are installed. Make layout marks for the rafters 2 ft. apart, center to center, along the ridge, walls, and beams. Fly rafters (Fig. B) are located 16 in. outside the walls.
Next, cut your rafters. Select the straightest 2x6 and cut it to the rafter dimension shown in Fig A. There are four cuts per rafter: the angled peak cut, the two triangular “birds-mouth” cuts (where the rafter rests on the wall and beam) and the curved tail out. Cut the birds-mouths by cutting to the line with a circular saw and finishing the cut with a jigsaw or handsaw (Photo 11).
After cutting the first rafter, set it in place on both sides of both gable ends to check for a snug fit. Use this first rafter as a pattern to cut the remaining ones. (Don’t cut the wall top birds-mouth in the four fly rafters.) Secure the two rafters at each gable end first, using 16d nails, then install the remaining rafters in opposing pairs (Photo 12).
To establish a straight line for laying the roof plywood, snap a chalk line near the eave end of the rafters. This project leaves 8 in of the rafter ends exposed, but you could also cover the rafters all the way to the ends.
Here are two tips:
- Use 5/ 8-in. plywood rather than the normal 1/2-in. if you want to avoid the tips of the 3/4-in. roofing nails from being visible from below.
- Paint the underside of the plywood before installation, so you don’t have to do it later.
Stagger the end joints of your plywood (Photo 13) as you install the sheets. and nail the plywood firmly to each rafter with 8d nails, spaced 6 in. apart (Fig. B.) Use a chalk line to mark any overhanging plywood and use a circular saw to trim it after it’s nailed down. Cover the exposed edges with flashing and cedar strips (Photo 14) before shingling.
Shingling
As always, use caution when working on a roof. Staple tar paper down over the entire roof right away. to protect your project from the rain. Horizontal tar paper seams should overlap by at least 3 in, and end-to-end seams by 6 in. Take care to lay the tar paper parallel to the ridge so it can be used as a guide for laying the shingles. The best shingling instructions I know of comes right on most shingle wrappers — follow them. Tread lightly on your installed shingles: In cold weather they’re brittle; in warm weather, they’re hot and gooey.
Skylights are optional but really brighten the interior. This project used inexpensive (around $75) plastic skylights available through most home centers. It took an extra hour to install each skylight and shingles around it. Skylights let in plenty of heat, too — you may want to install vents at gable ends for summer cooling.
Waterproof the ridge and give it a neat finished look by installing the ridge cap (Photo 17). Trim the upper comers of the individual tabs, then overlap the pieces as you nail them along the ridge. Snap a chalk line beforehand to keep your ridge cap straight.
Siding, Windows, and Doors
This project uses 4 by 8-ft. sheets of T1-11 (Photo 18) siding for a number of reasons. First, it doubles as both structural sheathing and siding, eliminating the need to use plywood underneath. T1-11 is relatively inexpensive and by simply changing the direction of the grooves, it makes an interesting design at a bargain rate. Finally, the large sheets made it easier to notch, then slide the siding around the rafters (Photo 18), so it wasn’t necessary to cut separate blocks to fit between the rafters.
Mark and cut the upper sheets of siding that fit around the rafter tails first. Next, tuck in the Z-flashing (Fig. E) and install the lower vertical siding (Photo 19). Before siding the gable ends, fill in the space between the rafters and Wall tops with short cripple studs (Fig A).
Install the windows, cedar corner boards, and horizontal 1x6s. The curved brackets installed in Photo 21 are cute, but also structural — they brace the eave posts and beams. You can change the bracket design (Fig. C), but make sure you leave some form of a solid triangle between post and beam.
Construct the doors as shown in Fig. A and install them. A standard door sweep will help seal the gap between the door bottom and the concrete slab from wind and water.
Painting and maintenance
Save a ton of time and energy by using a roller to paint the underside of your roof plywood and the back side of your siding before installing it. I cut and tacked my cedar trim in place to assure a tight fit, then removed it, painted it and nailed it up for good. Use caulk to seal any gaps. I coated the floor with a paint made specifically for concrete floors to help seal moisture out and make cleanups easier.
Hornets and other pests will love the open eaves of your shed almost as much as you do. An occasional spraying with a garden hose should help control the insect population.
Organizing and using your shed

You built this shed to conquer clutter, so here are some additional tips to help you win the battle:
- Determine what activities and equipment your shed will contain before you start building. This will help you find the best placement of doors, windows, benches, etc.
- Make a sketch before you build, showing the position of large items like workbenches, riding and push mowers, snow blowers and cabinets, then plan and build storage cabinets and shelves to fit around them.
- Use every square inch of your shed. The rafter space can store light, infrequently used items; the cavities between the studs can hold lumber; even the backs of your double doors can provide a convenient place to hang shovels and brooms.
- Take advantage of the great, low-maintenance workshop and closet organizers on the market today. Roll-out baskets, stackable bins, shelving systems and hooks are easy to install and ready to go to work.
Proper planning will turn your yard shed into a real DIYer’s castle.

